Tripgo — User Guide
A complete walkthrough for running a travel & tour booking website with the Tripgo theme. This guide focuses on how to create a tour, explains every field on the tour editor, and shows how each field connects to WooCommerce → Settings → Booking Tours.
1Introduction
Tripgo is a WordPress travel theme by Ovatheme. A tour is stored as a WooCommerce product of the special product type “Tour”. The Travel and Tour Booking plugin (ova-brw) adds all booking logic — pricing, availability, deposits, forms — while the theme handles the display. Two layers work together:
Global settings
Site-wide defaults that apply to every tour, configured once at WooCommerce → Settings → Booking Tours.
Per-tour settings
Values unique to one tour (price, dates, capacity, map), configured on the tour edit screen.
2Requirements
| Component | Needed for |
|---|---|
| WordPress 6.7+ & PHP 7.4+ | Core platform |
| WooCommerce | Products, cart, checkout, payments — the base of every tour |
| Travel and Tour Booking (ova-brw) | The “Tour” product type, booking forms, calendar, deposits |
| Elementor (Free) | Building tour page layouts, header/footer, widgets |
| ova-destination / ova-events / ova-framework / ova-megamenu | Destinations, events, header–footer builder, mega menu |
3Quick Start
Prefer to watch? This official video walks through installing the theme and importing the demo data:
Video: Tripgo theme installation & demo import — watch on YouTube
Install & activate
Activate the Tripgo theme, then install the bundled plugins from the admin notice (WooCommerce, Elementor, and the OVA plugins).
Set the store basics
At WooCommerce → Settings → General set your currency, country and units. Currency here controls the currency symbol shown on every tour price field.
Configure Booking Tours
Open WooCommerce → Settings → Booking Tours and work through the sections below. These are your global defaults.
Create categories & destinations
Add product categories (tour types) and, if using the plugin, Destinations so tours can be filtered and mapped.
Create your first tour
Go to Products → Add New, choose product type “Tour”, and fill in the fields — see the Creating a Tour section.
3.1 · Install theme, plugins & demo data
Server requirements
Make sure your hosting meets: max_execution_time = 180, max_input_time = 600, post_max_size = 60M, upload_max_filesize = 60M, PHP 7.x/8.x (8.1 recommended), MySQL 5+, and the latest WordPress.
Download the package
Tripgo is sold on two places — download the package from wherever you bought it:
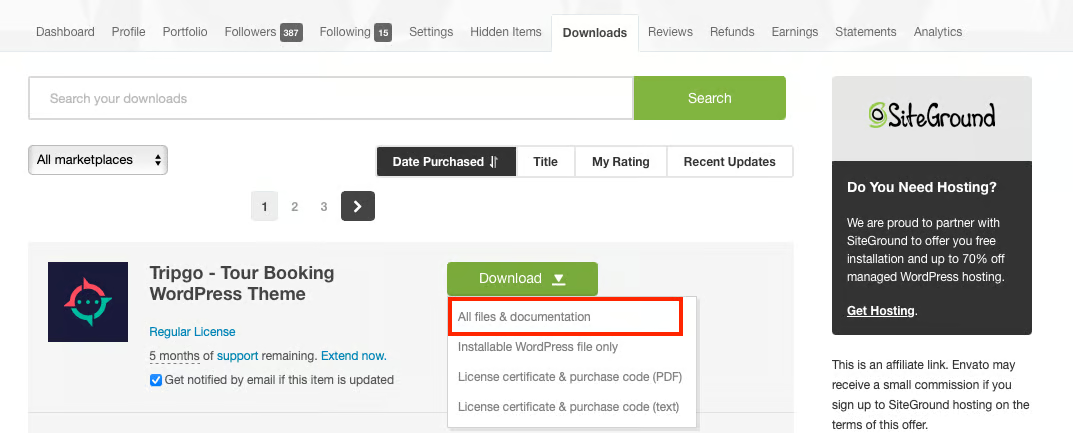
- ThemeForest — log in → Downloads → click Download next to Tripgo → choose All files & documentation.
- ovatheme.com — log in to your account at ovatheme.com/account and download the Tripgo theme.
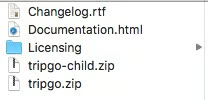
Unzip the package and you’ll get: tripgo.zip (parent theme), tripgo-child.zip (child theme — download), the Changelog, and the Documentation.
Install & activate
Add the parent theme
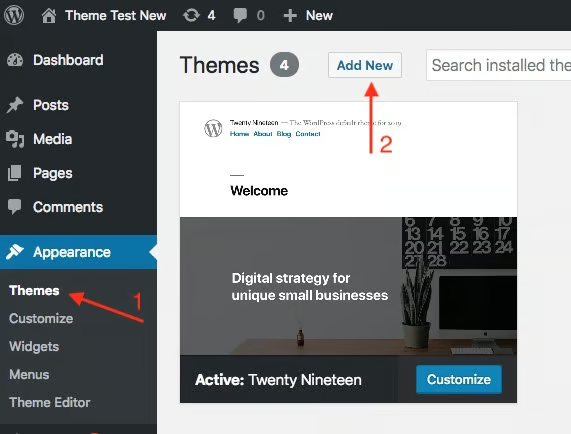
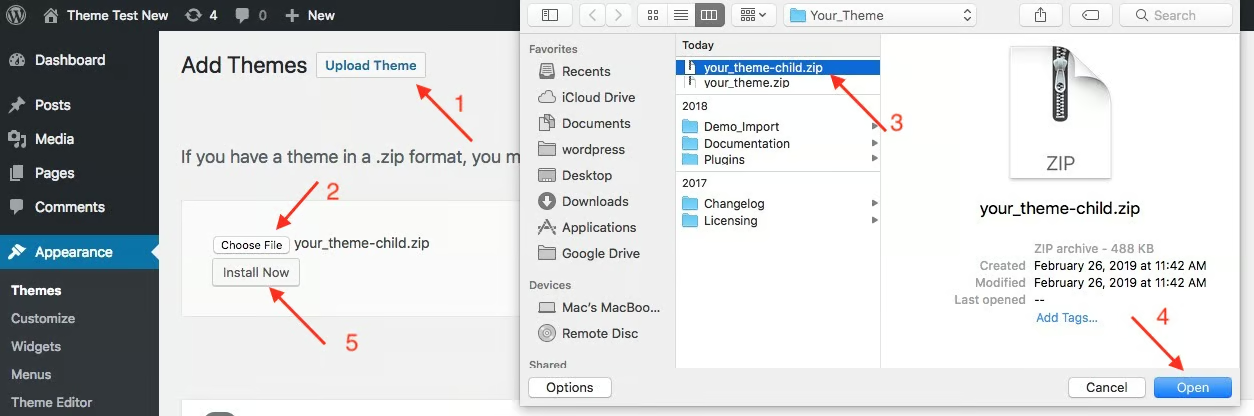
Go to Appearance → Themes → Add New → Upload and install tripgo.zip.
Add the child theme
Return to the Themes page and install tripgo-child.zip the same way.
Activate the child theme
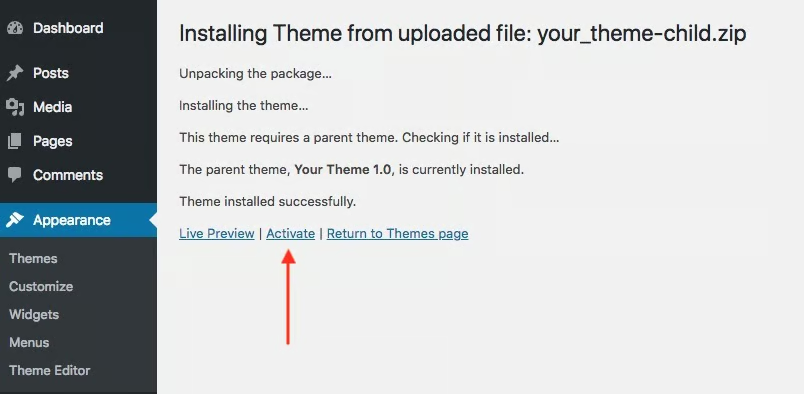
Click Activate on Tripgo Child — always run the site on the child theme so updates don’t overwrite your changes.
Install & activate plugins
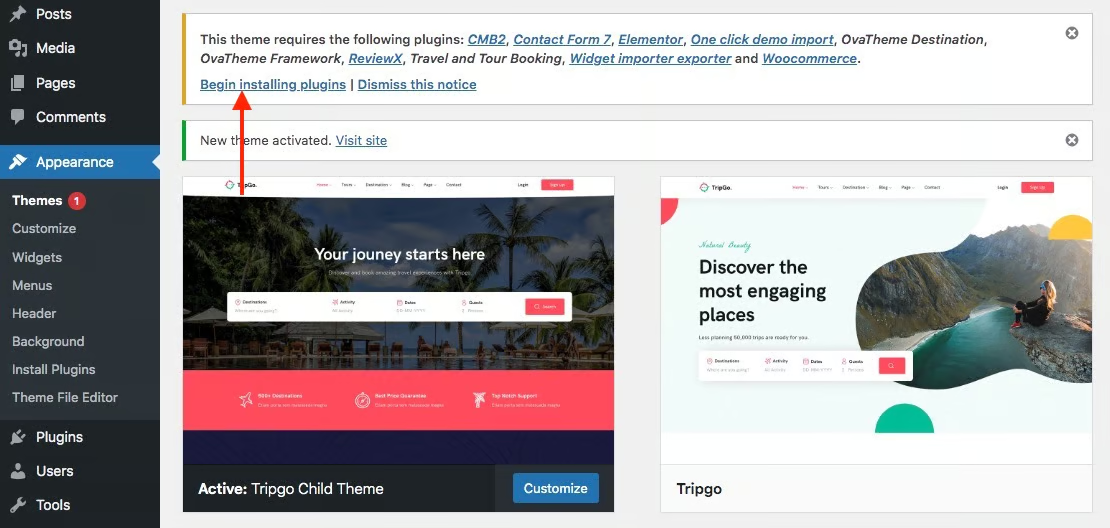
Click Begin installing plugins, select them, choose Install → Apply; then in Plugins → Installed Plugins select them, choose Activate → Apply.
Import demo data
Automatic (recommended): Appearance → Import Demo Data → pick a demo and wait ~5 minutes.
Manual: Tools → Import (Install Now); install the Customizer Export/Import plugin and import the customizer file at install-resource/demo-import/customizer.dat; then set up the Menu (Appearance → Menus) and choose the Home and Blog pages at Settings → Reading.
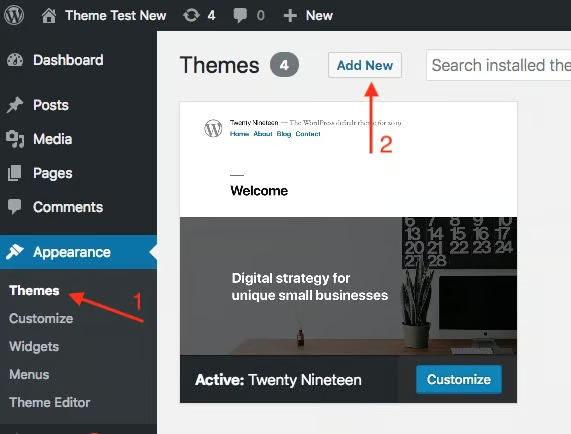
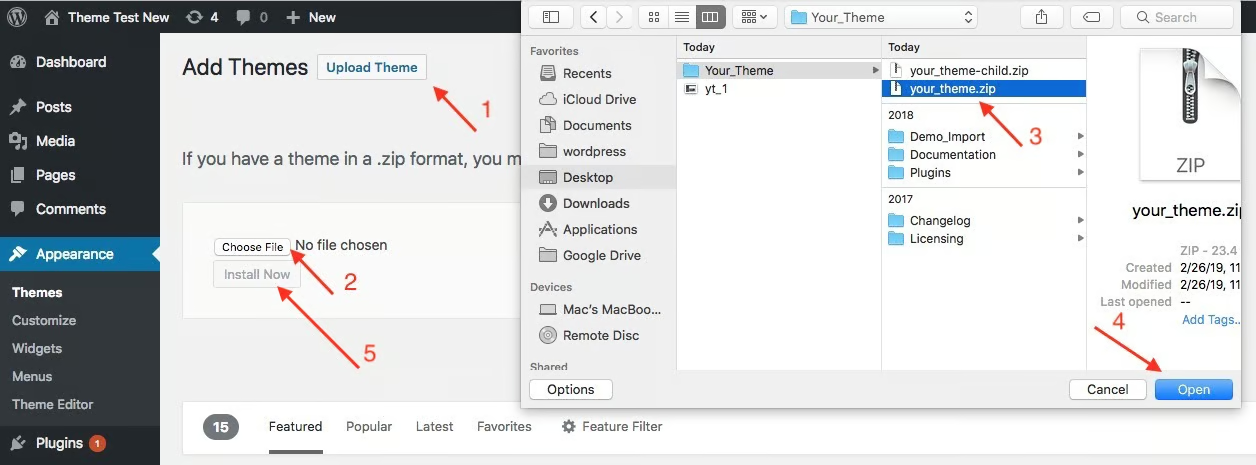
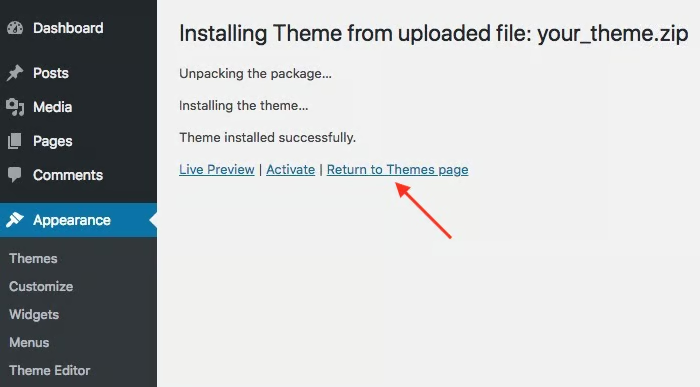
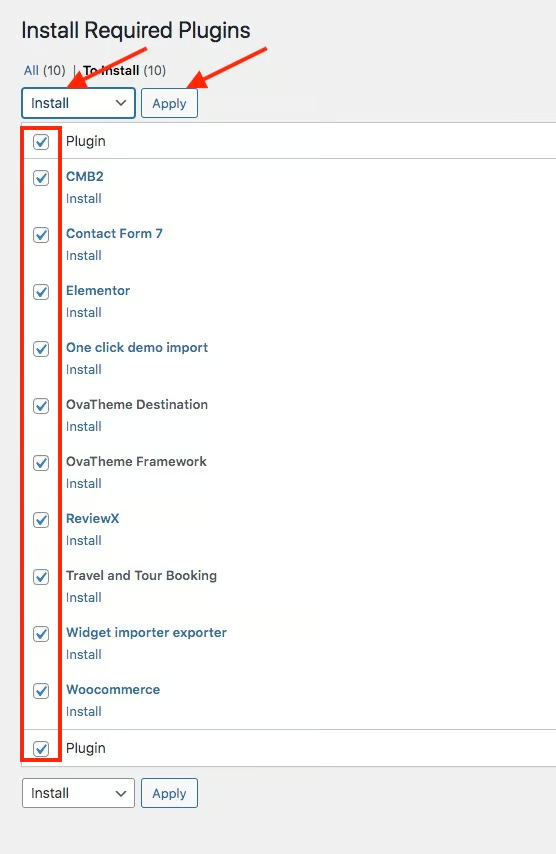
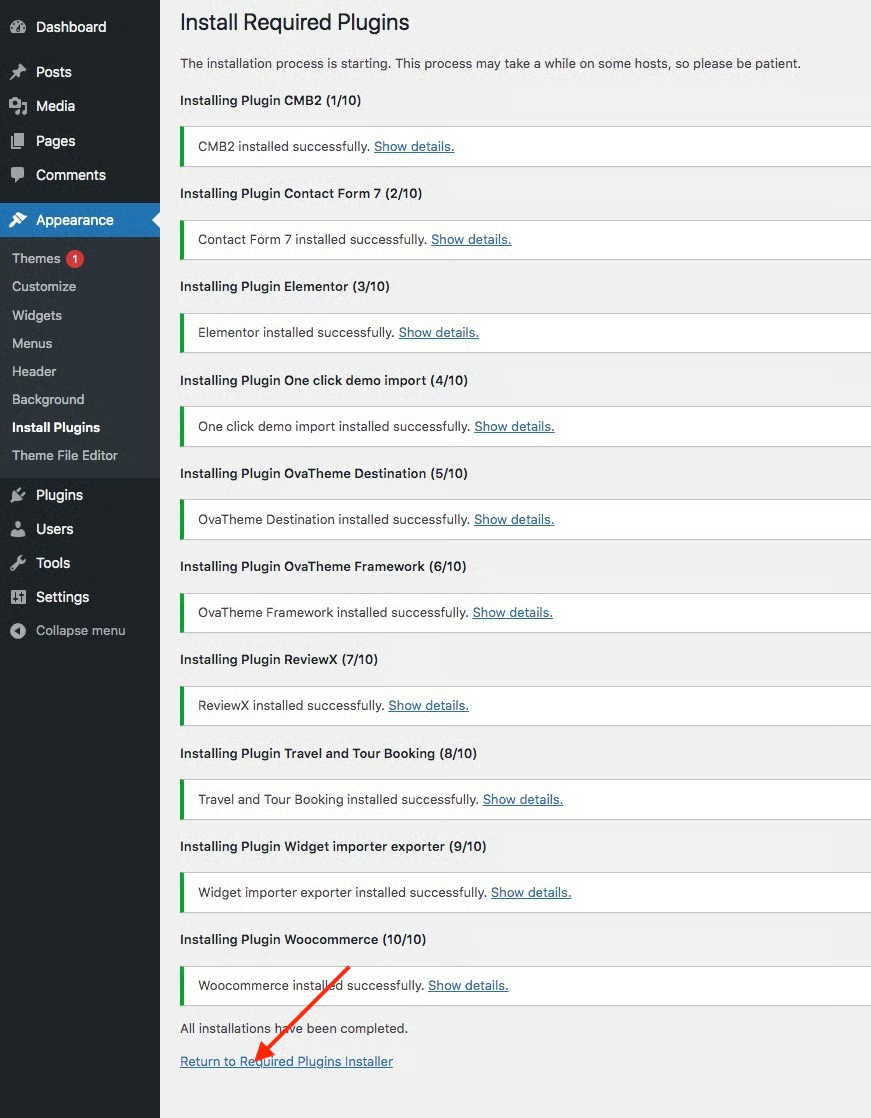
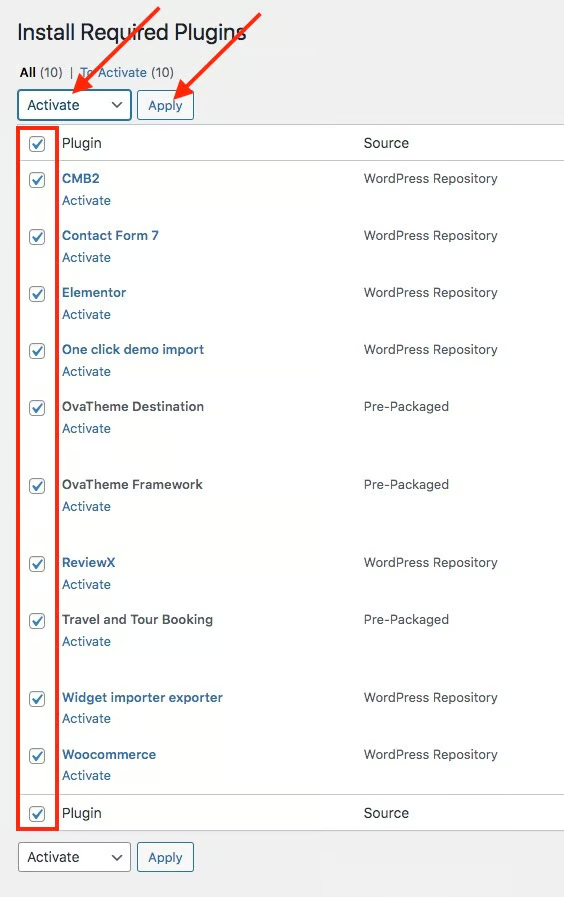
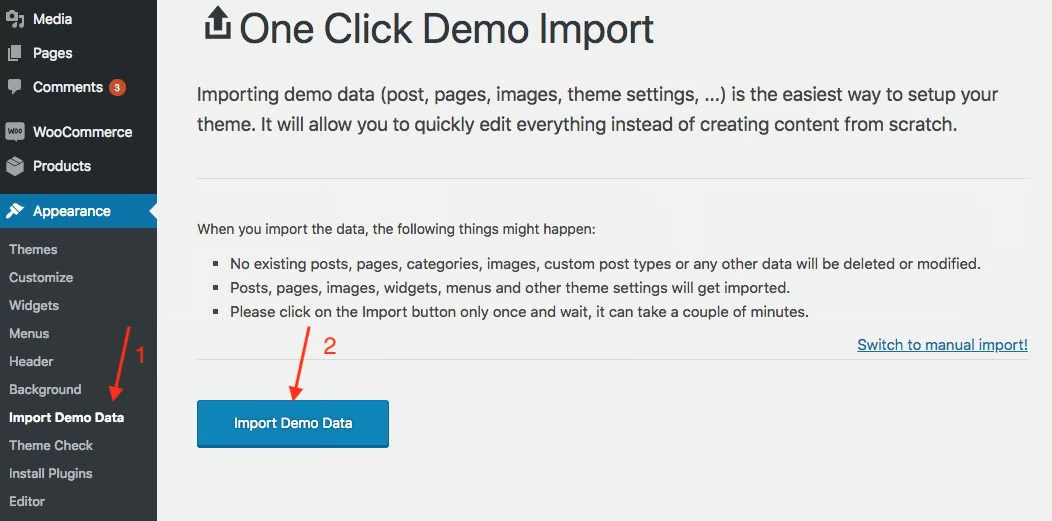
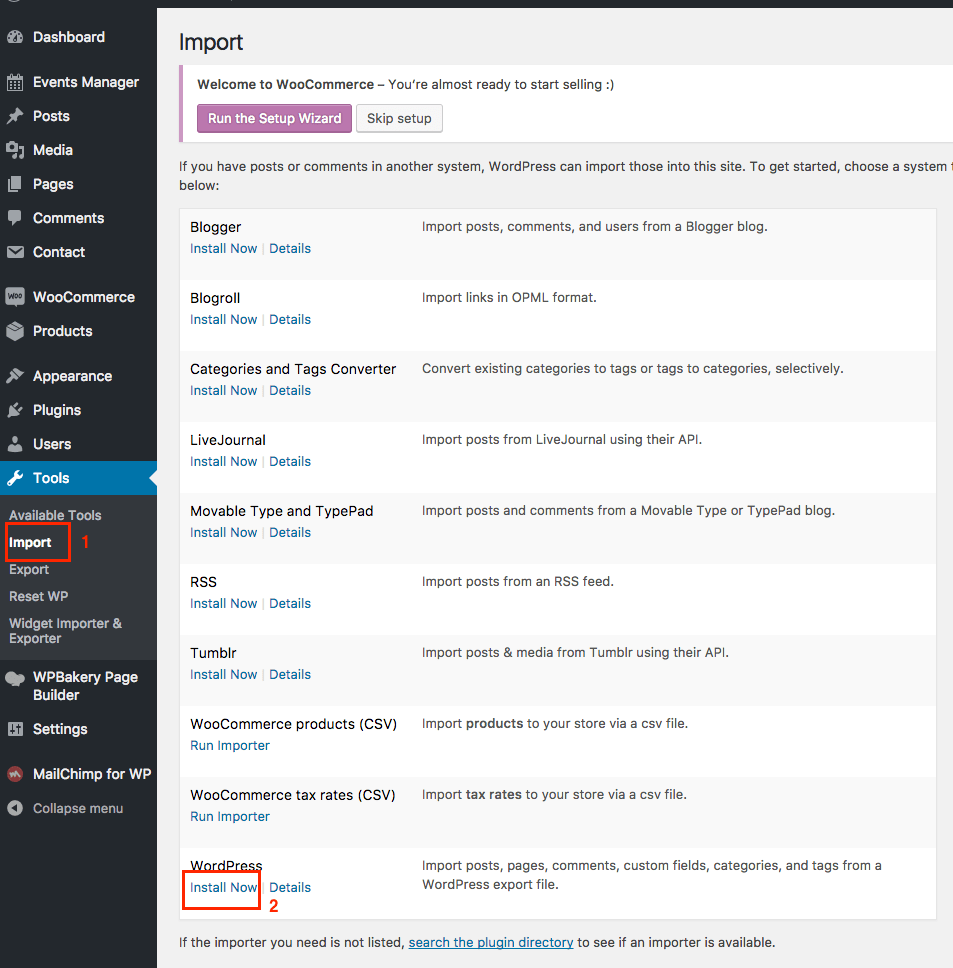
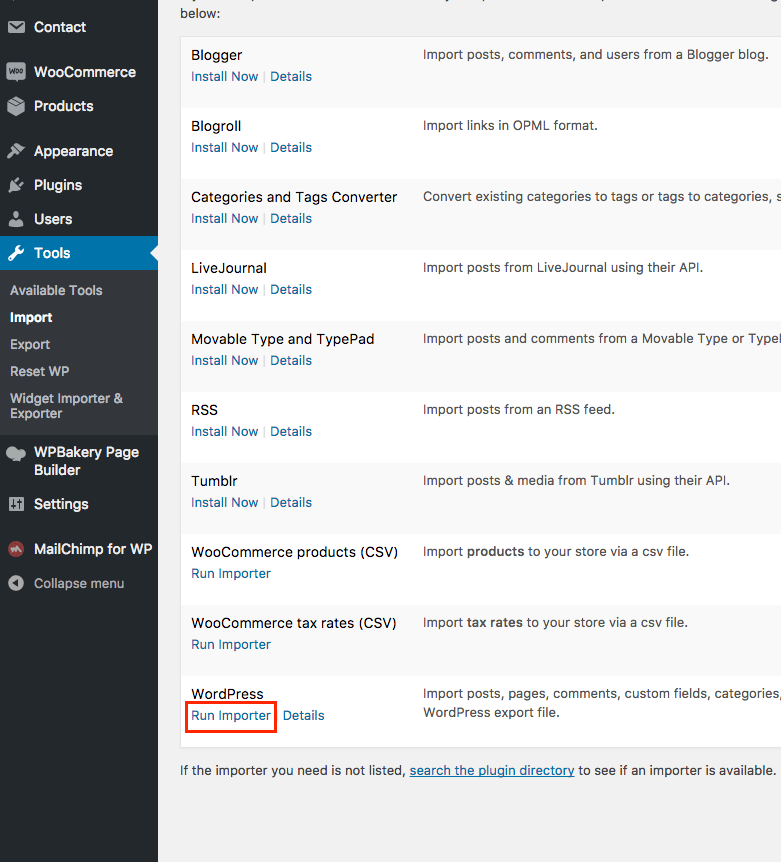
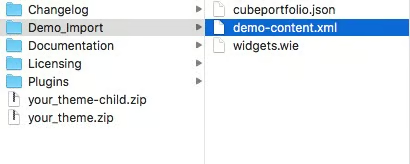
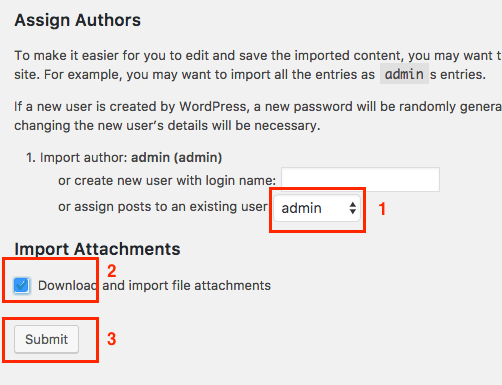
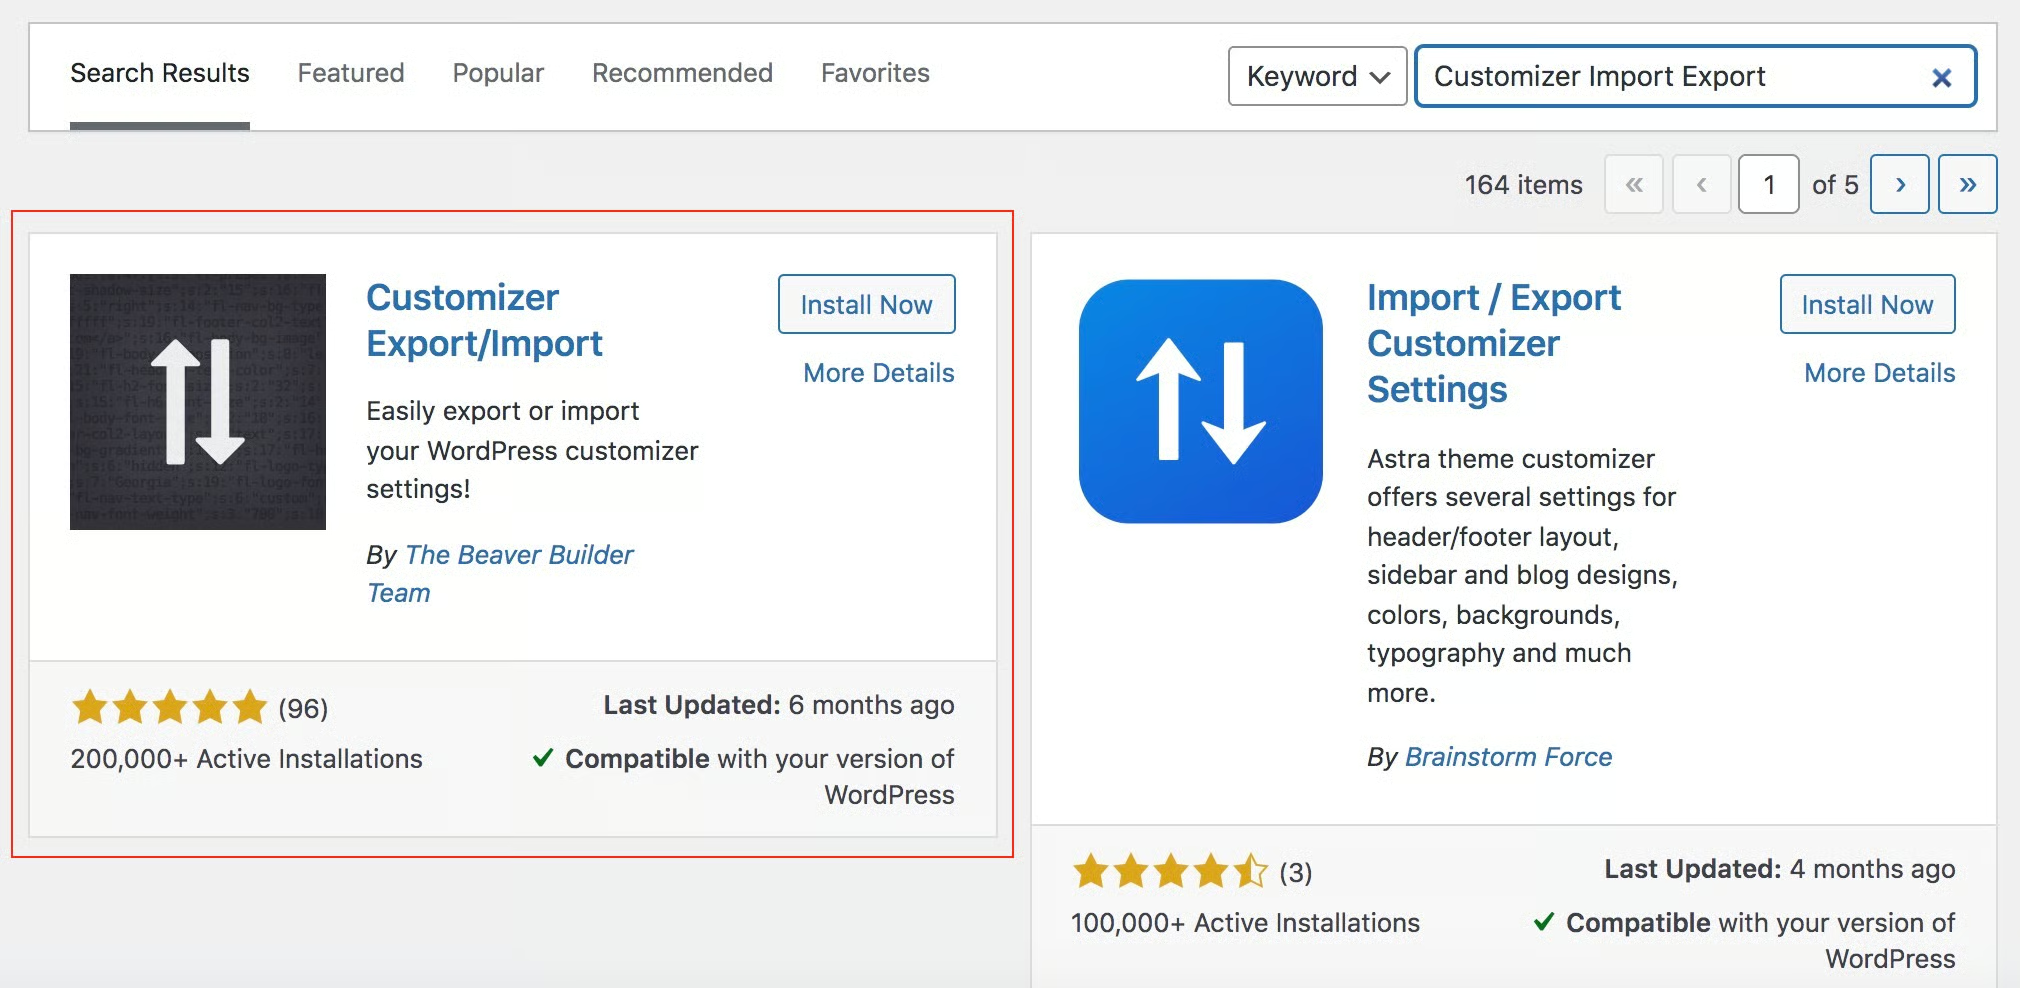
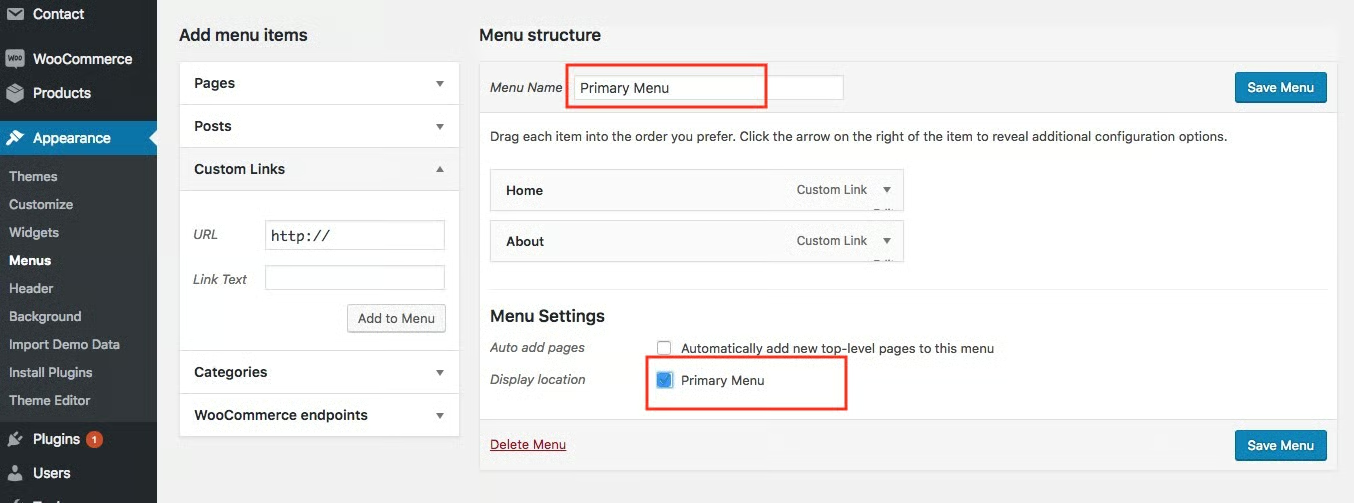
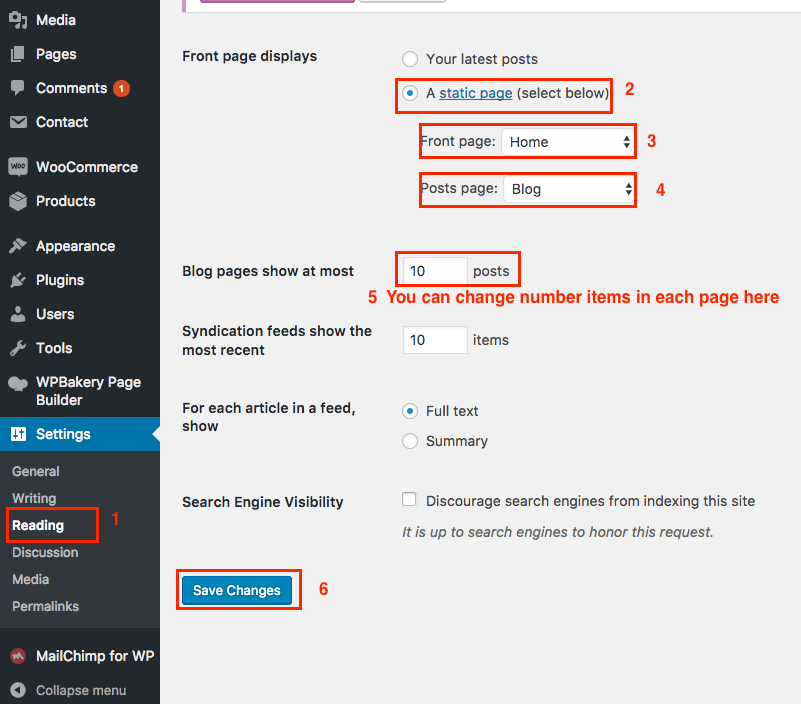
Click any image to view it larger · swipe or use the arrows to browse
3.2 · Update theme / plugin
Bought from ThemeForest
Two update methods are supported:
Automatic update
- Theme — install the Envato Market plugin (from envato.com/market-plugin) and connect it; it then updates the Tripgo theme for you.
- Plugins — open the Plugins menu; the bundled plugins show update notices there, so you can update them like any other plugin.
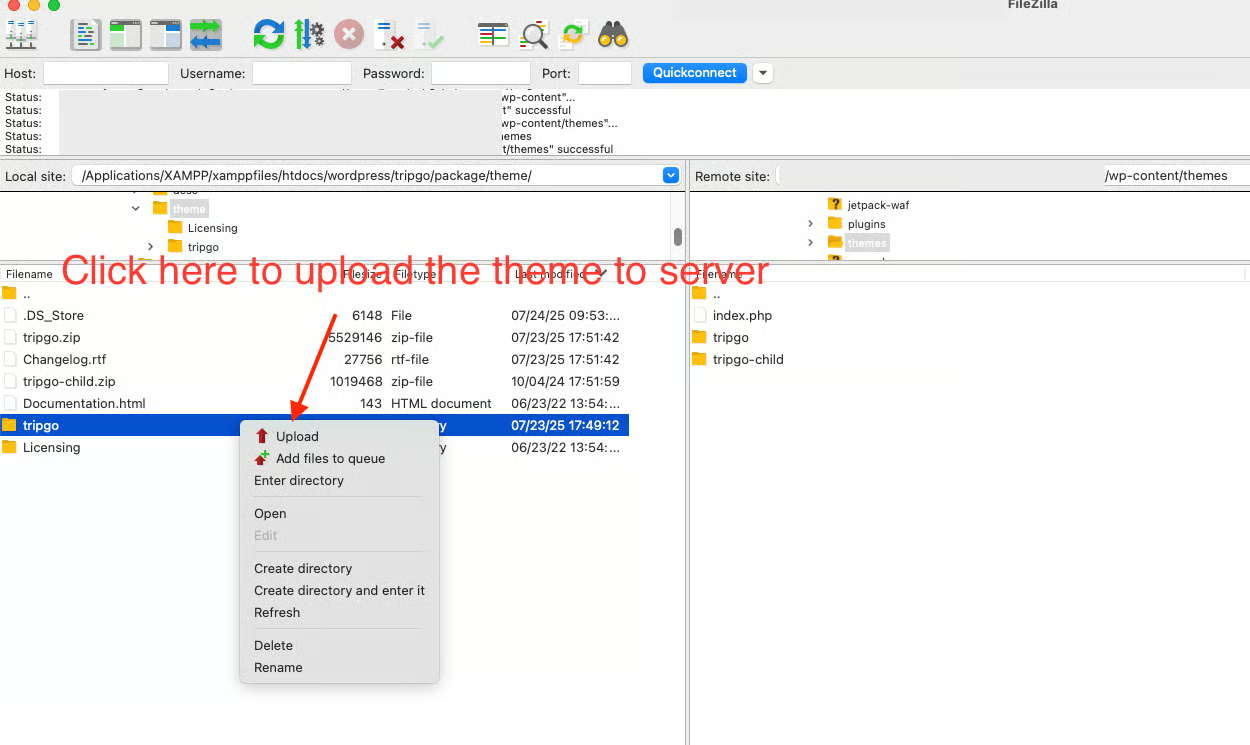
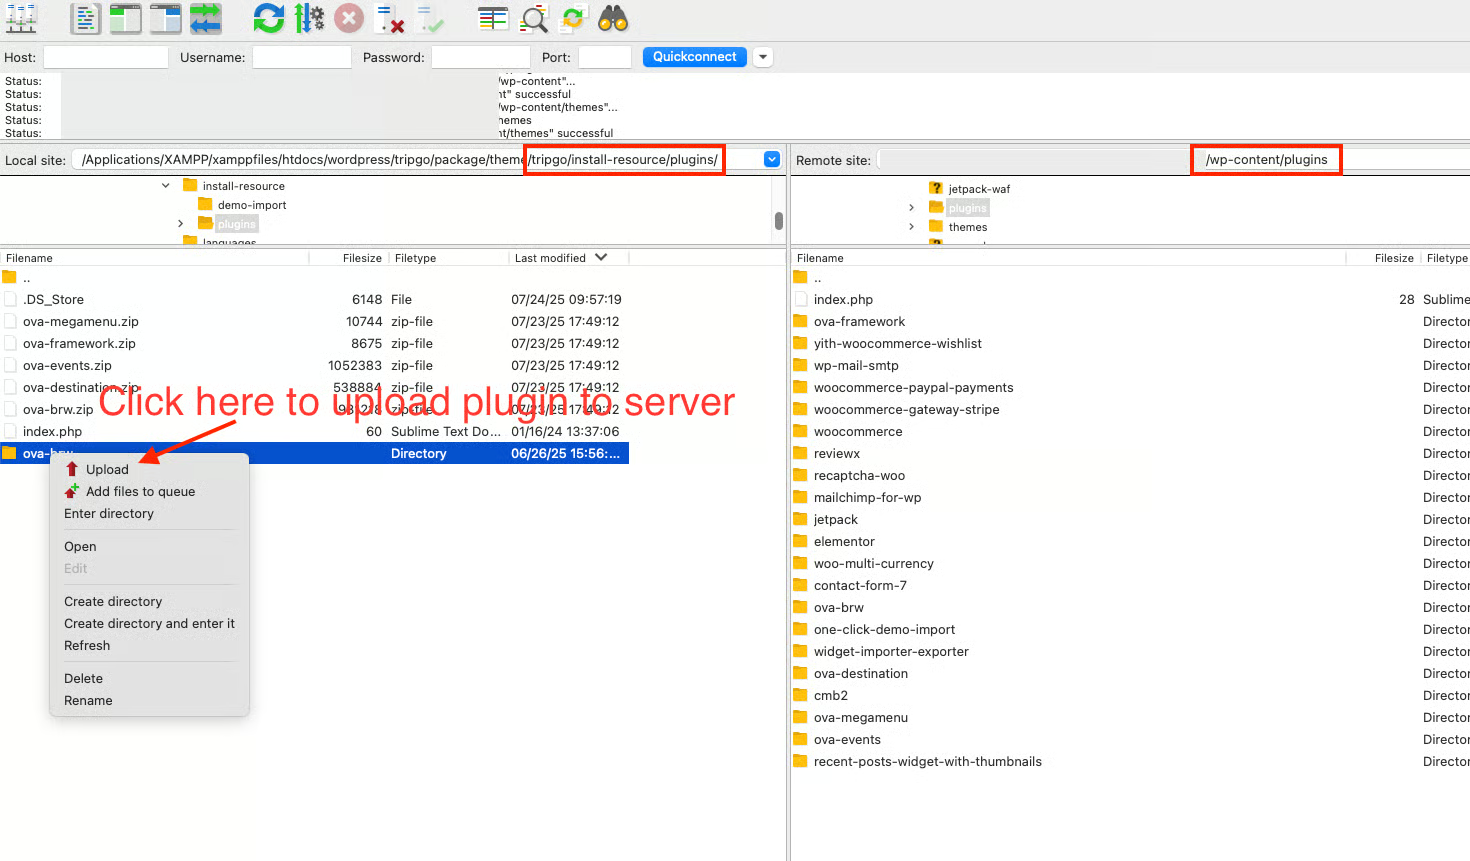
Manual update (via FTP) — use an FTP client (FileZilla, etc.):
- Re-download the package from themeforest.net/downloads → All files & documentation, extract it, and read
Changelog/readme.rtfto see which plugins changed. - Theme — unzip
tripgo.zipand upload/override thetripgofolder towp-content/themes/. - Plugins — unzip each plugin’s
.zipfrom the Plugins folder and upload/override towp-content/plugins/.
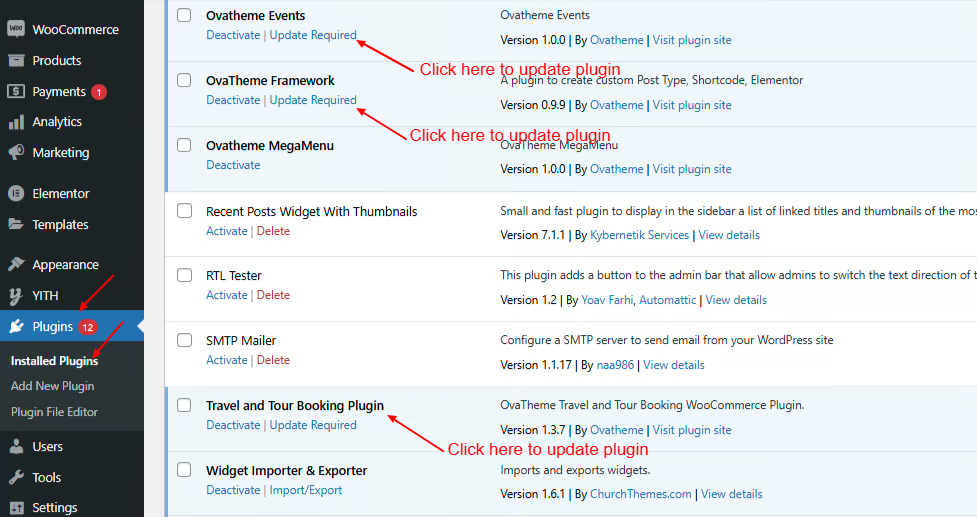
Click any image to view it larger · swipe or use the arrows to browse
Bought from ovatheme.com
You’ll see an update notice and an Update button directly in Appearance → Themes — choose the Tripgo theme and click update.
4Global settings — WooCommerce → Settings → Booking Tours
The plugin registers a dedicated tab named Booking Tours inside WooCommerce settings. It contains 14 sections. Below is what each one does and, importantly, which per-tour field it governs.
| Section | Purpose |
|---|---|
| General | Calendar behaviour for all tours: date/time format, step time, language, disabled weekdays, first day of week |
| Product details | Default page template + which forms appear on the tour page |
| Booking form | Behaviour of the main booking form (checkout field, quantity, insurance, terms) |
| Request form | Fields, thank-you/error pages and emails for the “Request a quote” form |
| Enquiry form | The lightweight “Ask a question” form |
| Guests | Adults / Children / Babies — enable, labels, show price beside each |
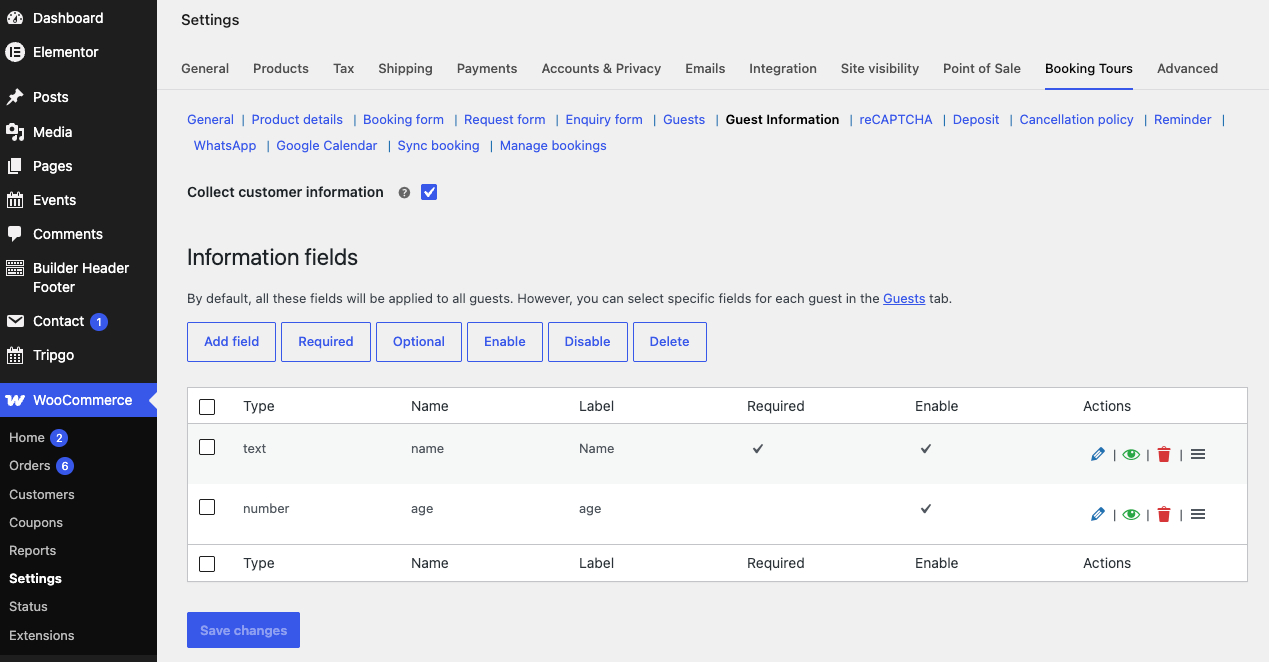
| Guest Information | Global custom checkout fields collected from customers |
| reCAPTCHA | Spam protection (v2 / v3) for the forms |
| Deposit | Partial-payment defaults and the remaining-amount invoice logic |
| Cancellation policy | Minimum notice before cancelling and amount conditions |
| Reminder | Automatic reminder email before the pick-up date |
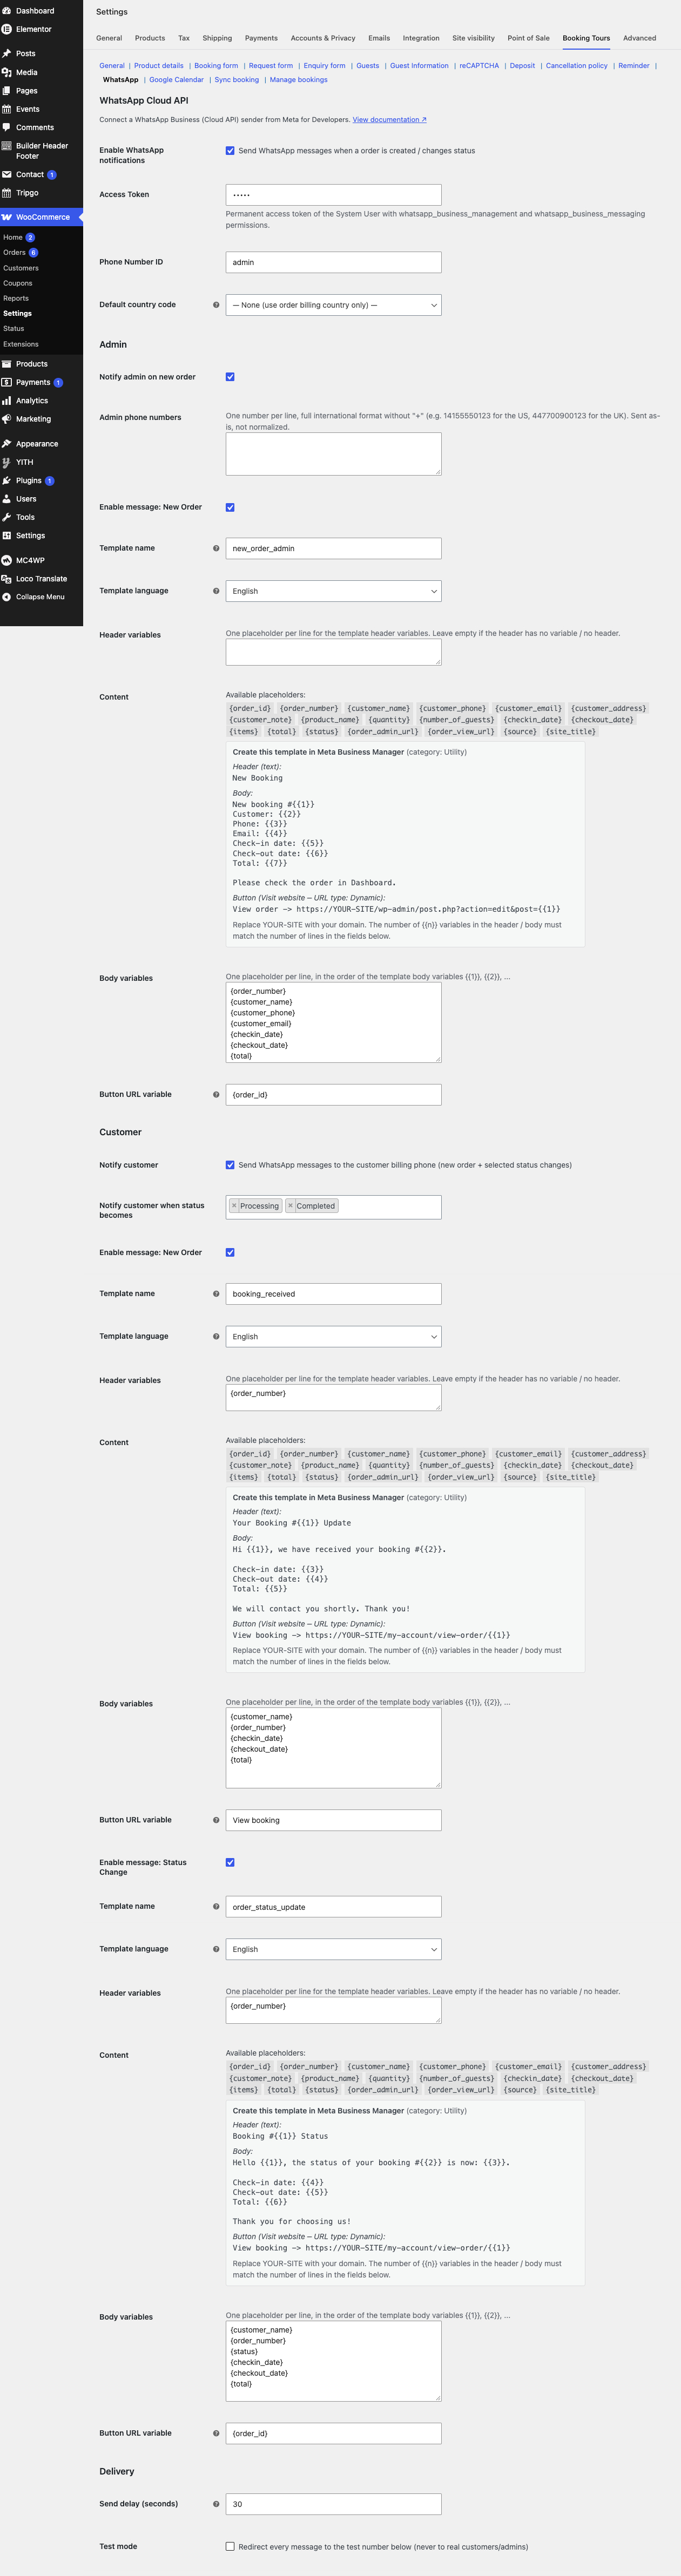
| WhatsApp Cloud API notifications to admin & customer | |
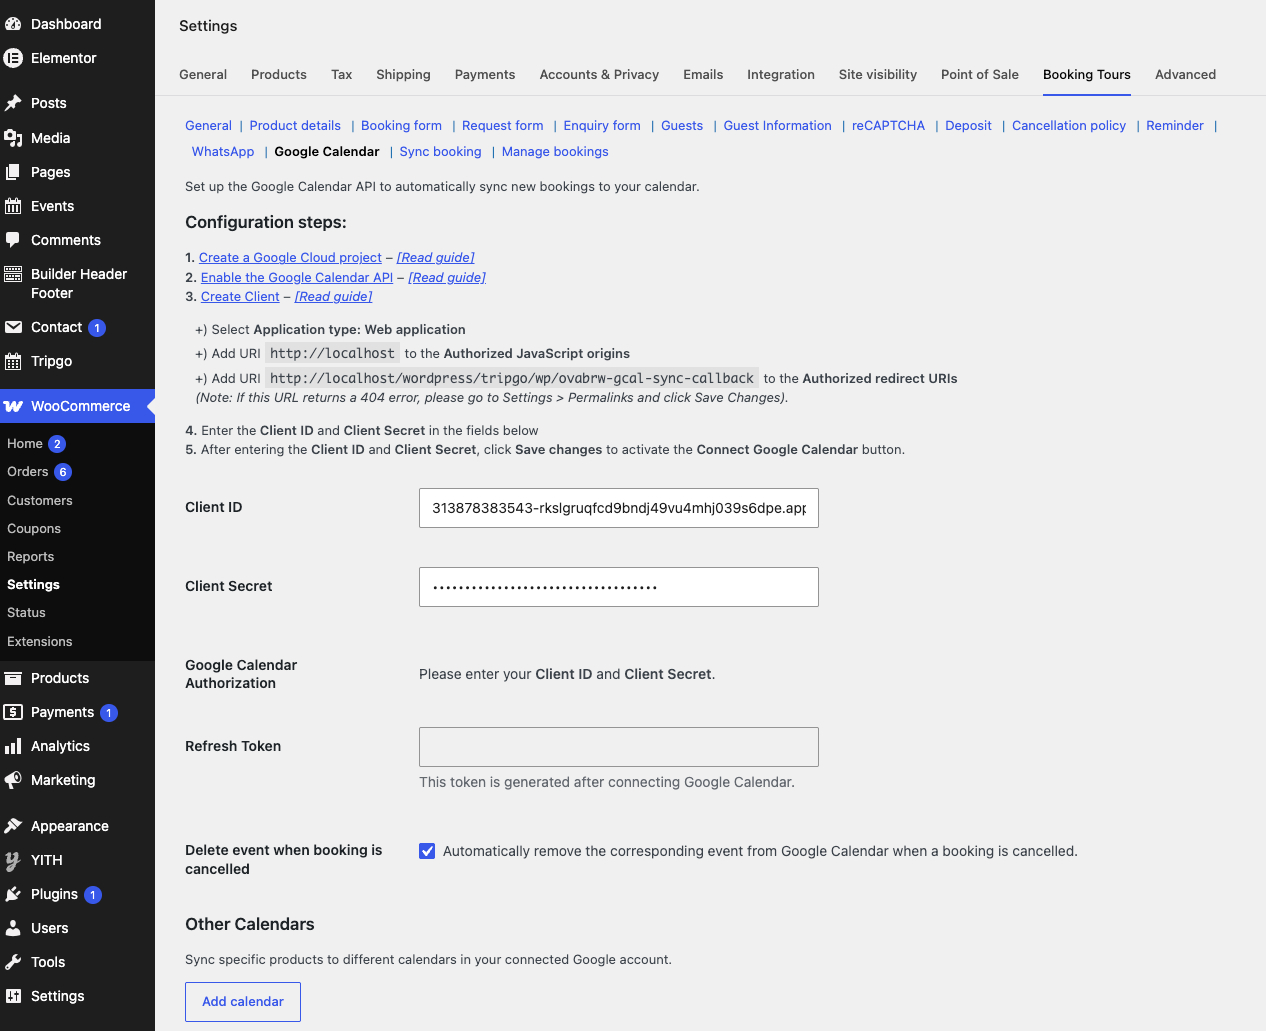
| Google Calendar | Auto-push each new order to Google Calendar; auto-remove the event when the booking is cancelled |
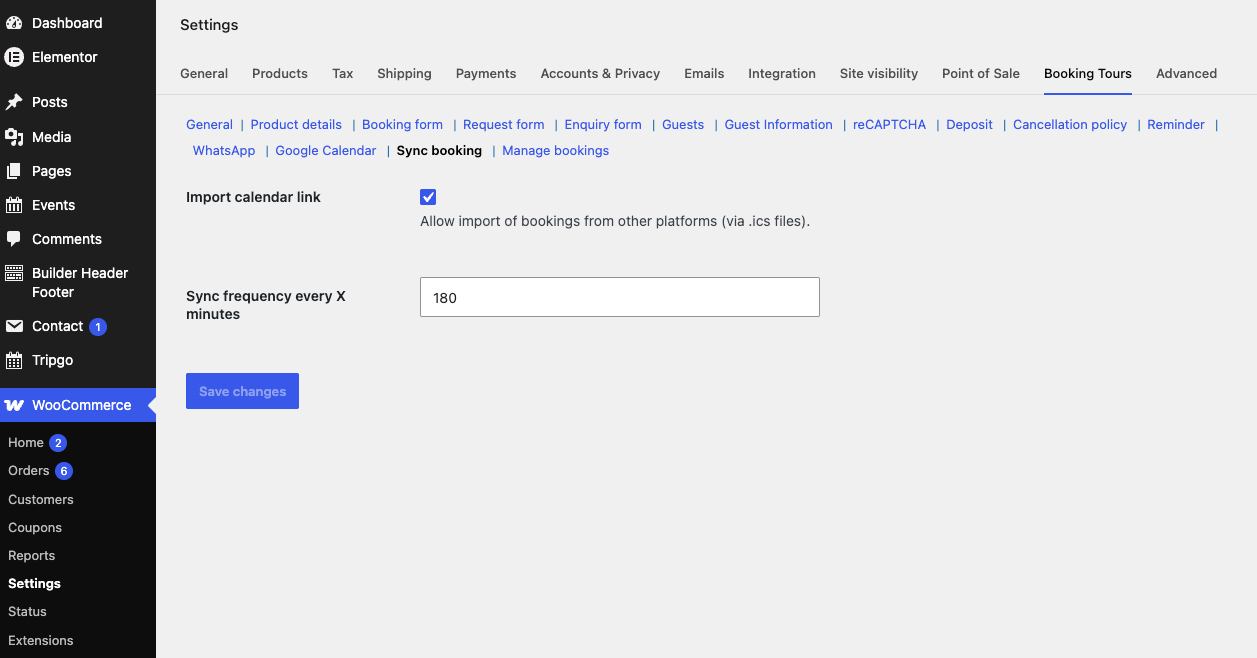
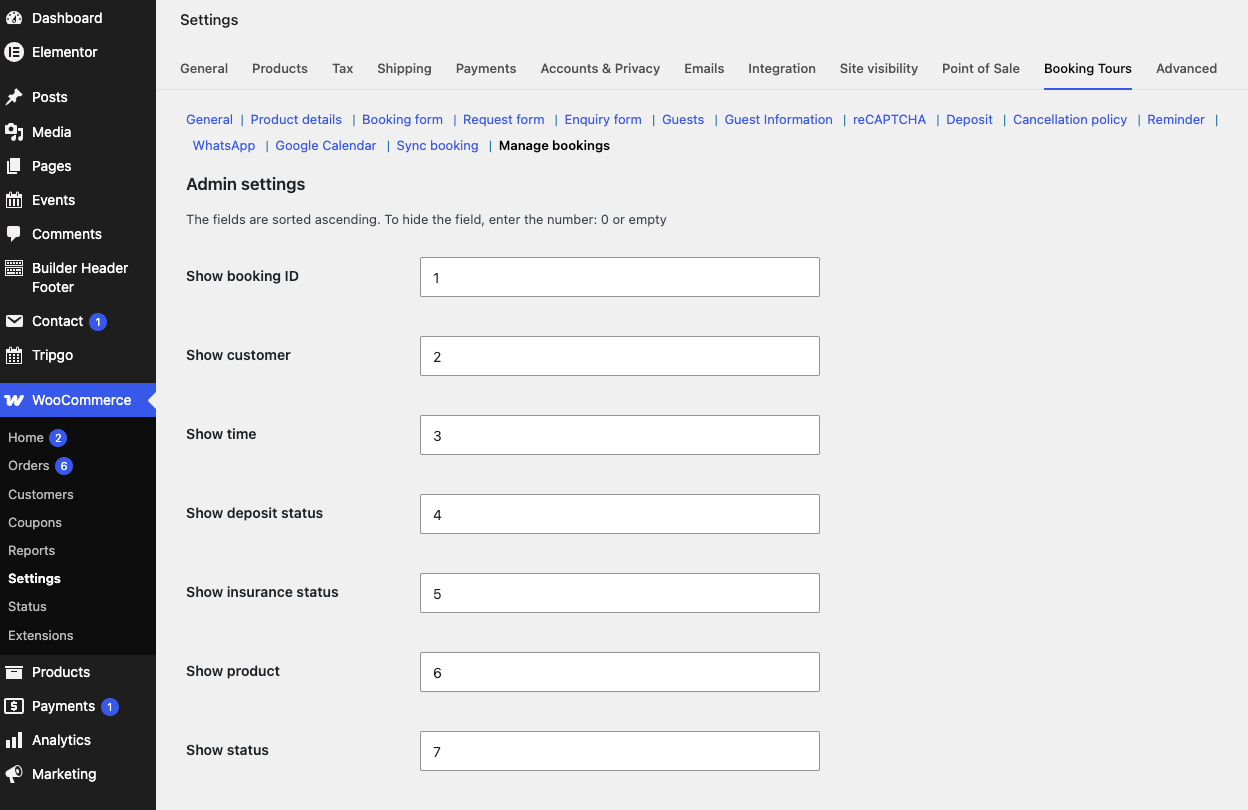
| Sync booking / Manage bookings | Enable two-way sync between the site and other platforms (managed per tour in its “Sync bookings” tab); choose which data columns appear in the bookings list |
4.1 · General
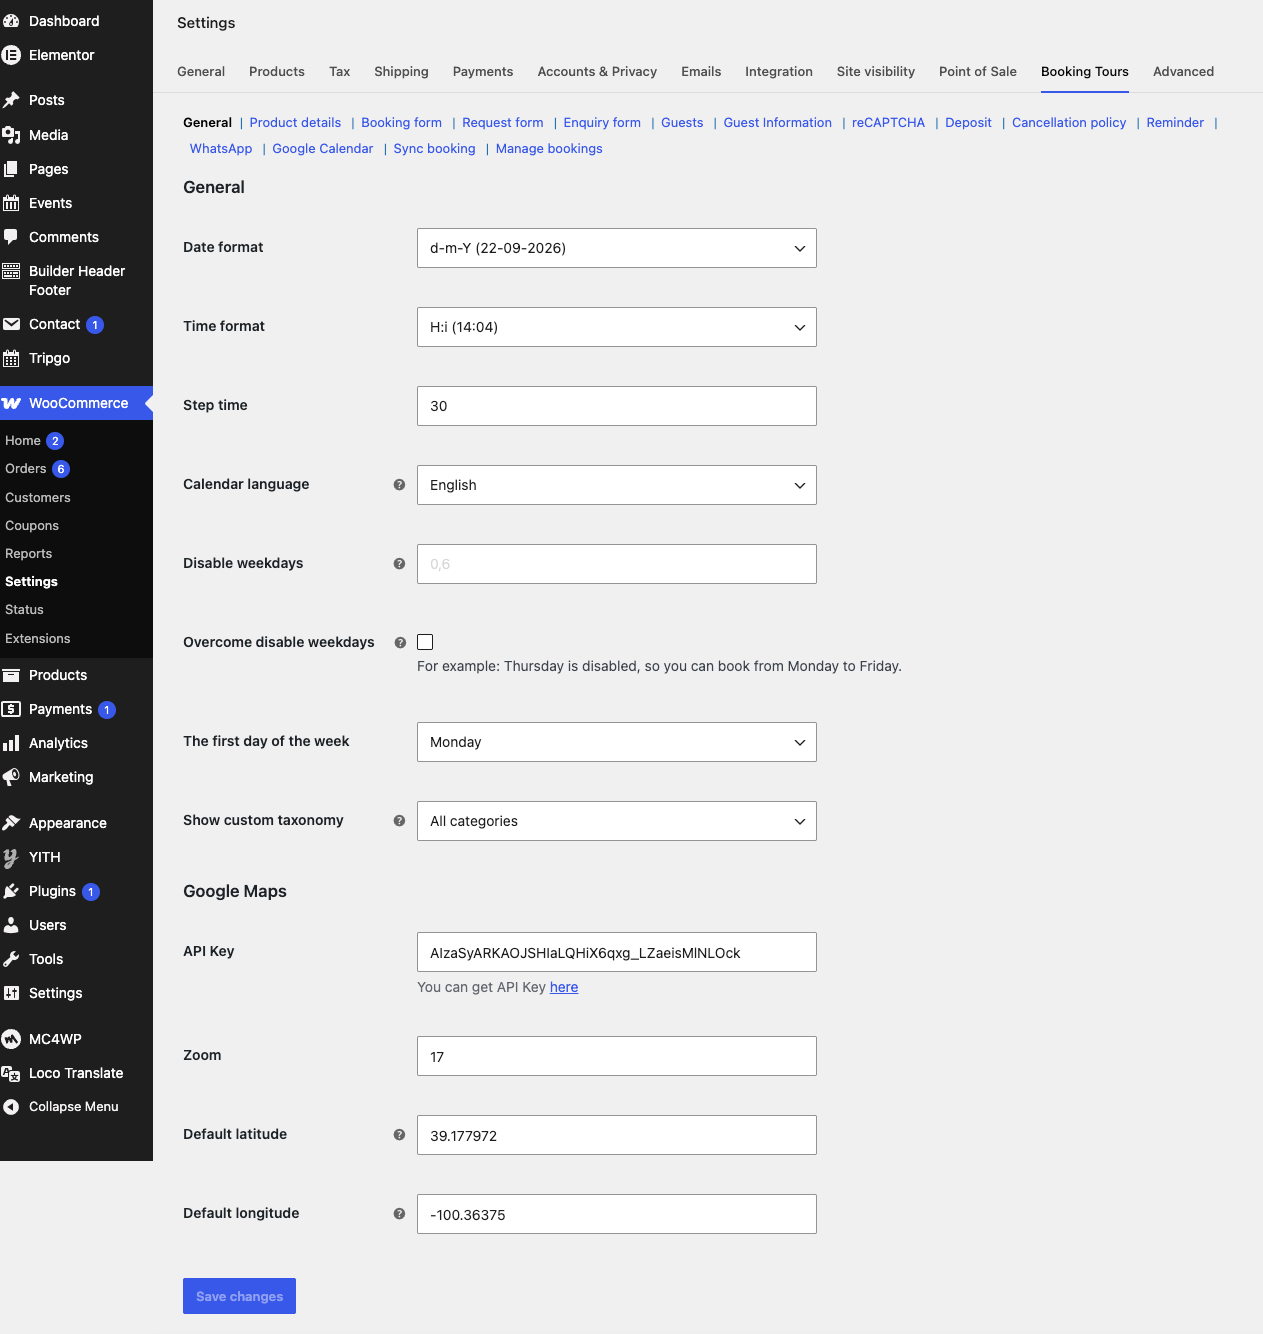
Click the image to view it larger
| Field | What it does | Affects tour… |
|---|---|---|
| Date format / Time format | How dates & times display in the booking calendar | Every date picker on every tour |
| Step time | Interval between selectable time slots (e.g. 30 min) | Tours that use Hours duration or schedules |
| Calendar language | Language of the date-picker (50+ languages) | All calendars |
| Disable weekdays + Overcome disable weekdays | Globally block certain weekdays; “overcome” lets a tour re-enable them | Interacts with per-tour Disable weekday |
| First day of the week | Sunday or Monday start | All calendars |
| Show custom taxonomy | Whether custom taxonomies appear in search/filter | Archive & search widgets |
Google Maps sub-section
Enter your Google Maps API Key, default Zoom, and default latitude/longitude. The API key is required for the per-tour map (Short address / Show map / Latitude / Longitude) to render.
4.2 · Product details & the three forms
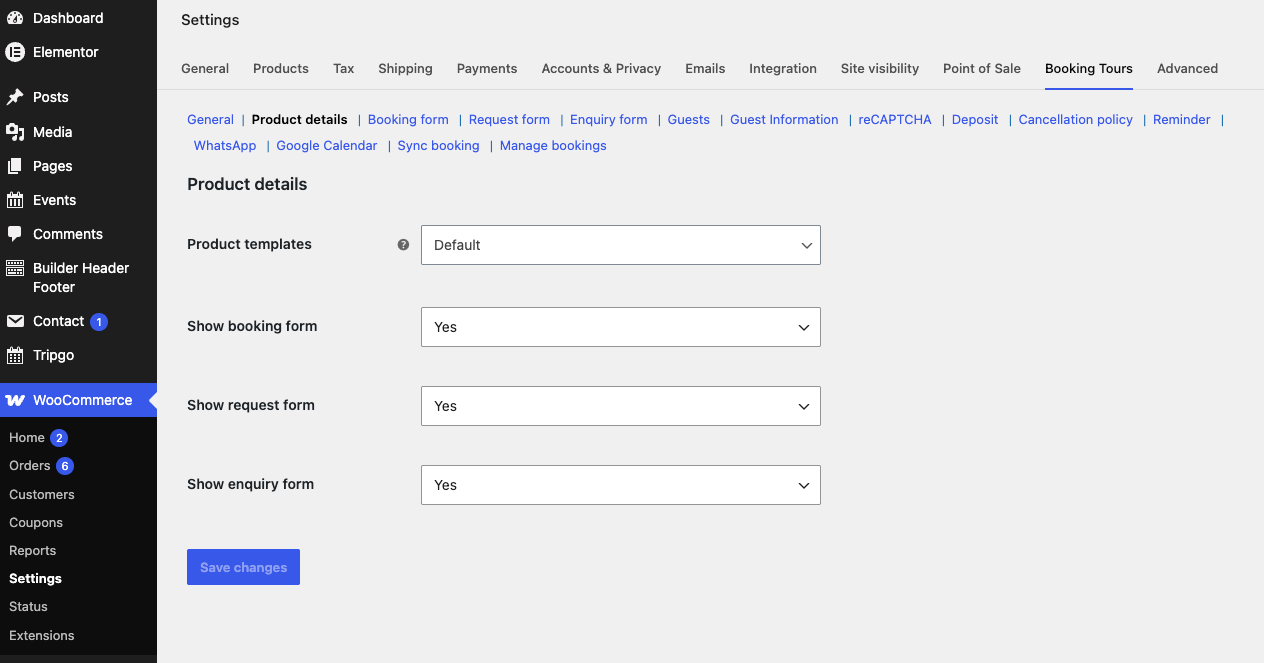
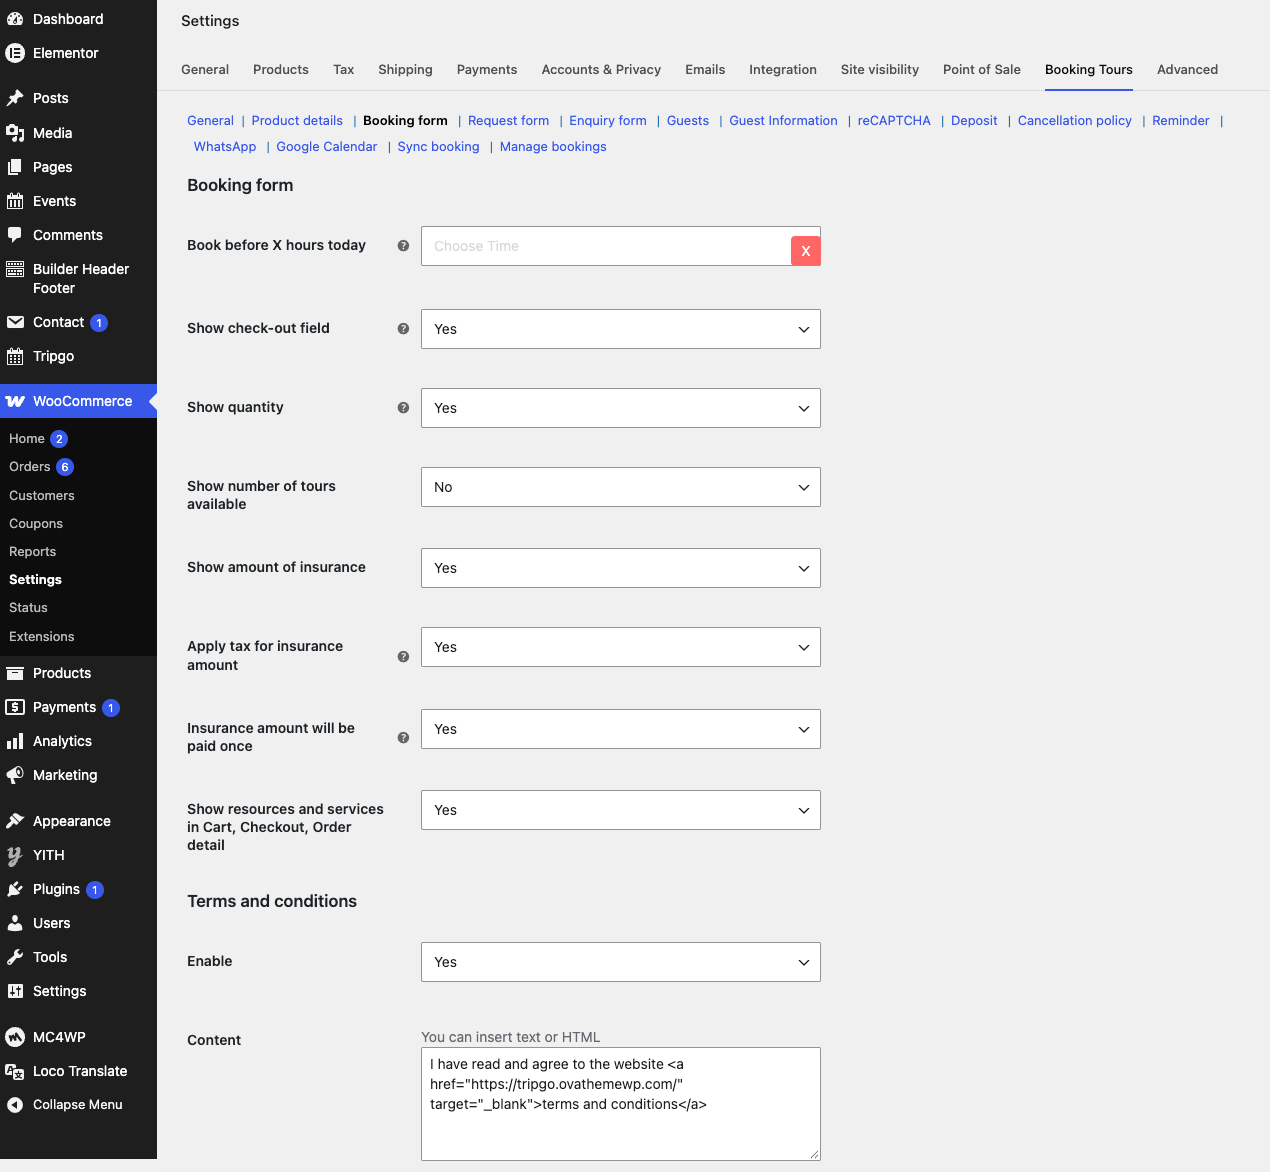
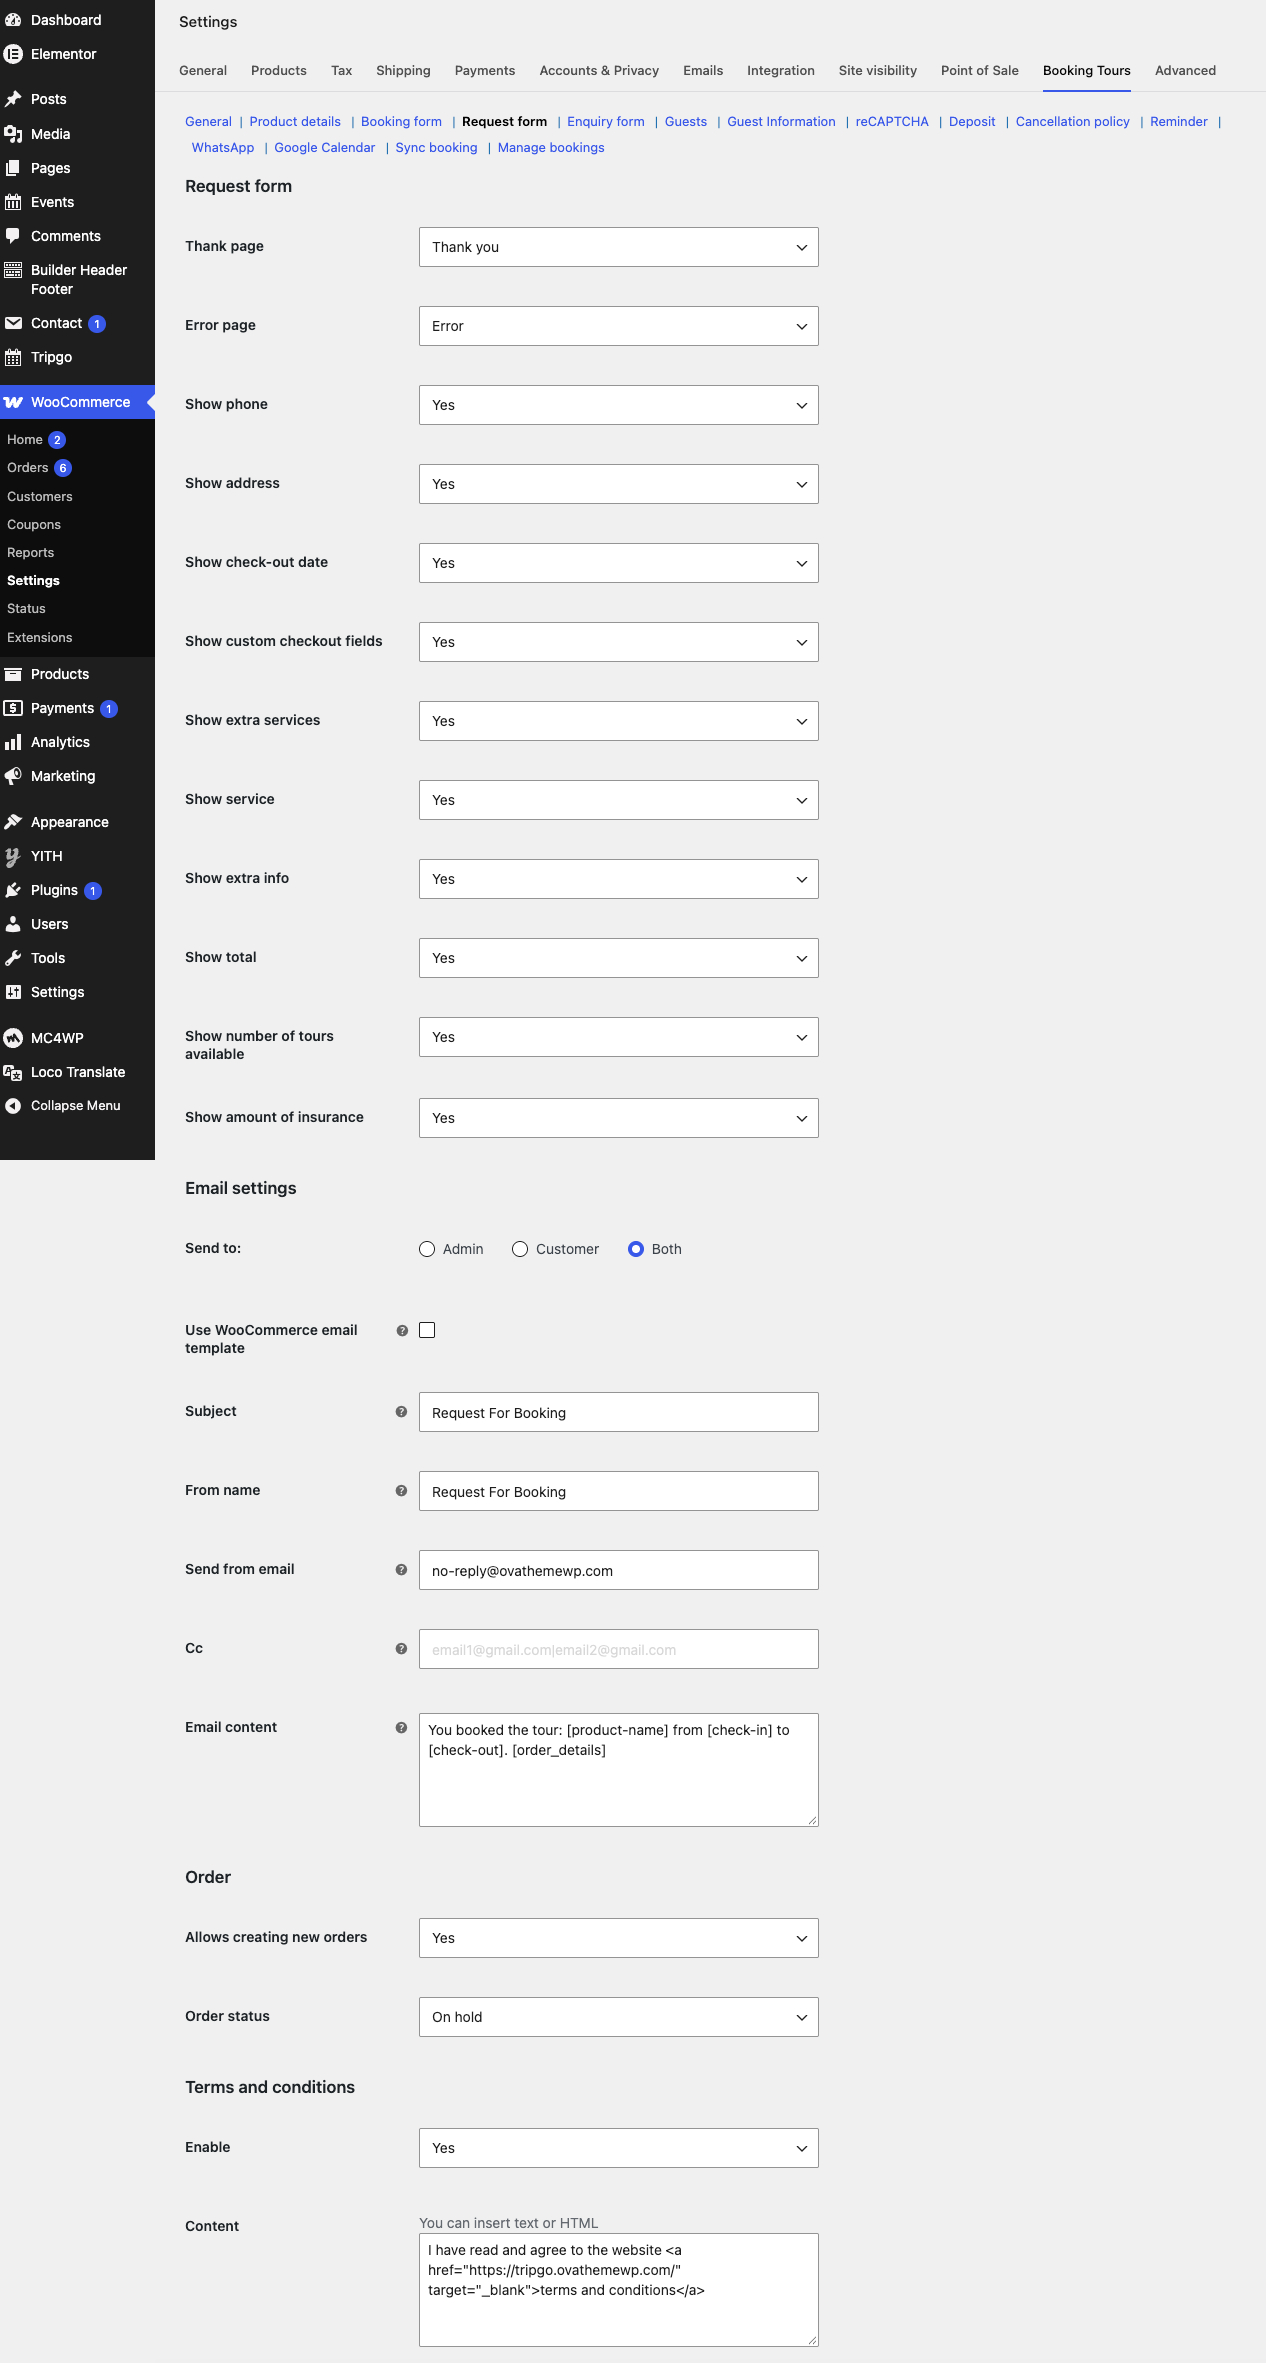
Click any image to view it larger · swipe or use the arrows to browse
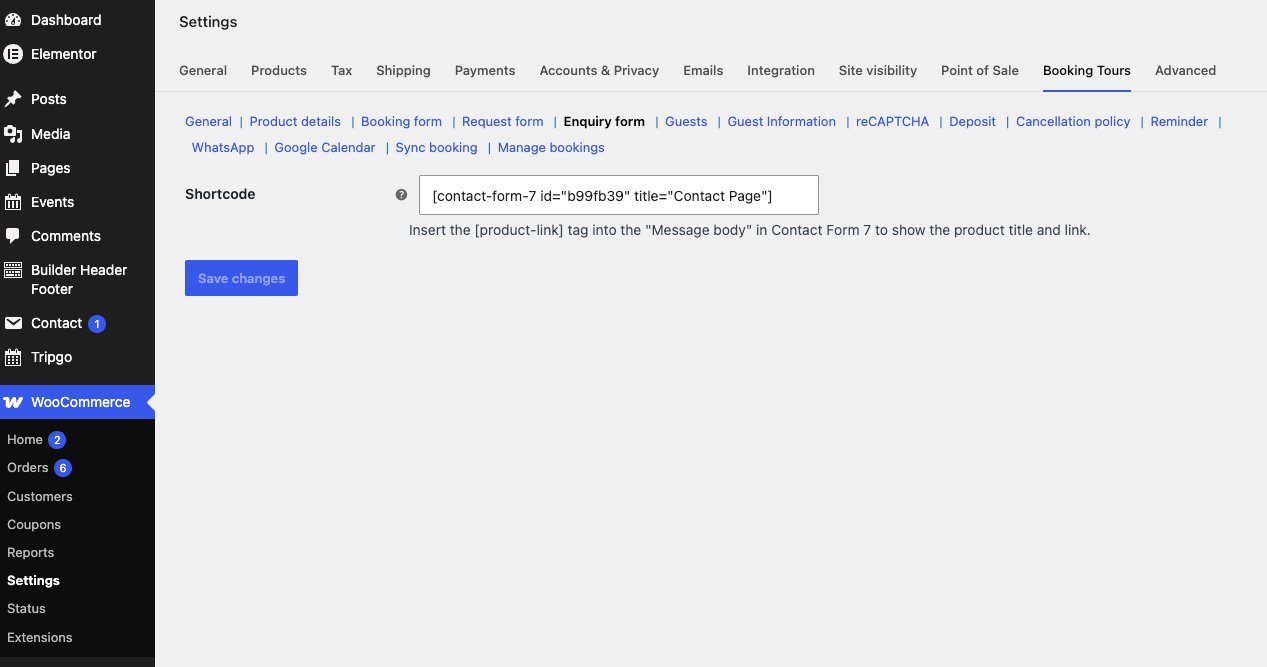
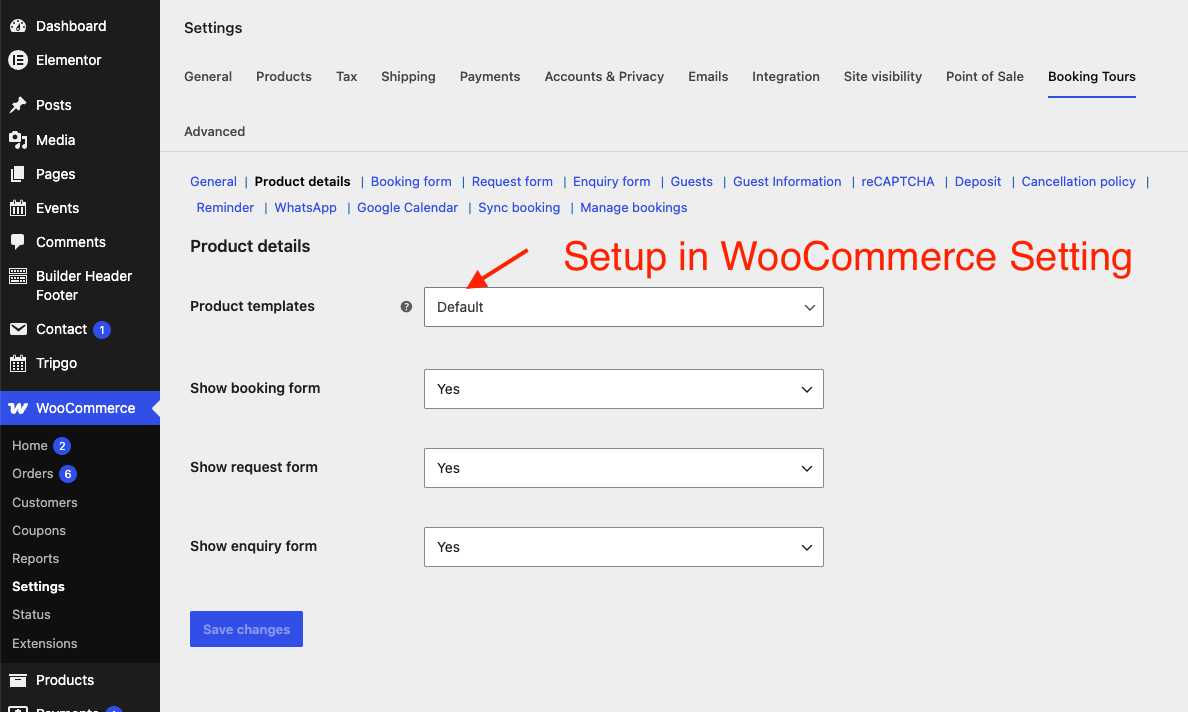
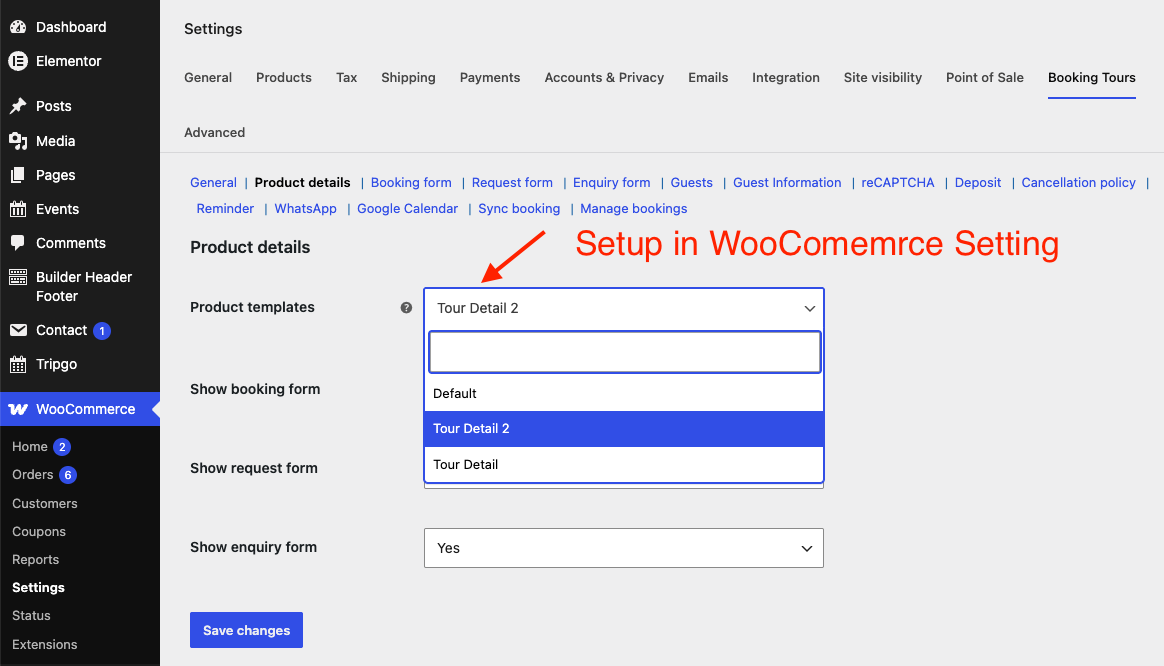
The Product details section sets the default Product template (an Elementor template used to lay out single tour pages) and three global toggles: Show booking form, Show request form, Show enquiry form. Each tour can override these under its own Forms field.
Booking form
Full booking & payment through WooCommerce checkout. Controls: book-before-X-hours, checkout field, quantity, insurance display & tax, terms and conditions.
Request form
“Request a quote” — sends an email and can optionally create an order. Configure recipient, subject, sender, thank-you/error pages, and which fields show.
Enquiry form
A short “ask a question” form for quick pre-sale questions.
4.3 · Guests & Guest Information
Click any image to view it larger · swipe or use the arrows to browse
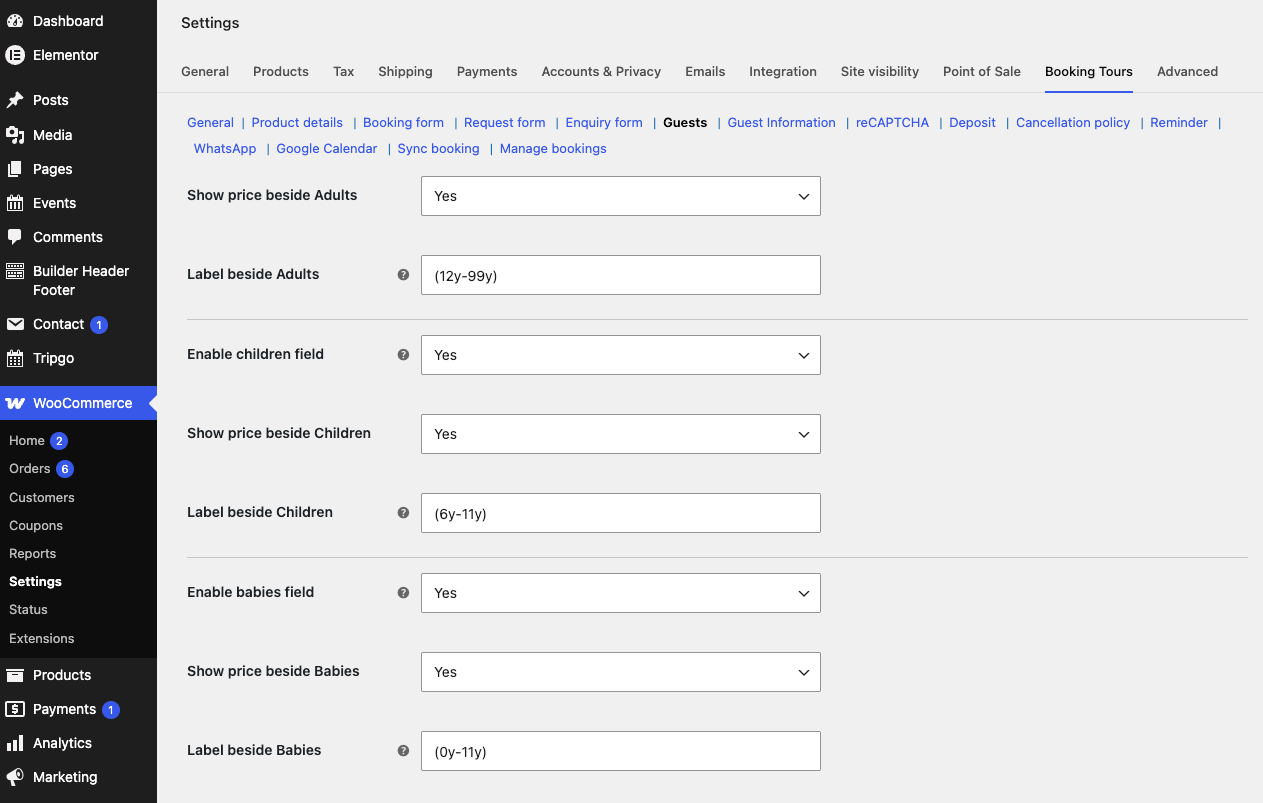
The Guests section defines the three guest types used across all tours:
- Adults — always on; set the label and whether the price shows beside it on the form
- Children — Enable children field, label, and show-price toggle
- Babies — Enable babies field, label, and show-price toggle
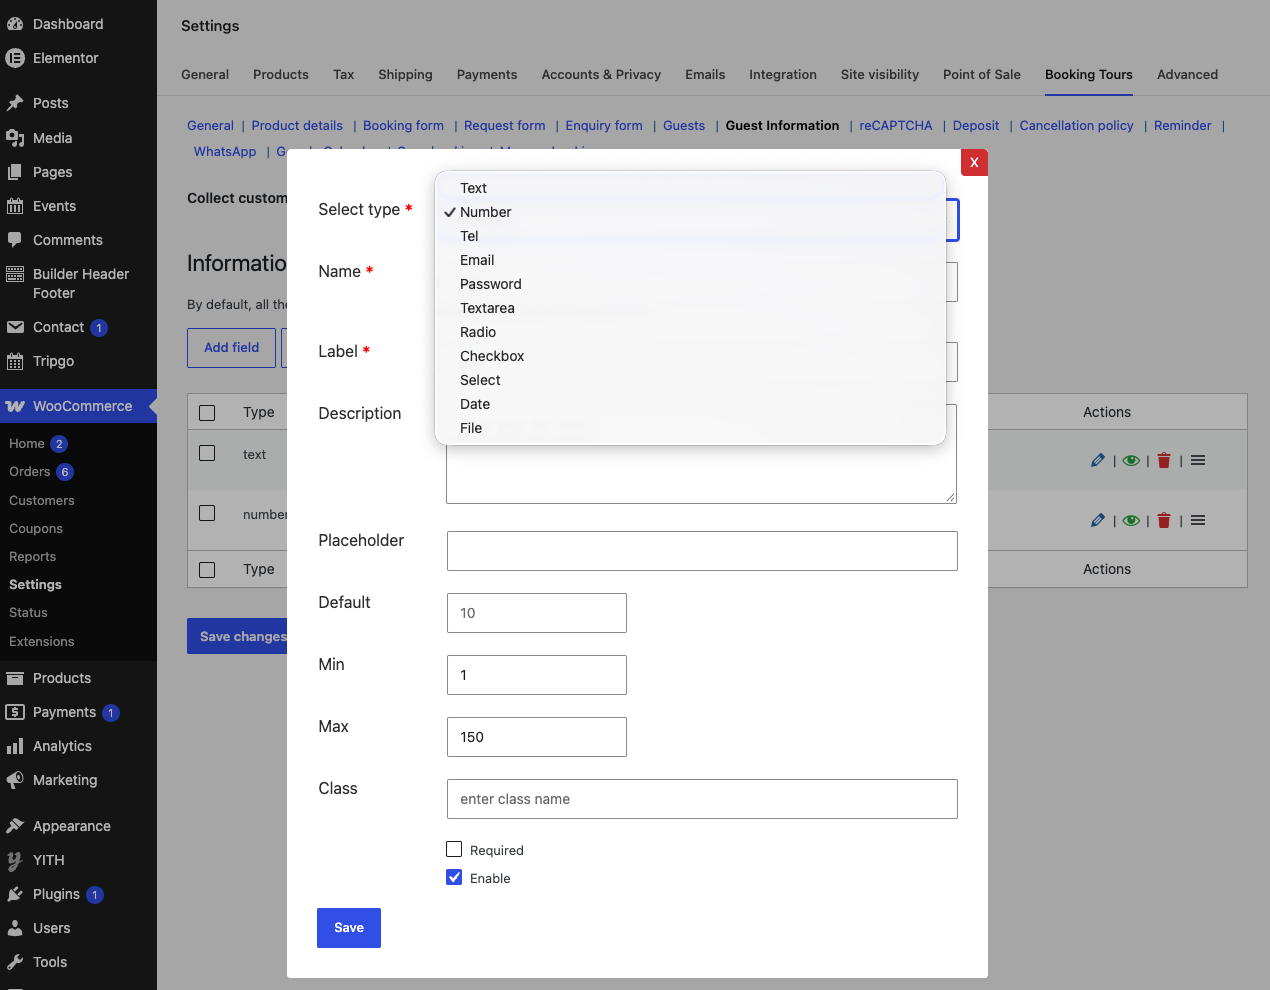
The global custom checkout fields (e.g. passport no., pickup point) are managed at Tripgo → Custom checkout field in the left admin sidebar. A tour can either reuse this global set or define its own — see the per-tour Display custom checkout fields option in 5.7.
4.4 · Deposit, Remaining amount & Cancellation
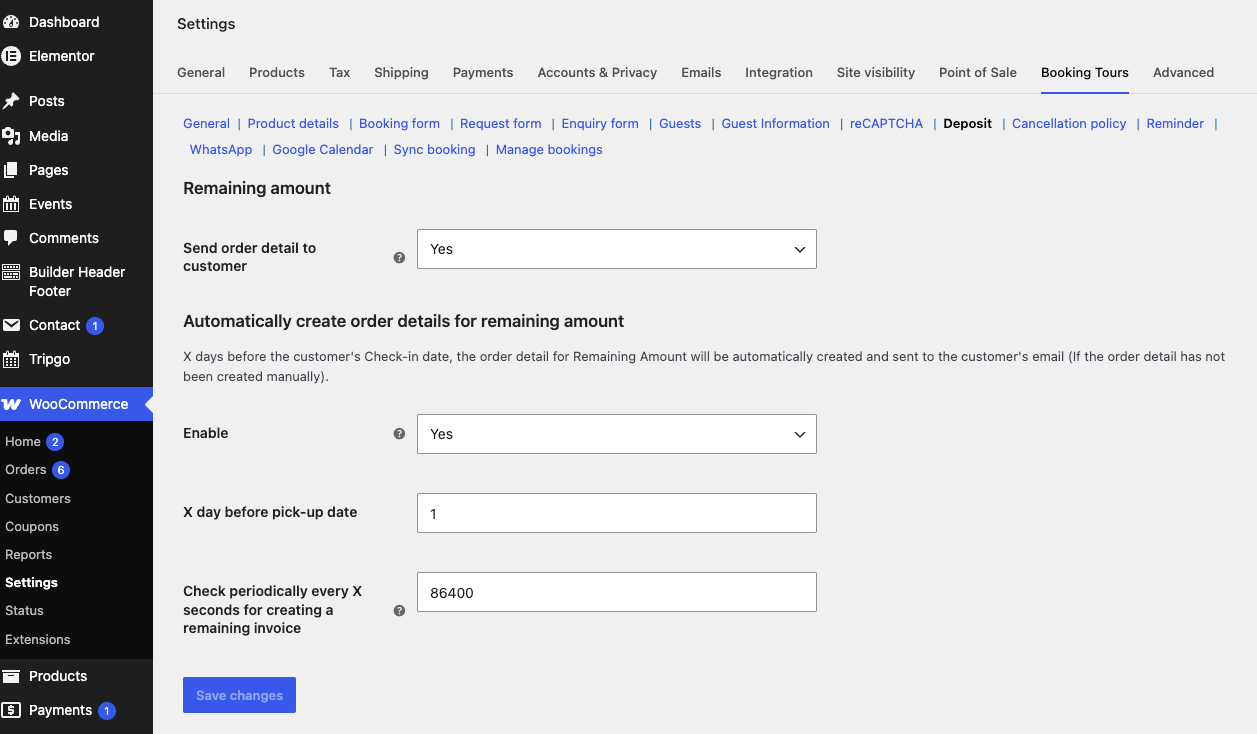
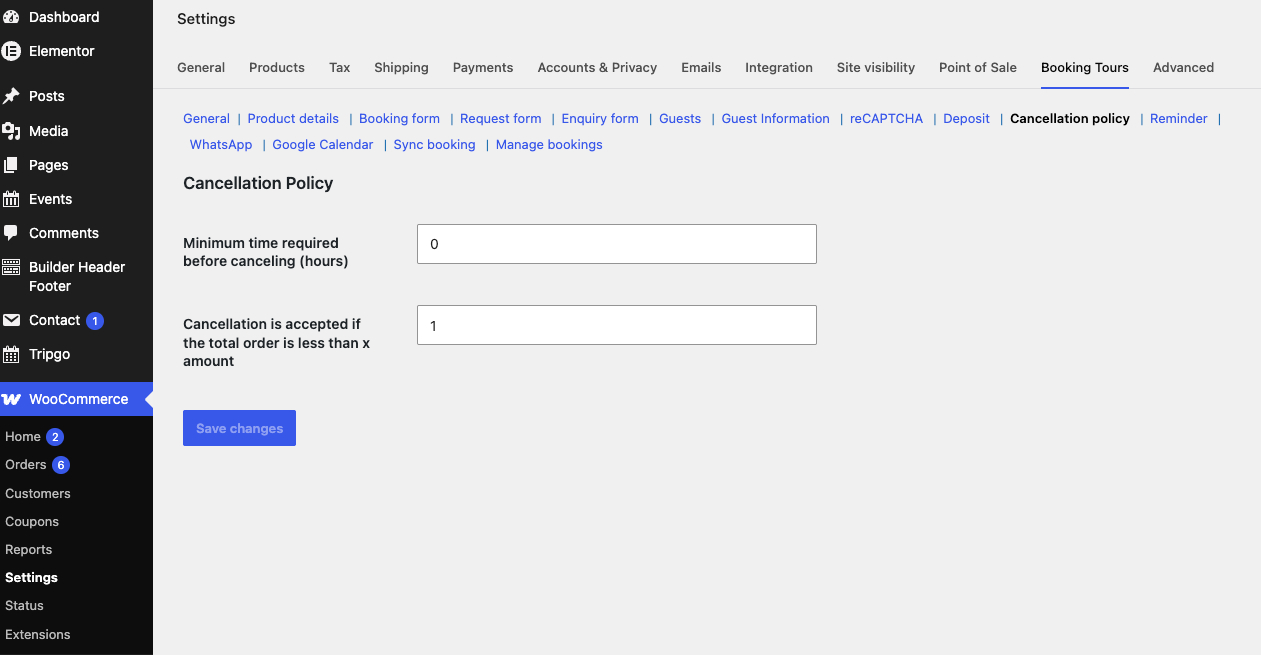
Click any image to view it larger · swipe or use the arrows to browse
| Setting | Meaning |
|---|---|
| Deposit section | Global deposit defaults (type, whether full payment is offered, default selection). A tour’s own Enable deposit / Deposit type fields override these. |
| Send order detail to customer | Emails the order to the customer when a deposit is paid |
| Automatically create order details for remaining amount | Auto-generates a second invoice for the balance, X days before pick-up, checked every X seconds |
| Cancellation Policy | Minimum hours before start that cancellation is allowed, plus an order-amount condition |
4.5 · Reminder, WhatsApp, Google Calendar & Sync
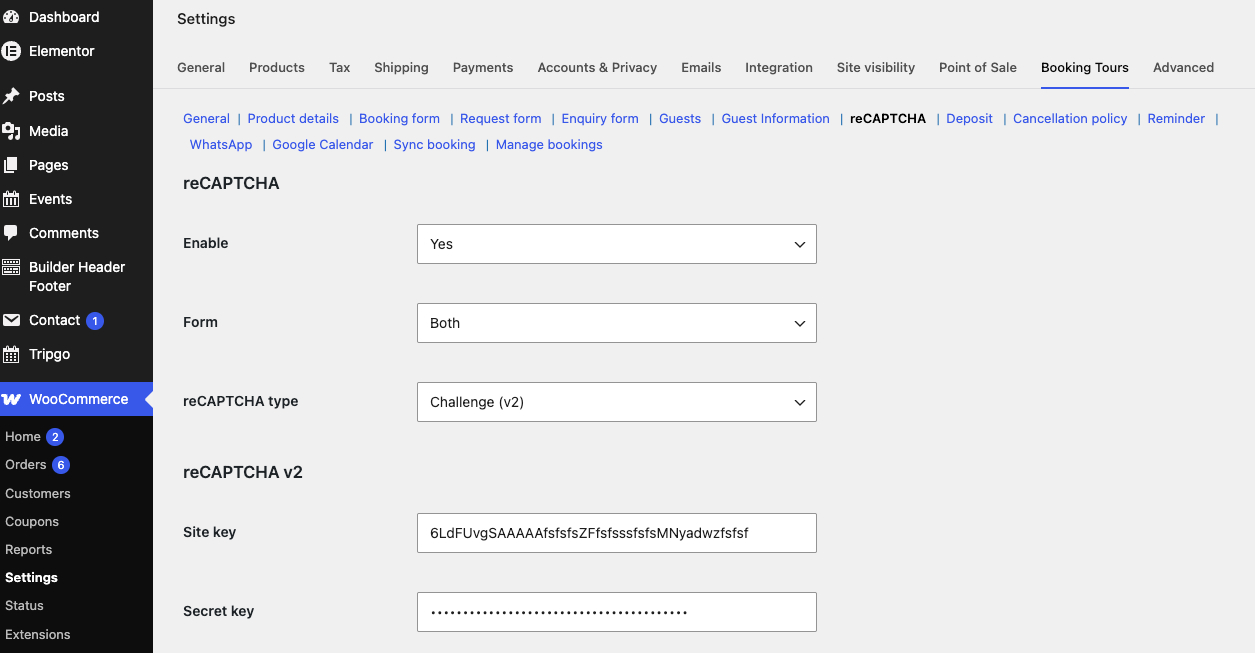
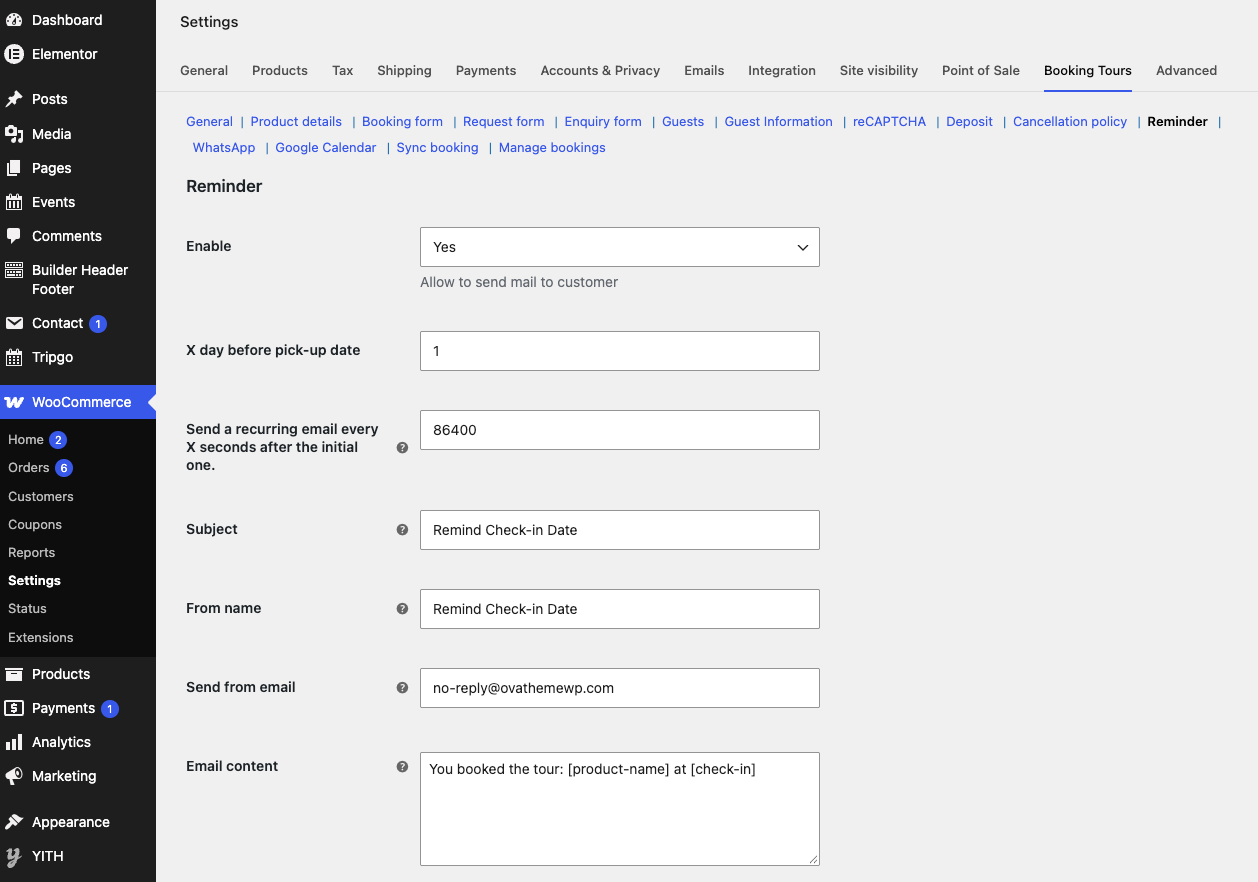
Click any image to view it larger · swipe or use the arrows to browse
These sections are global only — they apply to all bookings and have no per-tour equivalent.
- Reminder — automatic email X days before pick-up, with subject, sender and content
- WhatsApp Cloud API — notify admin on new orders and customers on new order / status change (template name, language, variables, delivery delay, test mode)
- Google Calendar — after authorizing with Client ID / Secret / Refresh Token, every order created on the site is automatically pushed to Google Calendar as an event; when that booking is cancelled, its event is automatically removed from the calendar
- Sync booking / Other Calendars — when enabled, the site can sync bookings two ways with other platforms (e.g. Airbnb, Booking.com, Google Calendar via iCal). Once on, a “Sync bookings” tab appears on each tour when you create/edit it, where you paste the external calendar link(s) and set the sync frequency for that tour.
- Manage bookings — lets you choose which data columns show in the bookings list.
- reCAPTCHA — enable v2 or v3 on the forms with site & secret keys
5Creating a Tour — step by step
Add a new product
Go to Products → Add New. Enter the tour title and the long description (shown on the tour page), and set a Featured image and Product gallery.
Select the “Tour” product type
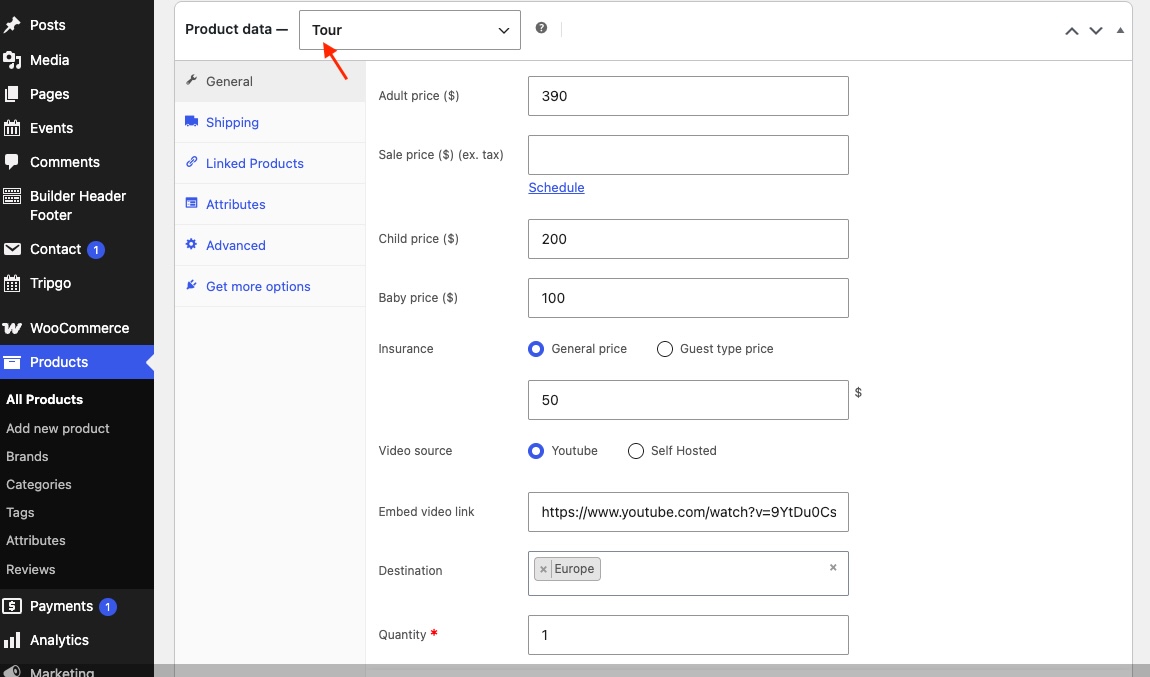
In the Product data panel, open the product-type dropdown and choose Tour. The Tripgo booking fields now appear inside the General tab.
Set the price & capacity
Fill in the per-guest prices, Quantity (stock), and guest min/max. Prices use your WooCommerce currency symbol automatically.
Define availability
Choose the duration model (Days vs Hours, Fixed dates or Schedule), disabled weekdays, preparation time and any unavailable dates.
Add content & extras
Add features, included/excluded items, FAQ, video, map location, extra services and resources.
Assign taxonomy & publish
Pick the product category, tags and Destination(s), then Publish. Preview the page to confirm the booking form works.
5.1 · Basic fields
| Field | Description | Notes |
|---|---|---|
| Adult / Child / Baby price | Base price per guest type | Child/Baby only show if enabled in Guests settings |
| Insurance | Optional insurance: General price (one amount) or Guest type price (per Adult/Child/Baby) | Display & tax controlled by the Booking form settings |
| Quantity (required) | Available stock — how many bookings can be sold for the tour/slot | Can be set per guest via “Stock quantity by Guests” |
| Destination | Links the tour to one or more Destinations (multi-select) | Populated by the ova-destination plugin |
| Video | Intro video: YouTube (embed link) or Self Hosted (media URL) | Shown by the Video Gallery widget |
Click the image to view it larger
5.2 · Duration & dates
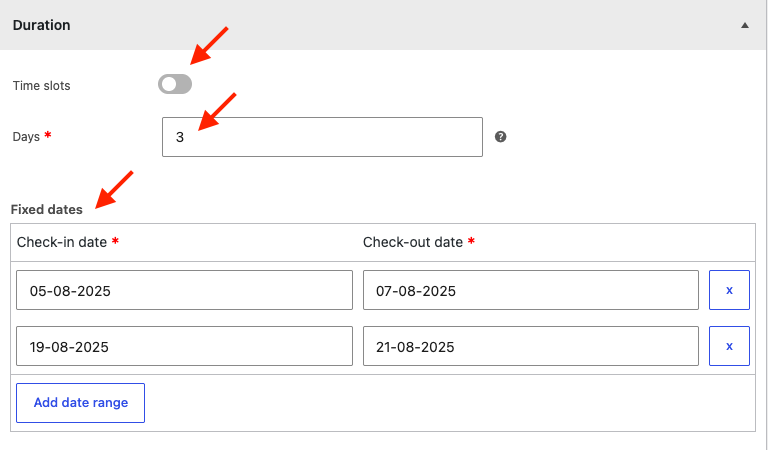
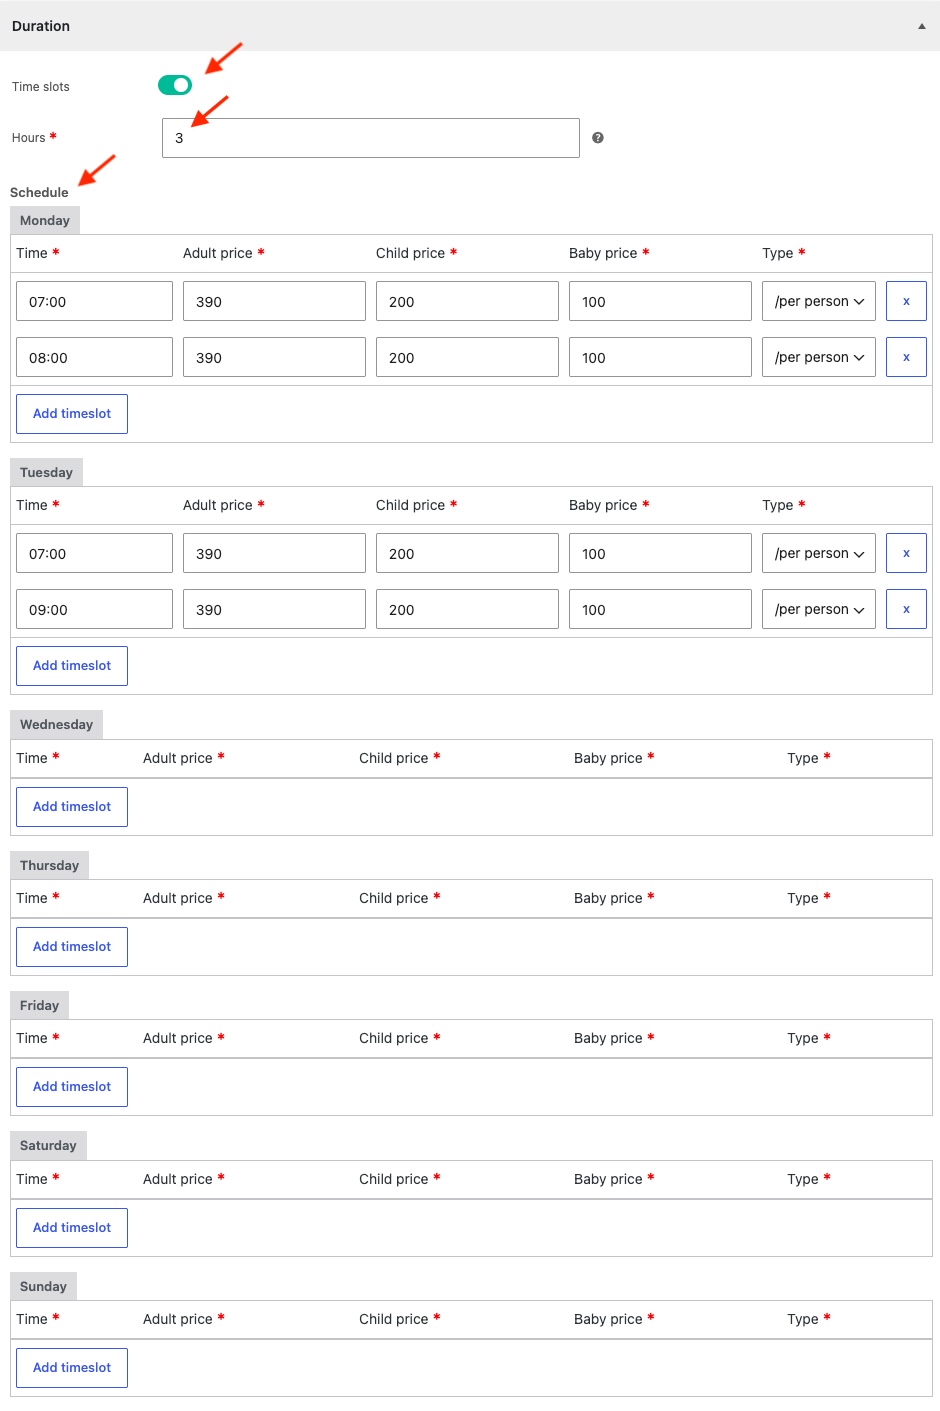
The Duration control decides how customers pick their booking time. Turn on Time slots to switch between two models:
| Field | Description |
|---|---|
| Days + Fixed dates | Multi-day tour. Set the number of days and add Fixed dates (check-in / check-out) the tour departs on. |
| Hours + Schedule | Hourly / day tour. Set the number of hours and build a Schedule of start times, each with its own per-guest price. |
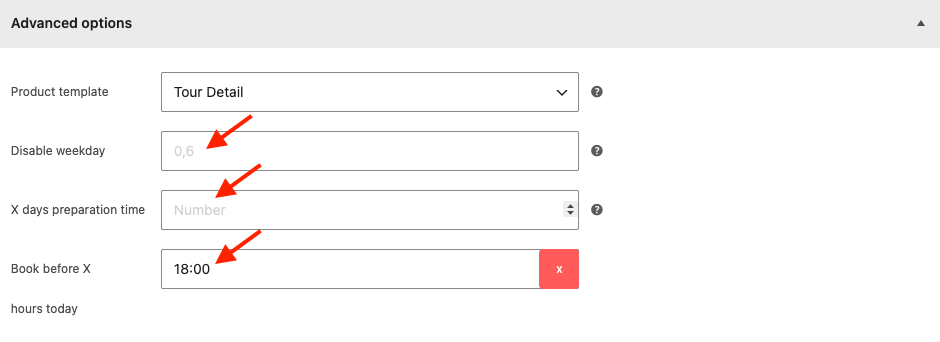
| Disable weekday | Block specific weekdays for this tour (works with the global Disable weekdays / Overcome options). |
| X days preparation time | Buffer days required before a booking can start. |
| Book before X hours today | Cut-off — how many hours before start the tour can still be booked. Defaults from the global Booking form value. |
| Unavailable time | Specific date ranges when the tour cannot be booked (holidays, maintenance, sold-out dates). |
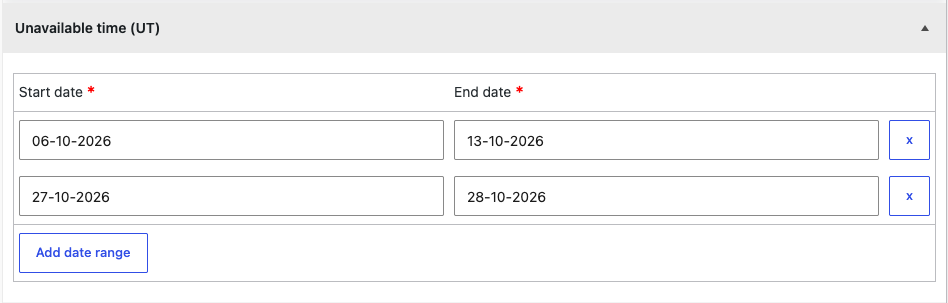
Click any image to view it larger · swipe or use the arrows to browse
5.3 · Pricing model
Beyond the base price, Tripgo supports three layered pricing tools:
Daily / Schedule price
Different Adult/Child/Baby prices per weekday (Mon–Sun) or per scheduled start time.
Global Discount (GD)
Price-per-person tiers by duration range (min–max days/hours) — e.g. cheaper per day on longer trips. Applies to Adults/Children/Babies.
Special Time (ST)
Seasonal / date-range pricing per person — override prices for specific periods (high season, promotions).
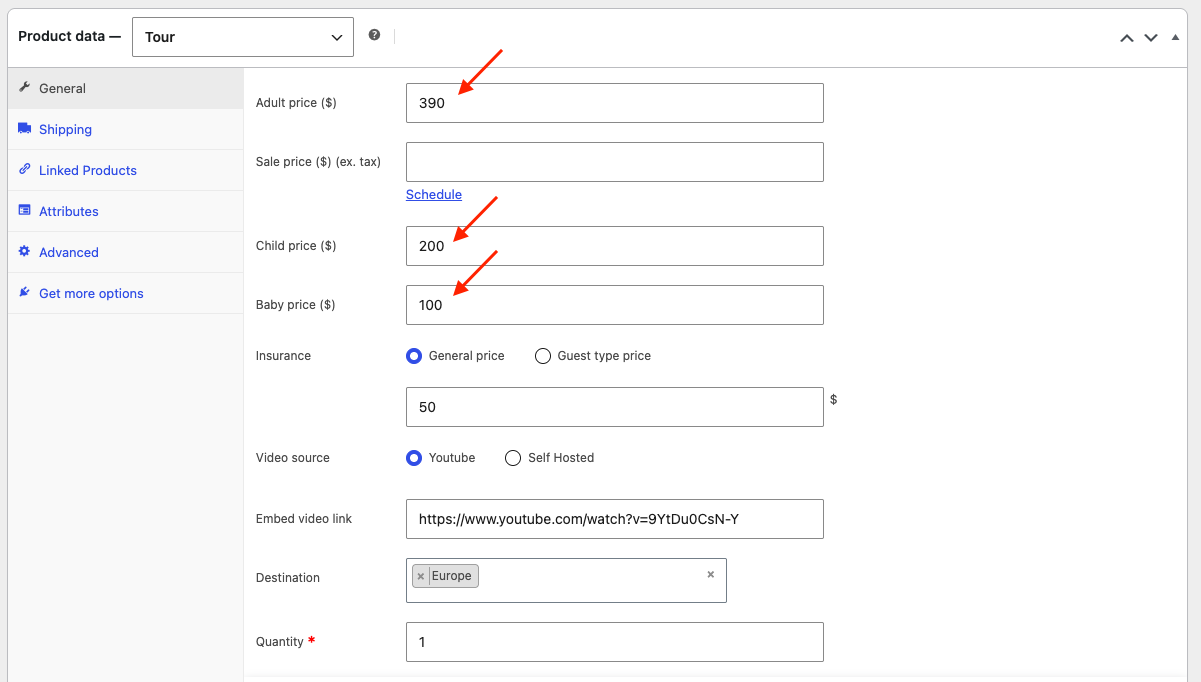
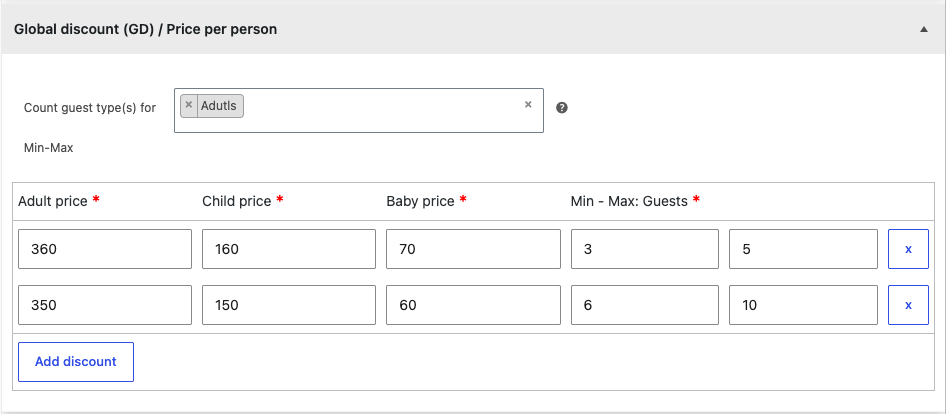
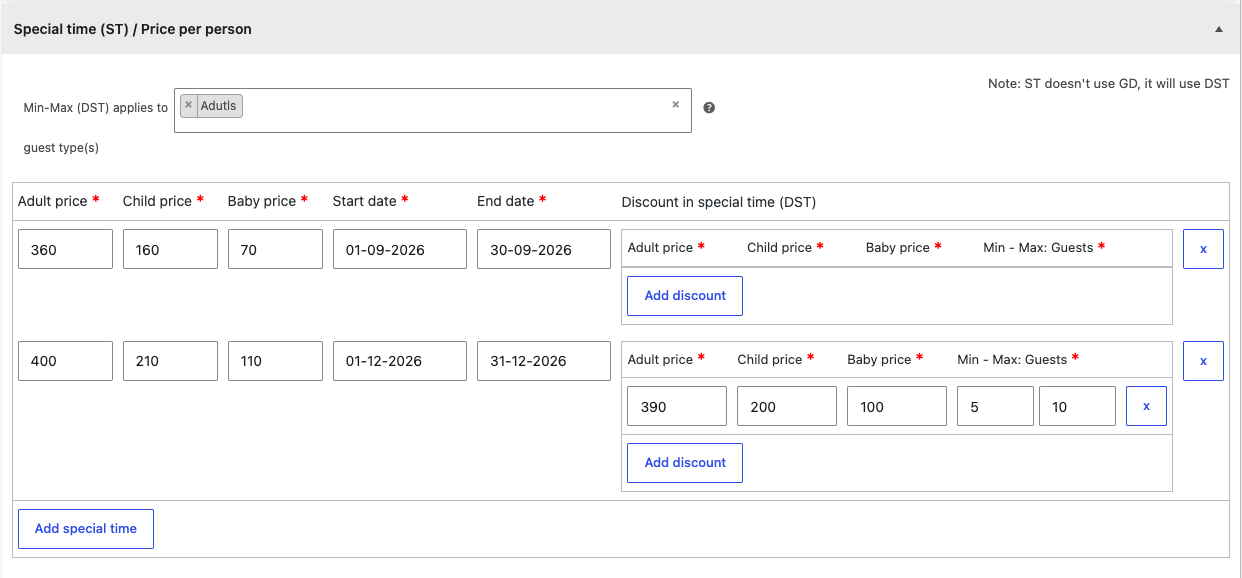
Click any image to view it larger · swipe or use the arrows to browse
5.4 · Guests & deposit (per tour)
Guest capacity
| Field | Description |
|---|---|
| Minimum / Maximum total number of guests | Overall booking size limits |
| Min / Max adults, children, babies | Per-type limits (Children/Babies rows appear only if enabled globally) |
| Show children field / Show babies field | Per-tour override of whether those guest types appear on this tour’s form |
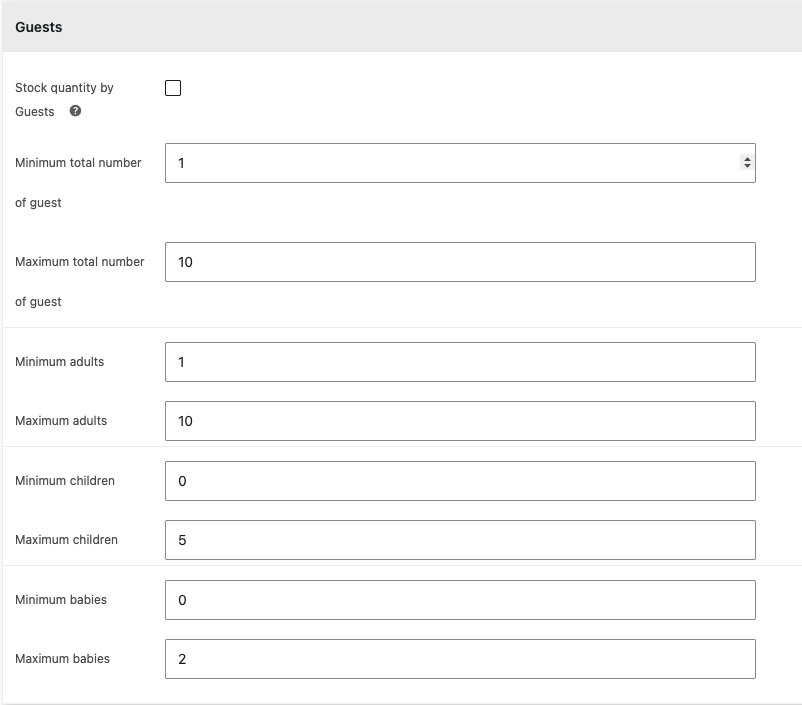
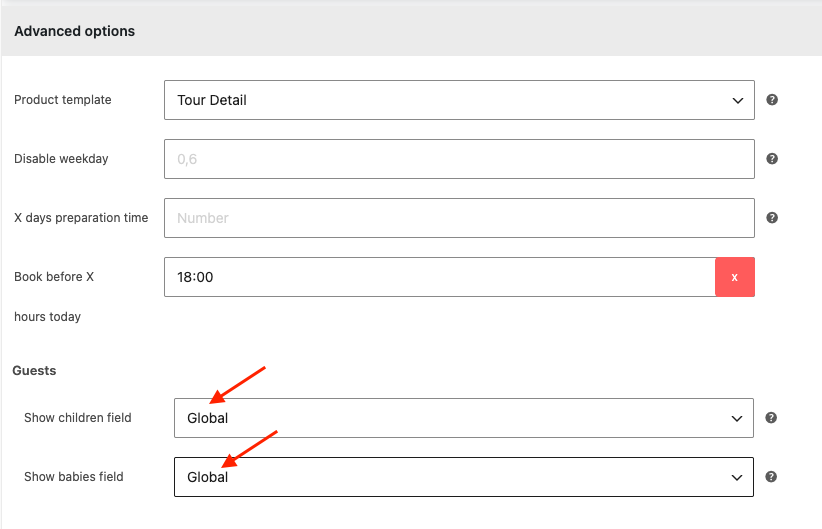
Click any image to view it larger · swipe or use the arrows to browse
Deposit
| Field | Description |
|---|---|
| Enable deposit | Allow partial payment for this tour |
| Show full payment | Also offer to pay in full alongside the deposit option |
| Default selected | Whether full payment or deposit is pre-selected |
| Deposit type | Fixed amount or percentage of the total |
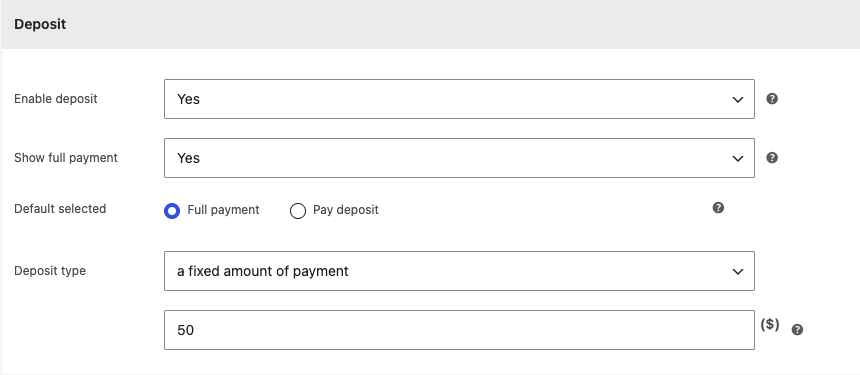
Click the image to view it larger
↔ Relationship
Per-tour deposit fields override the global Deposit defaults. When a customer pays a deposit, the global “Automatically create order details for remaining amount” setting decides if/when the balance invoice is generated — the tour itself does not control that.
5.5 · Extra services & resources
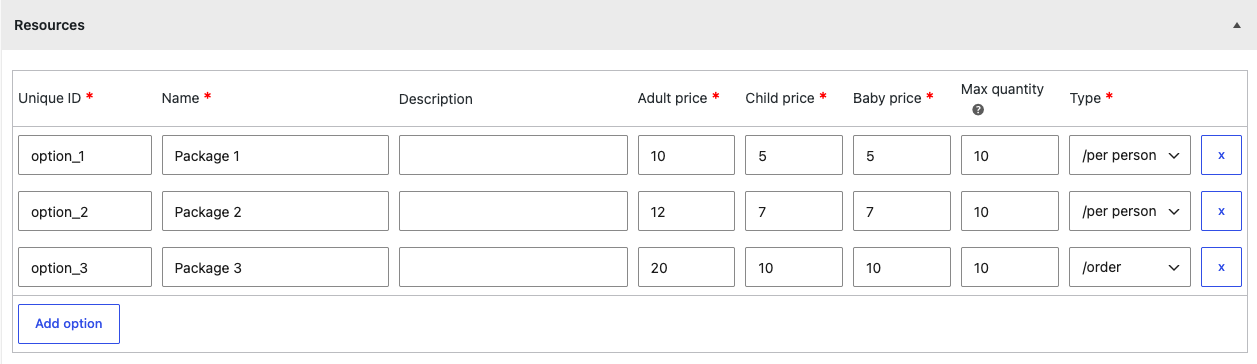
Both are repeaters — click Add option to add as many rows as you need. They look similar but behave differently: an extra service is an optional add-on priced per booking, while a resource is a shared, limited stock that runs out.
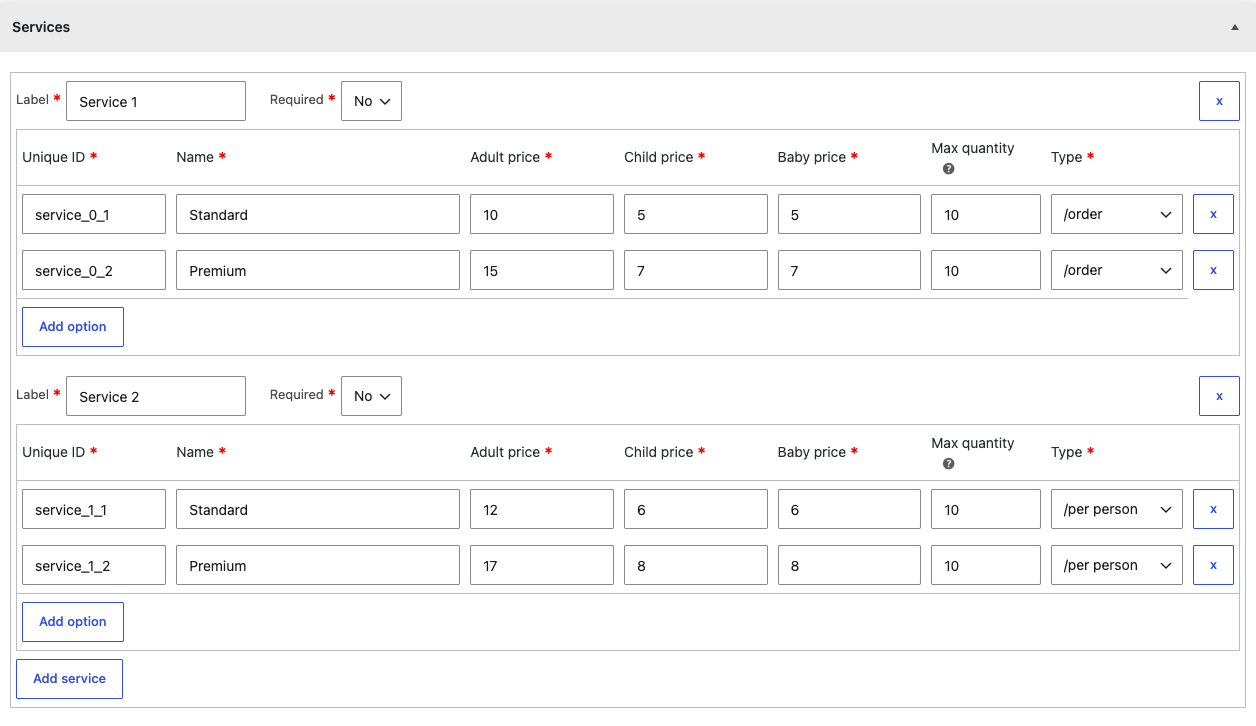
Click any image to view it larger · swipe or use the arrows to browse
Extra service — options per row
| Option | What it does |
|---|---|
| Name | The add-on shown to the customer on the booking form (e.g. Airport pickup, Lunch, Insurance upgrade). |
| Adult price / Child price / Baby price | Price of the service for each guest type. (Child/Baby only apply when those guest types are enabled.) |
| Max quantity | The largest number of this service one booking may add. |
| Duration type | How the price is calculated: per person (price × number of guests) or total (one flat charge for the whole booking). |
| Required | Yes forces every customer to take this service; No makes it optional (customer chooses). |
Resources — options per row
| Option | What it does |
|---|---|
| Name | The resource shown to the customer (e.g. Bike, Kayak, Van seat, Tour guide). |
| Description | Short note about the resource, shown on the form. |
| Adult price / Child price / Baby price | Price to add this resource per guest type. |
| Max quantity | Total shared stock available. Availability is tracked across all bookings for the same date/slot — once it’s fully booked the resource shows “No space”. |
| Duration type | per person or total, same as extra service. |
5.6 · Tour content — Features, Included/Excluded, FAQ & Tour plan
These describe the tour on its single page (they carry no price). Each is a repeater — use Add … to add rows — and each has a matching Elementor widget (Product Features, Included/Excluded, Product FAQ, Product Plan) so you can place it anywhere on the layout.
| Block | Fields per row | Shown as |
|---|---|---|
| Features | Icon class (an icon from the theme’s icon set), Label, Description | A grid/list of highlight items with icons (e.g. Free cancellation, Hotel pickup, Small group) |
| Included (“Add Tour Included”) | Label — one line per item that is covered | A checklist of what the price includes (meals, guide, tickets…) |
| Excluded (“Add Tour Excluded”) | Label — one line per item that is not covered | A checklist of what is not included (flights, tips, personal expenses…) |
| FAQ | Question + Answer | An expandable question/answer accordion |
| Tour plan (“Add Tour Plan”) | Day + Title + Description | A day-by-day itinerary / timeline of the trip |
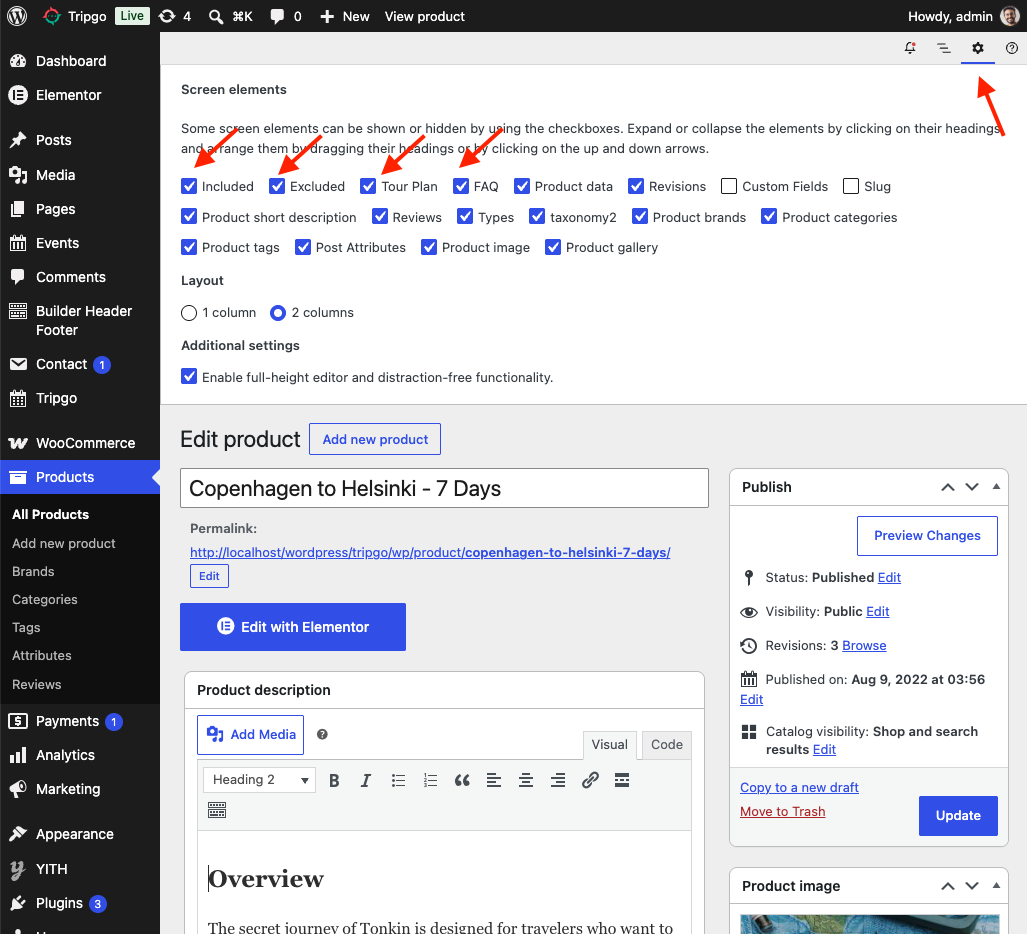
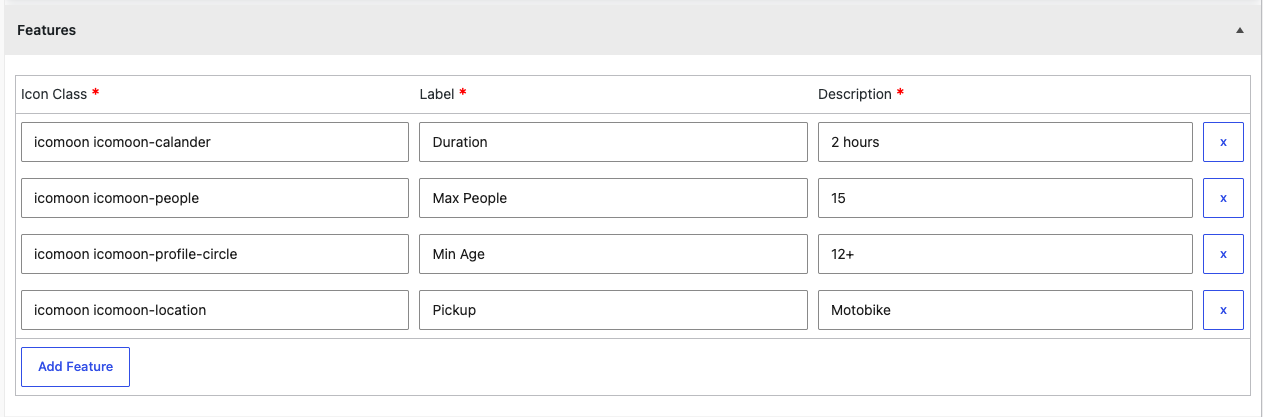
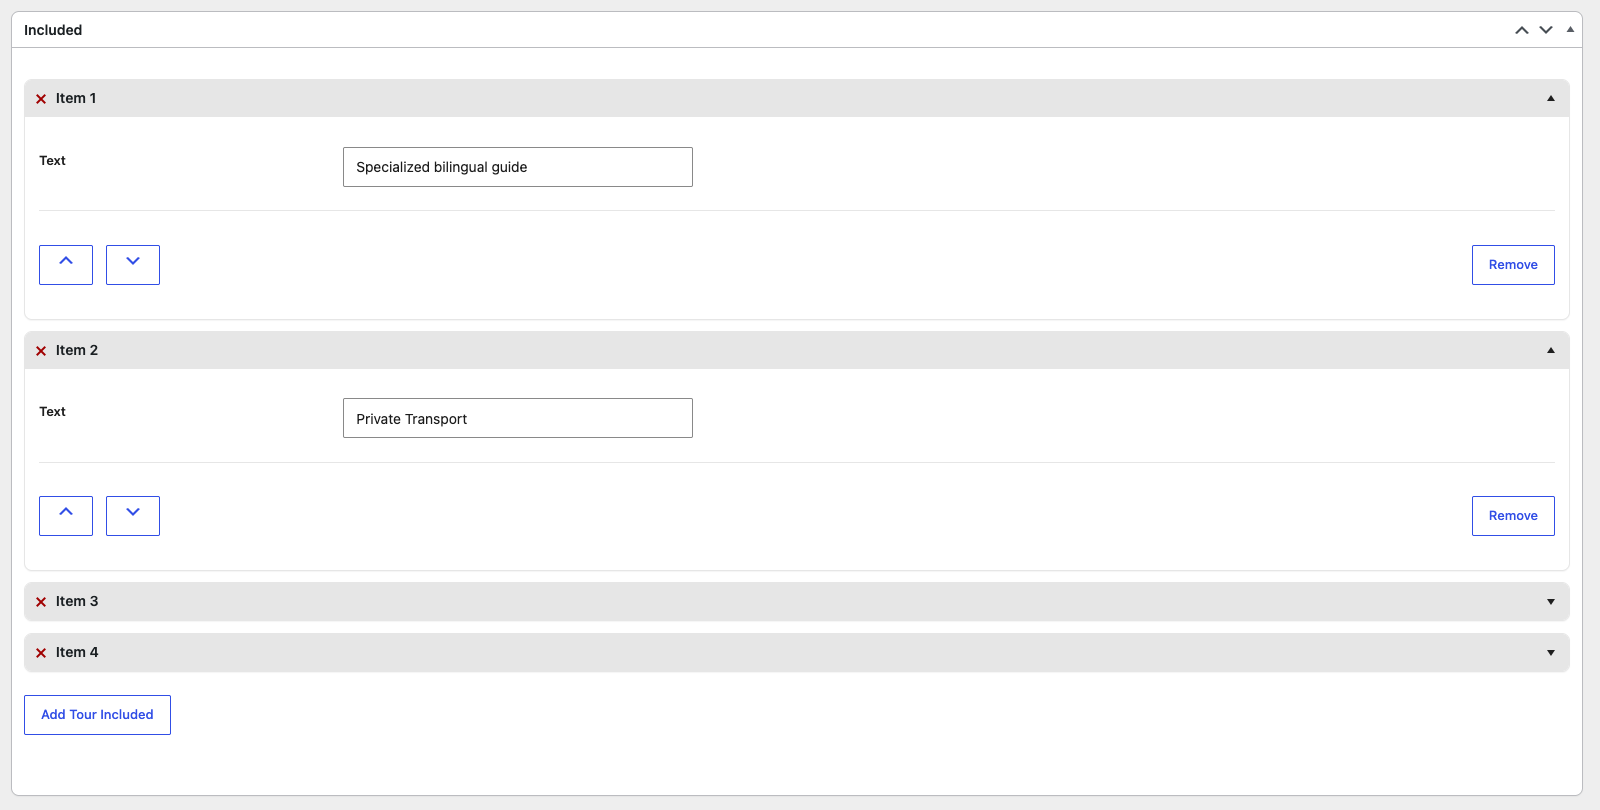
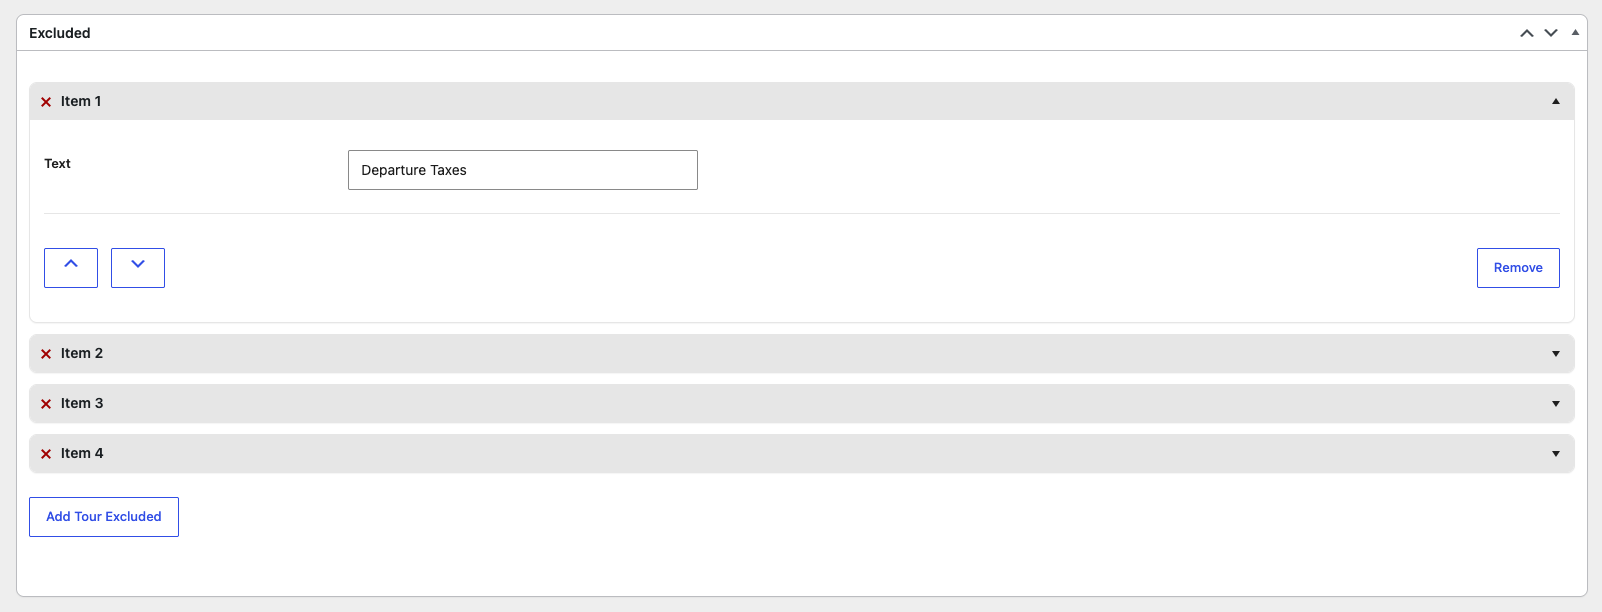
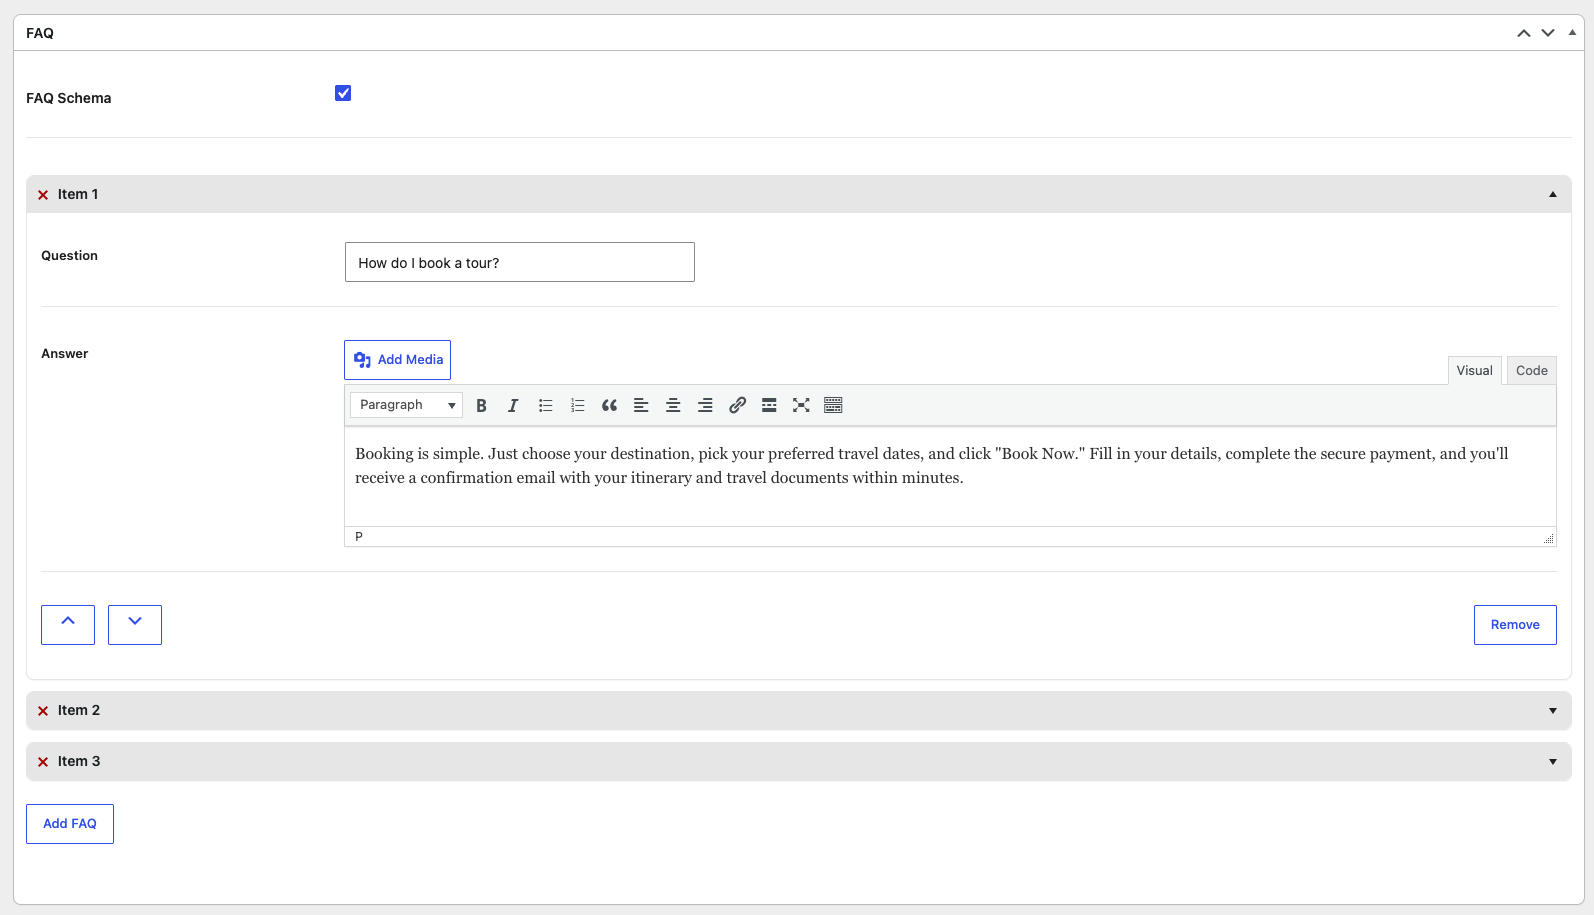
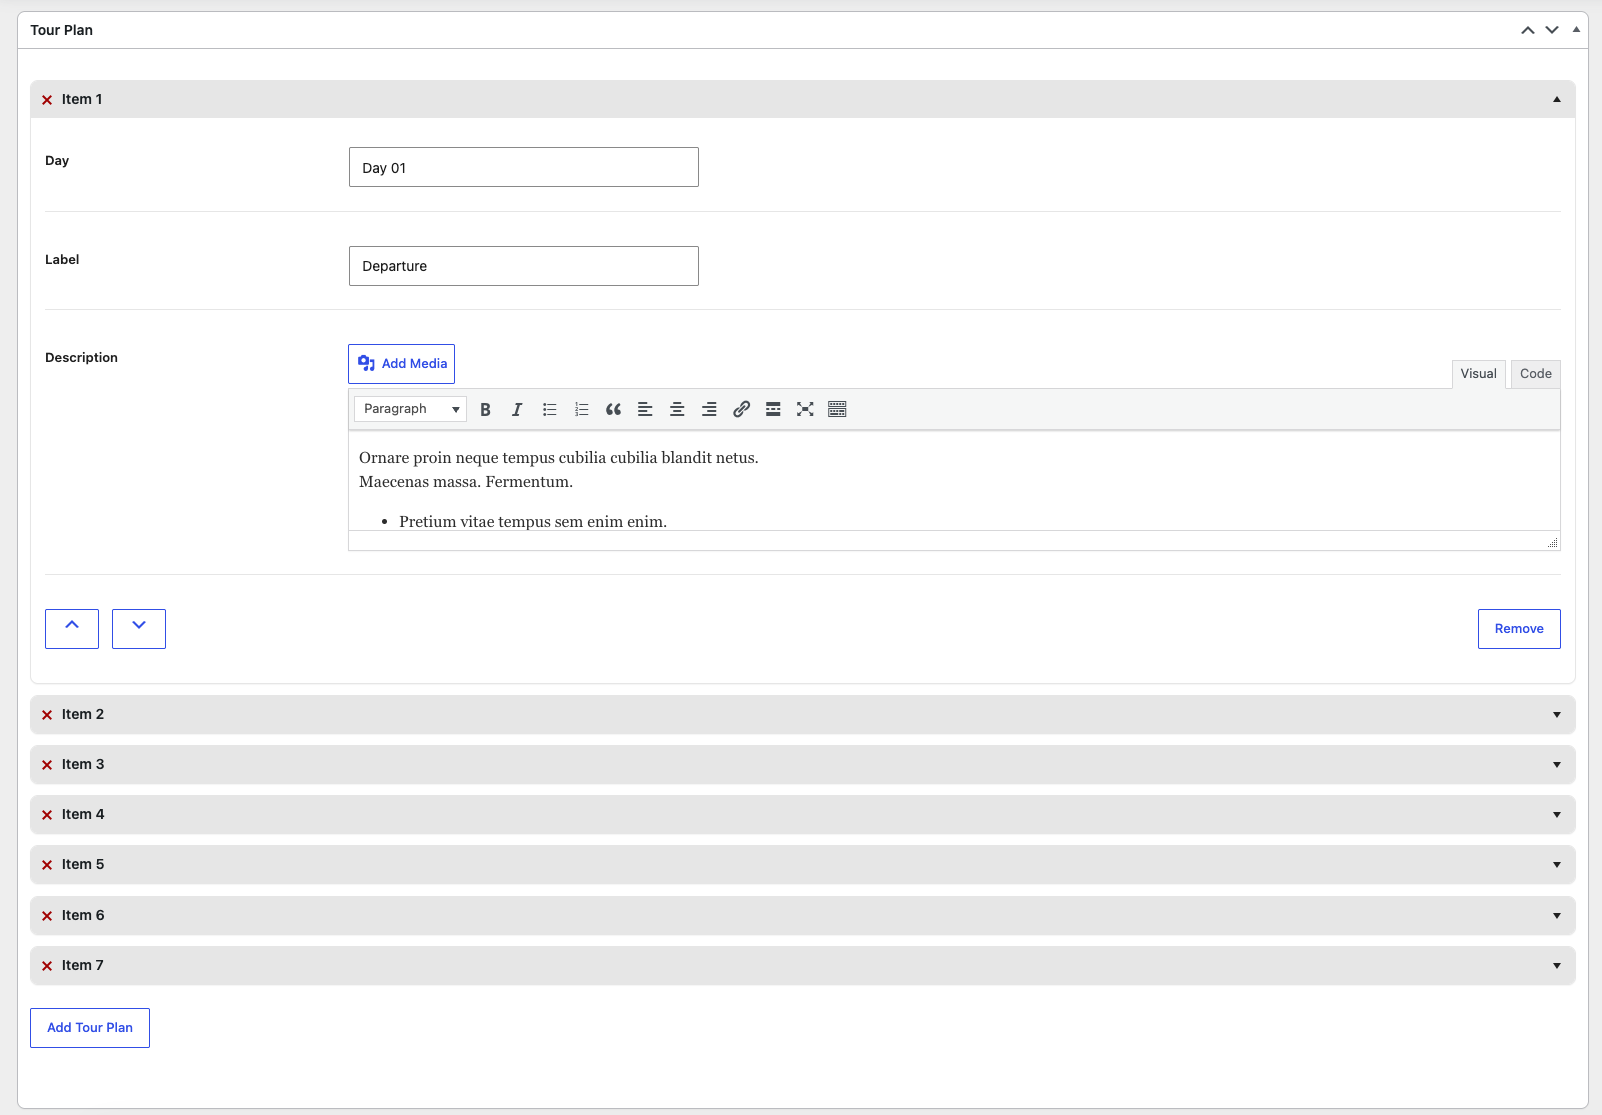
Click any image to view it larger · swipe or use the arrows to browse
· Icomoon — docs.ovatheme.com/tripgo/icomoon/demo.html
· Ovaicon — docs.ovatheme.com/tripgo/ovaicon/font/ovaicon.html
5.7 · Sync bookings (per tour)
Sync bookings keeps this tour’s availability in step with external platforms (Airbnb, Booking.com, VRBO, Google Calendar, etc.) using the standard iCalendar (.ics) format — in both directions. Enable it globally first at WooCommerce → Settings → Booking Tours → Sync booking (§4.5); a Sync bookings tab then appears on each tour with two fields:
| Field | What it does |
|---|---|
| Export calendar link | An auto-generated, read-only .ics URL for this tour. It updates automatically whenever an order is placed or cancelled. Copy it and paste it into another platform’s “import calendar” field. |
| Import calendar link | Paste one or more .ics URLs from other platforms; use + / − to add or remove rows and ↺ to force an immediate sync. The plugin otherwise syncs these links on a WordPress cron schedule. |
Export — send your dates out
Copy this tour’s export link and paste it into the other platform (e.g. in Airbnb: Calendar → your listing → Availability → Connect calendars → Connect to another website), then name and add it. That platform will block the matching dates. Example: a booking on your site from Apr 1–3 blocks Apr 1–2, and those show as blocked on the other platform too.
Import — pull other platforms’ dates in
Copy the .ics link from the other platform’s calendar and paste it into the Import field, then save (syncing starts on save; use ↺ for an instant sync). Tripgo creates blocking orders for the imported dates, so those dates become unavailable on your site too — e.g. if Apr 10 is blocked on Airbnb, it also shows as blocked on your tour.
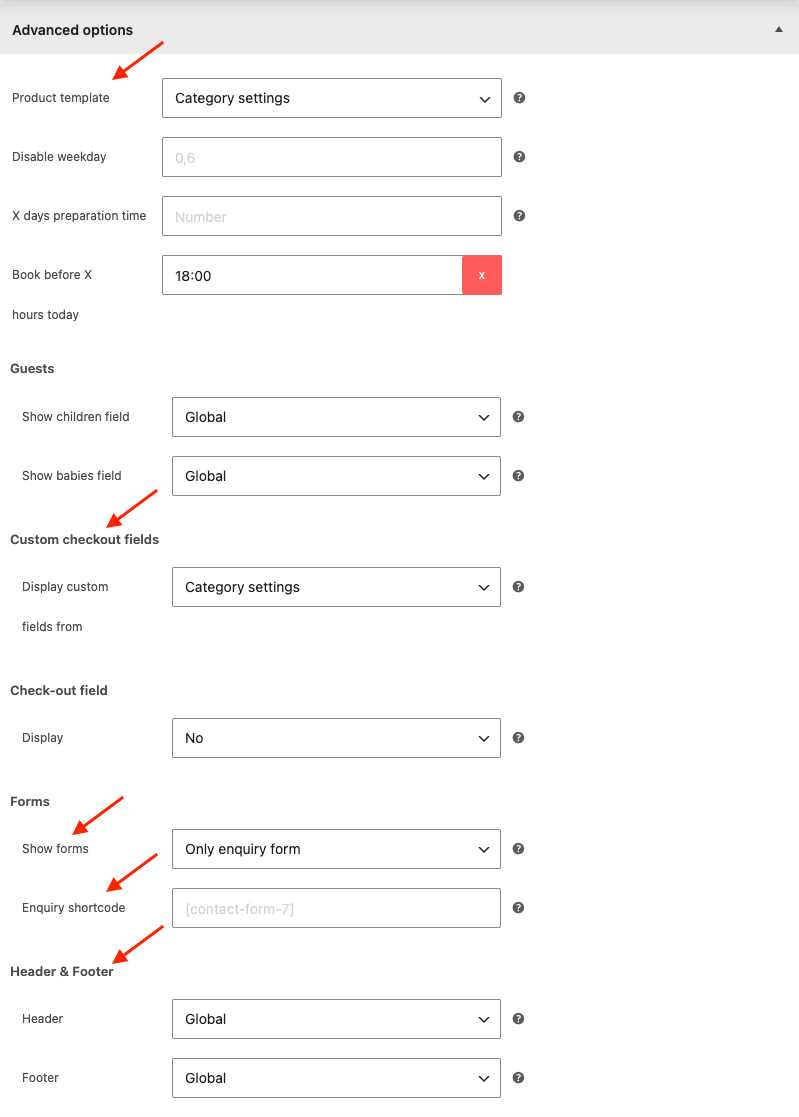
5.8 · Map, template & forms (per tour)
| Field | Description | Relationship |
|---|---|---|
| Short address | Text label for the location | — |
| Show map / Latitude / Longitude | Pin the tour on a Google Map | Needs the global Google Maps API Key |
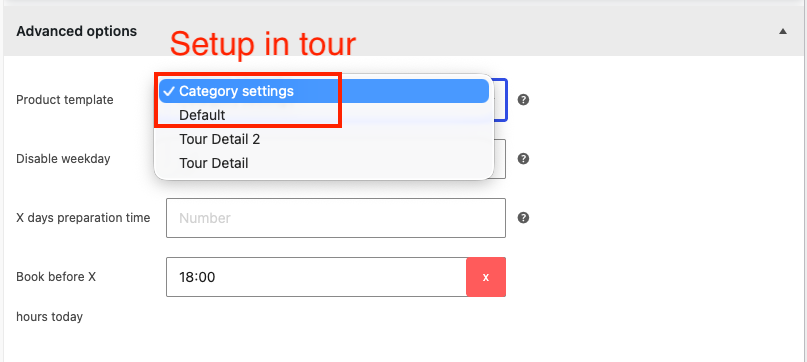
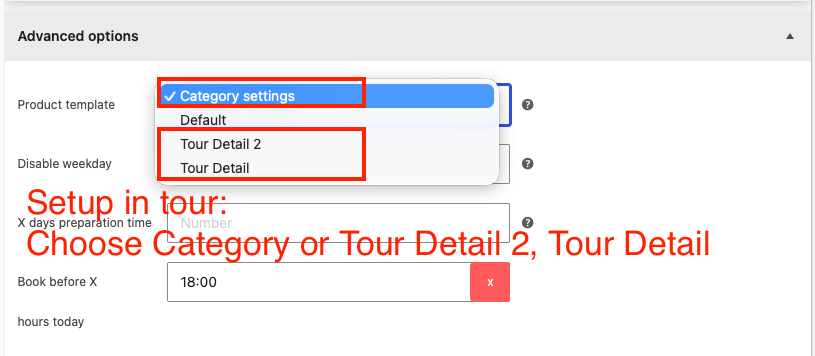
| Product template | Choose Default or an Elementor template for this tour’s single page — see 5.8 | Falls back to the global default Product template |
| Display custom checkout fields | Use the global custom checkout fields or define this tour’s own | The global set is managed at Tripgo → Custom checkout field (left admin sidebar) |
| Show forms | Which of Booking / Request / Enquiry appear on this tour | Overrides the global Product details toggles |
| Enquiry shortcode | Custom shortcode used for the enquiry form | — |
| Header / Footer | Assign a specific builder header/footer to this tour | Built with ova-framework HF Builder |
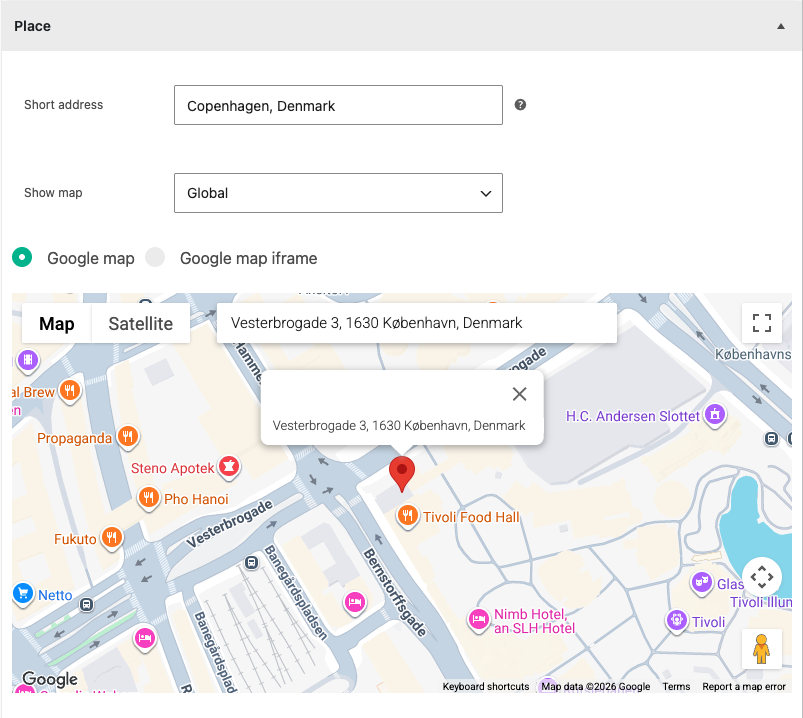
Click any image to view it larger · swipe or use the arrows to browse
5.9 · Tour detail template — Default vs Elementor
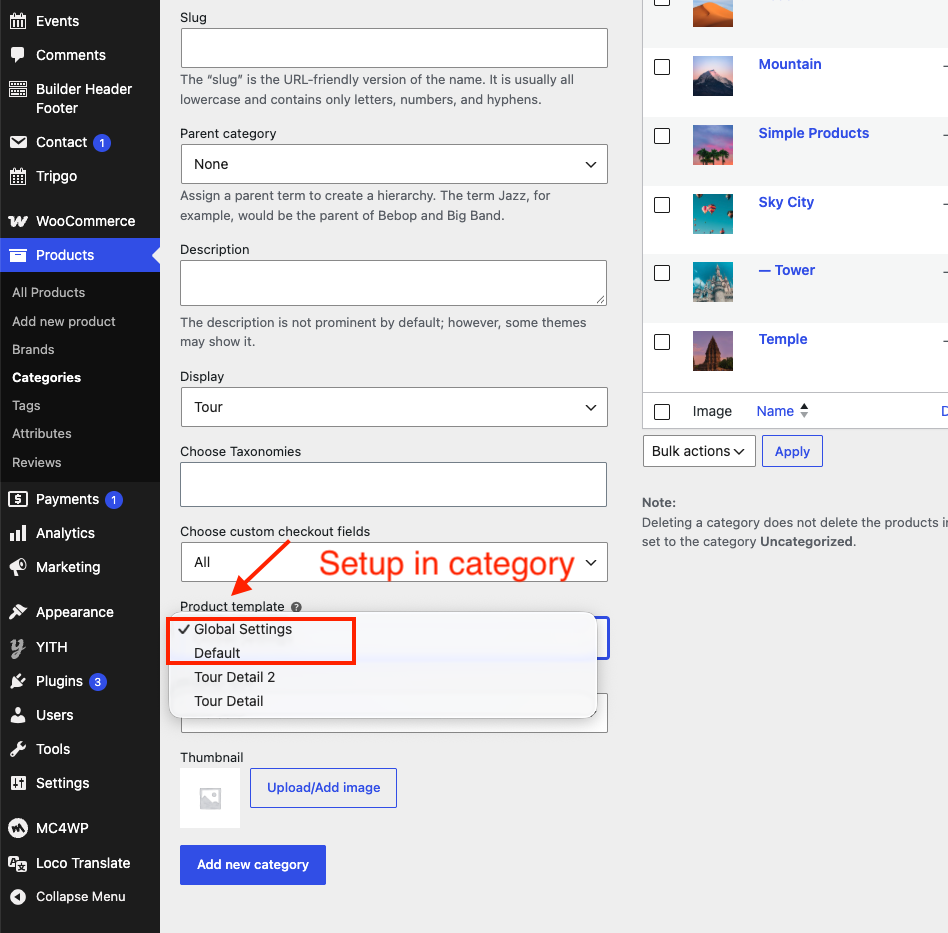
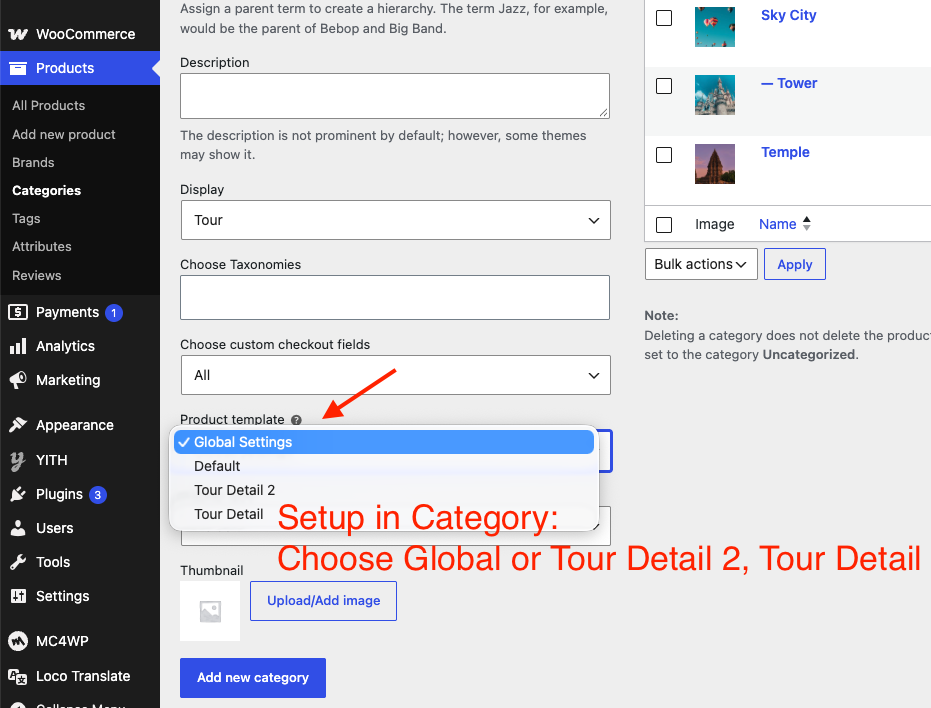
Every tour’s single page is drawn by a Product template. You have two ways to control what it shows, chosen by the Product template value (set per tour in 5.8, per category, or globally in §4.2). Per-tour overrides category, which overrides the global default.
A · Default template — toggle fields in the Customizer
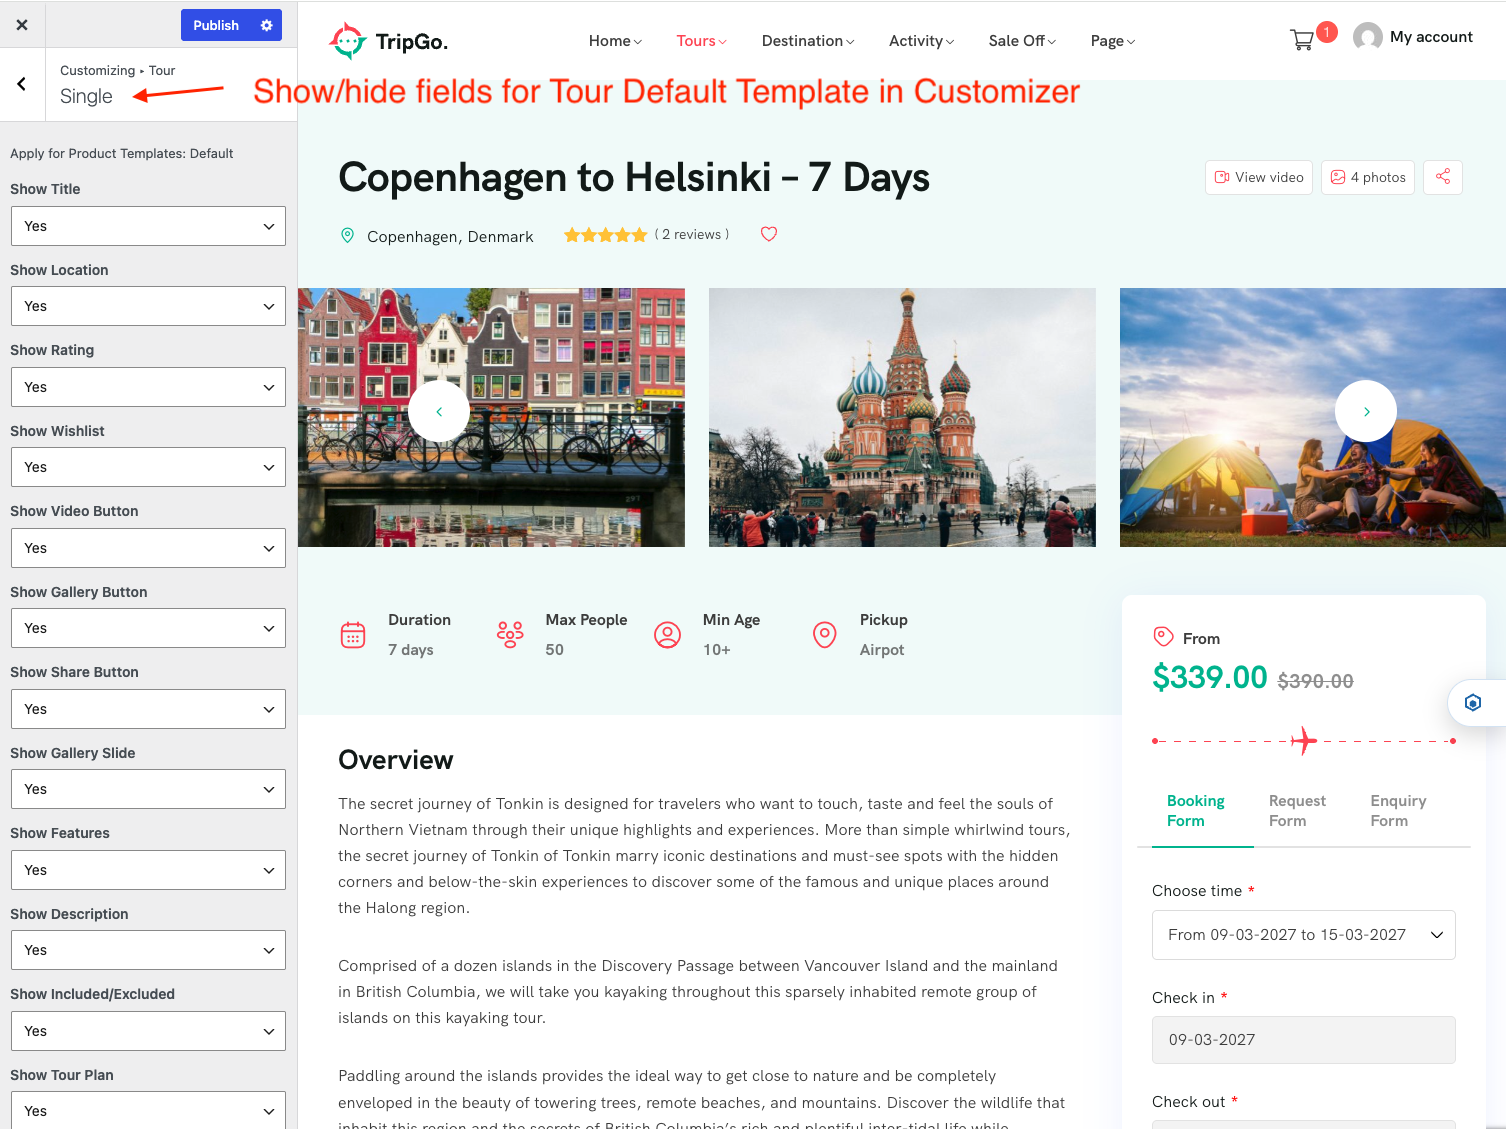
When the template is Default, the layout is the theme’s built-in tour page and you turn individual blocks on/off at Appearance → Customize → Tour → Single. These toggles are labelled “Apply for Product Templates: Default” — they only affect the Default template. You can show/hide:
TitleLocationRatingWishlistDescriptionGallery SlideGallery ButtonVideo ButtonMapFeaturesIncluded/ExcludedTable PriceTour PlanFAQFormReviewsRelatedShare Button
So to hide something (e.g. Reviews or Related tours) on every Default-template tour, just switch its toggle off here — no page building needed.
Click any image to view it larger · swipe or use the arrows to browse
B · Elementor template — build your own layout
When you want full control of the design, use a template built with Elementor instead of the Default one:
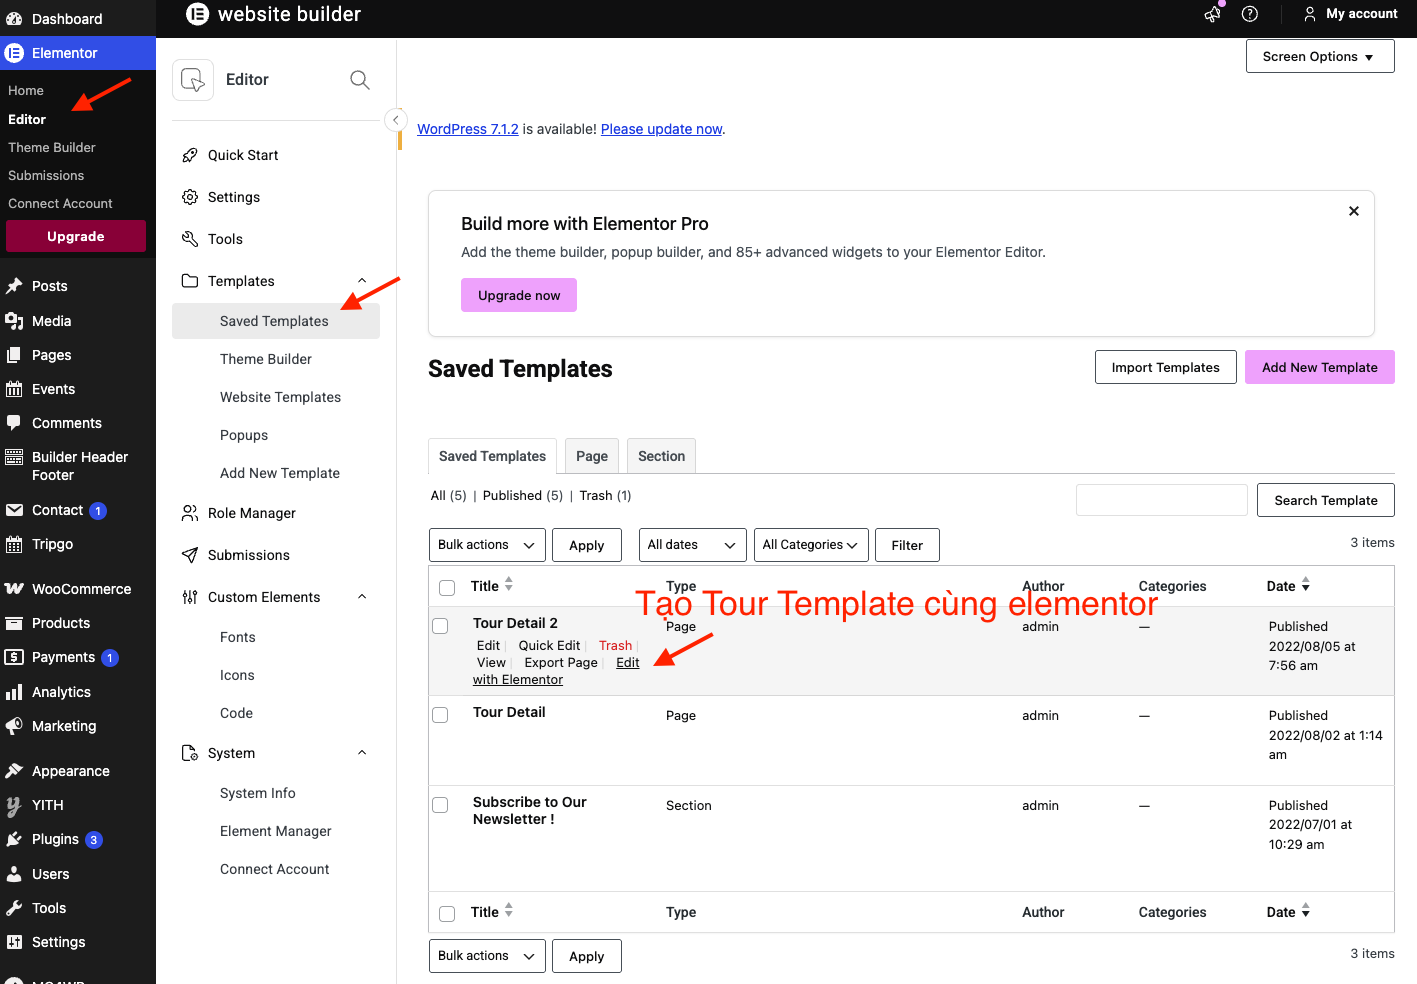
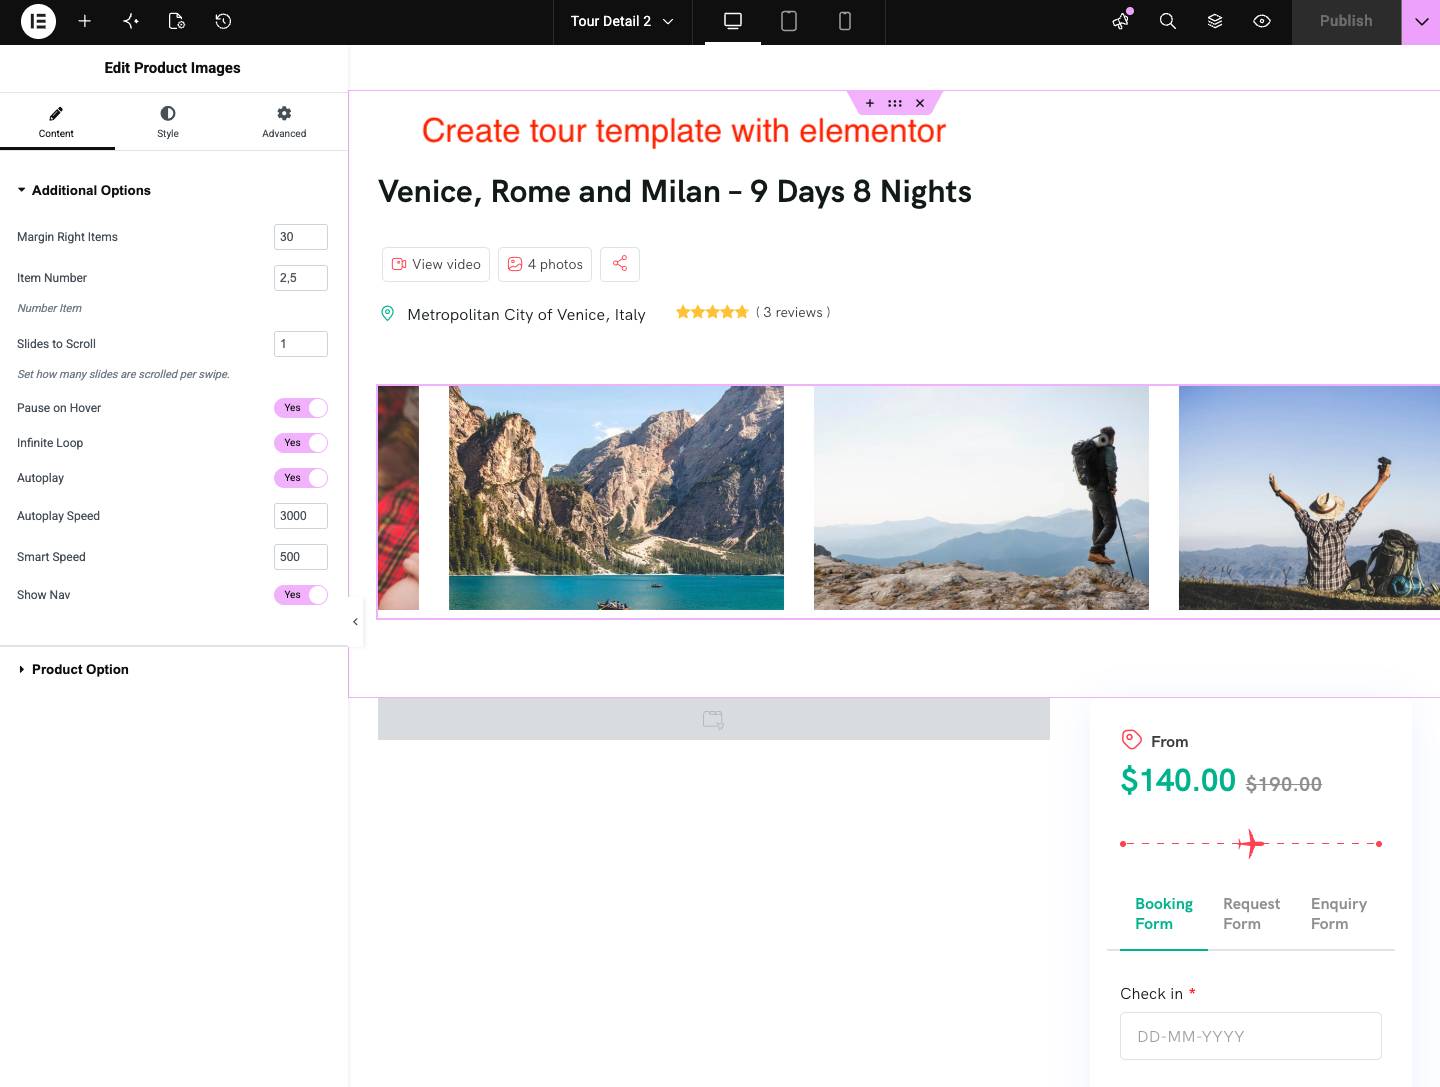
- Create the layout in Elementor (a saved template / Theme Builder single) and design it with the booking widgets — Product Title, Short Description, Product Content, Product Images, Video & Gallery, Product Forms, Product Price Table, Product Plan, Features, Included/Excluded, FAQ, Product Map, Location & Rating, Product Reviews, Unavailable Time (see 7.9).
- Assign that template as the Product template — globally at Booking Tours → Product details, per category (7.1), or on the single tour’s Product template field (5.8).
- What appears is now decided by which widgets you place in the template — the Customizer Tour → Single toggles above no longer apply.
Click any image to view it larger · swipe or use the arrows to browse
6Field ↔ Setting relationship map
This is the key reference: a per-tour field on the left, and the global Booking Tours setting that governs or feeds it on the right.
| Per-tour field (Product editor) | Related global setting (WooCommerce → Booking Tours) | How they interact |
|---|---|---|
| Child / Baby prices & min/max | Guests → Enable children / babies field | Global toggle must be ON for the per-tour fields to appear |
| Guest labels & “price beside” | Guests → Label / Show price beside | Global defines wording & display; tour sets the amounts |
| Insurance amount / type | Booking form → Show insurance, Apply tax, Paid once | Tour sets the value; global controls display, tax & charge frequency |
| Book before X hours today | Booking form → Book before X hours today | Global default; per-tour value overrides it |
| Disable weekday | General → Disable weekdays / Overcome | Global blocks days site-wide; tour + “overcome” can re-open them |
| Date/time pickers, schedule slots | General → Date/Time format, Step time, Language, First day | Global formatting applied to all tour calendars |
| Show map / Latitude / Longitude | General → Google Maps API Key, Zoom, default lat/lng | API key required; defaults used when tour leaves them blank |
| Enable deposit / Deposit type | Deposit + Remaining amount | Tour overrides global default; balance invoice handled globally |
| Display custom checkout fields | Tripgo → Custom checkout field (left admin sidebar) | “Global” uses the shared field set managed there; “This product” uses tour-specific fields |
| Show forms (Booking / Request / Enquiry) | Product details → Show booking / request / enquiry form | Global sets defaults; tour overrides per form |
| Product template | Product details → Product templates | Tour uses its own template, else the global default |
| Resources & services (in cart/checkout) | Booking form → Show resources and services… | Global toggle decides where they’re displayed |
| — (no per-tour field) | Reminder / WhatsApp / Google Calendar / Cancellation / reCAPTCHA | Global-only — apply automatically to every booking |
7.1 · Categories
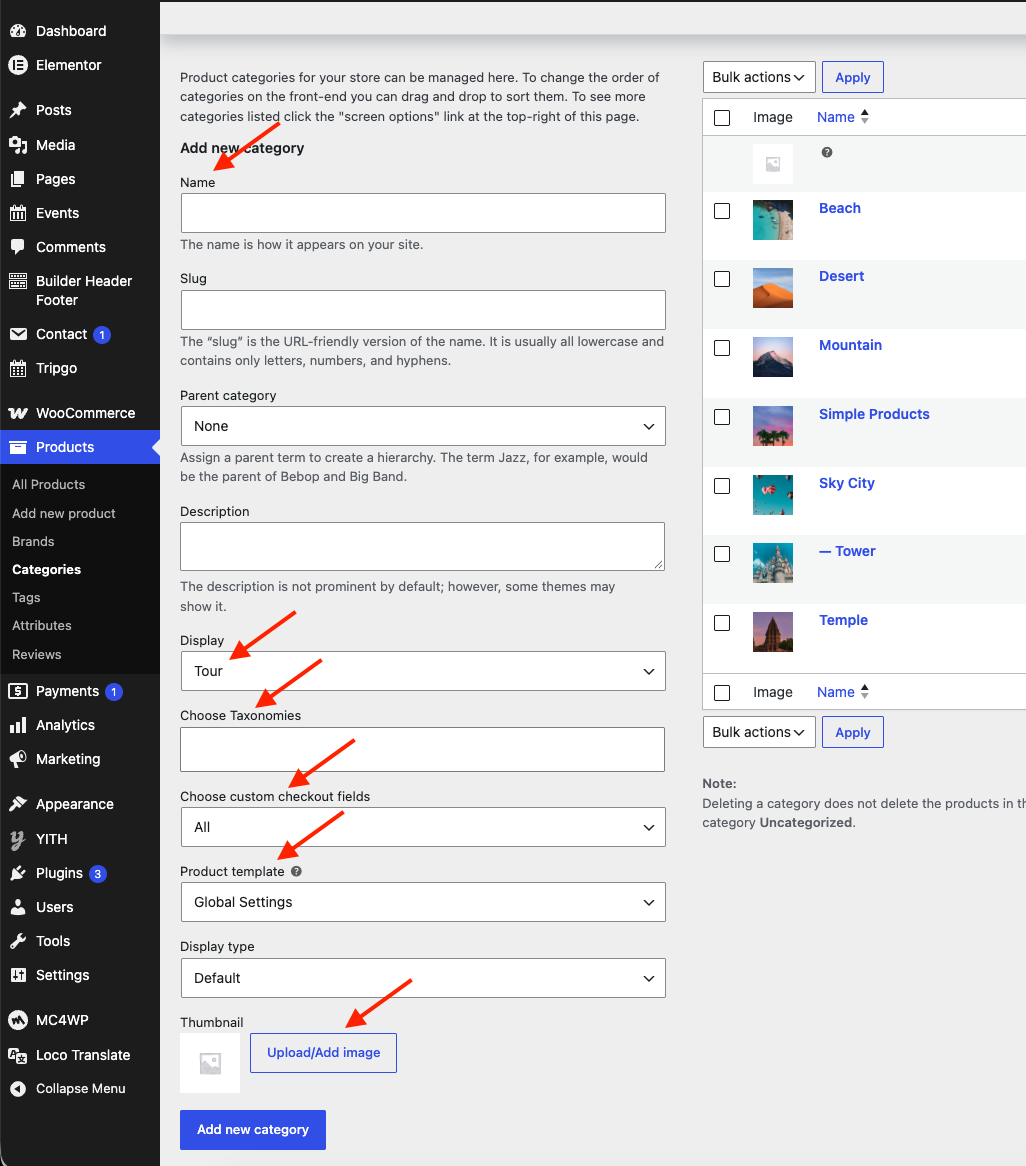
Create and manage the categories your tours are grouped under. Beyond the name and image, each category carries a Global Settings block that sets defaults for every tour in it:
- Product template — the layout used for tours in this category: Default, or a specific Tour / Rental / Shop template (the same template a tour can override in its own settings).
- Choose Taxonomies — which of your custom taxonomies are shown on those tours.
- Choose custom checkout fields — which of the custom checkout fields are collected for tours in this category.
- Display / other fields — pick additional fields to display.
These act as category-level defaults; an individual tour can still override them. Categories also drive the category listings and the search & filter widgets.
Display a category at the frontend
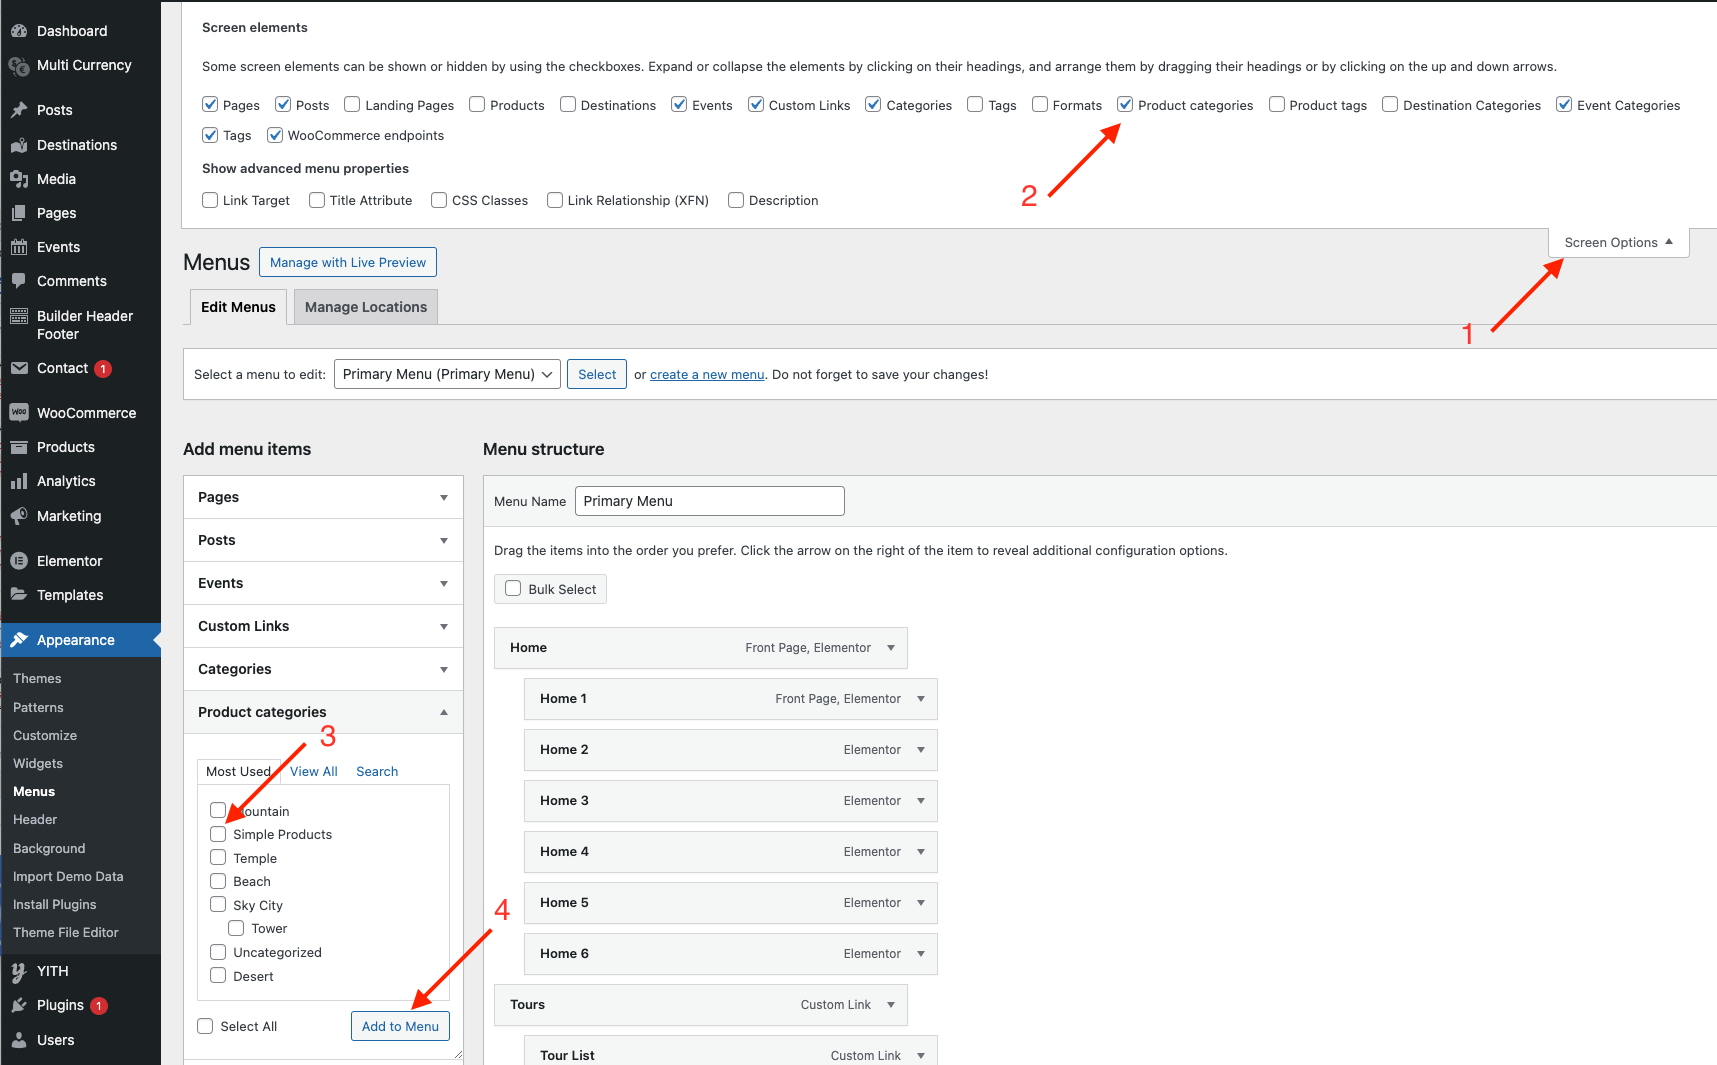
To show a category to visitors, add it to a menu (Appearance → Menus) or link straight to it: https://your-domain/product-category/slug-category/ (the product-category slug can be changed in WooCommerce settings). Which fields appear on the category/archive page is controlled at Appearance → Customize → Tour → Archive.
Customize Template
You can customize the Shop and Category layouts safely in the Tripgo Child Theme: activate tripgo-child, then copy the template file you want to change from the parent into the child, keeping the same path — e.g. themes/tripgo/woocommerce/rental/content-item-product.php → themes/tripgo-child/woocommerce/rental/content-item-product.php — and edit the copy.
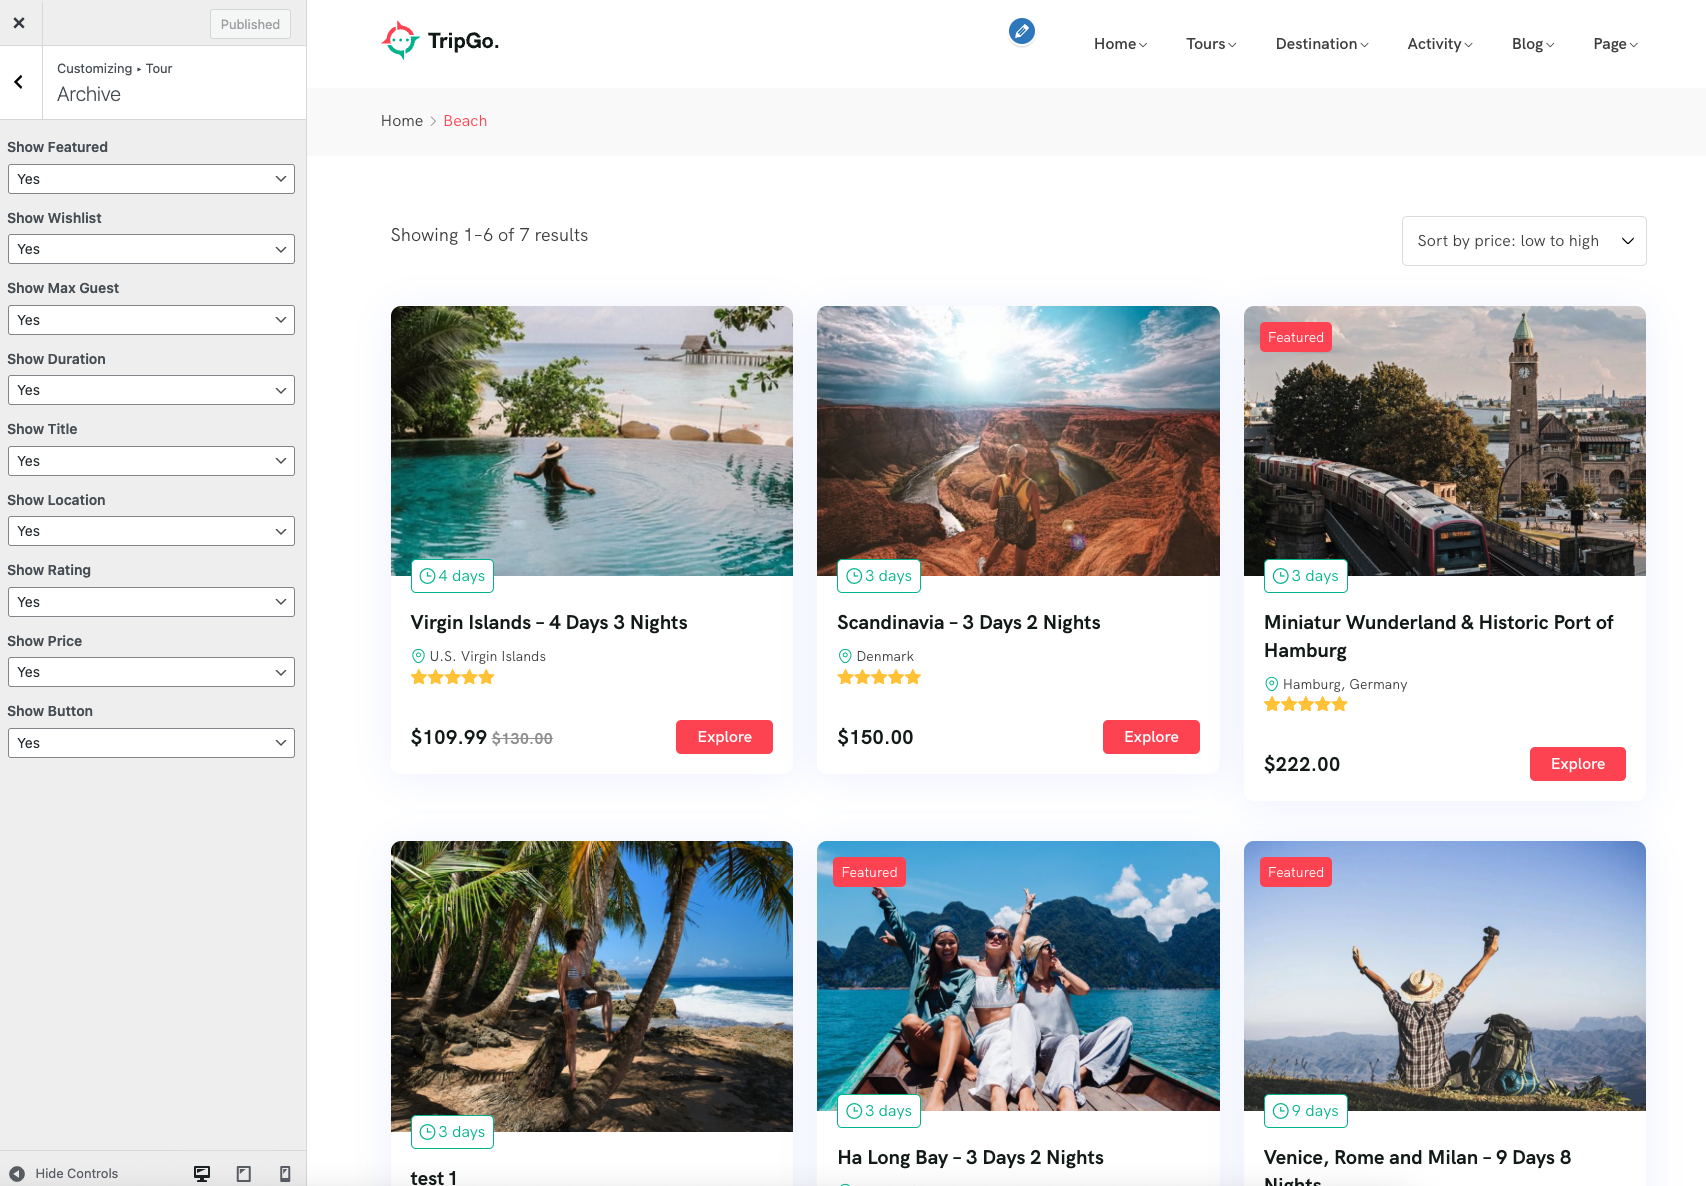
Click any image to view it larger · swipe or use the arrows to browse
7.2 · Destinations
Manage the destinations (places) that tours link to — powered by the Ovatheme Destination plugin. A tour is linked through its Destination field, so visitors can browse “tours in this destination”.
7.2.1 · Create Destination
Go to Tripgo → Destinations → Add new Destination. Each destination is its own record with a title, featured image, description and content blocks (Info, Sights, Tour details), a sort order, and a map location (uses the Google Maps key from §4.1). On the frontend a single destination can use Template 1 or Template 2 (switched in the Destinations settings). To customize a template, copy plugins/ova-destination/templates/single-destination-template1.php (or …-template2.php) into themes/tripgo-child/ovadestination-templates/ and edit the copy.
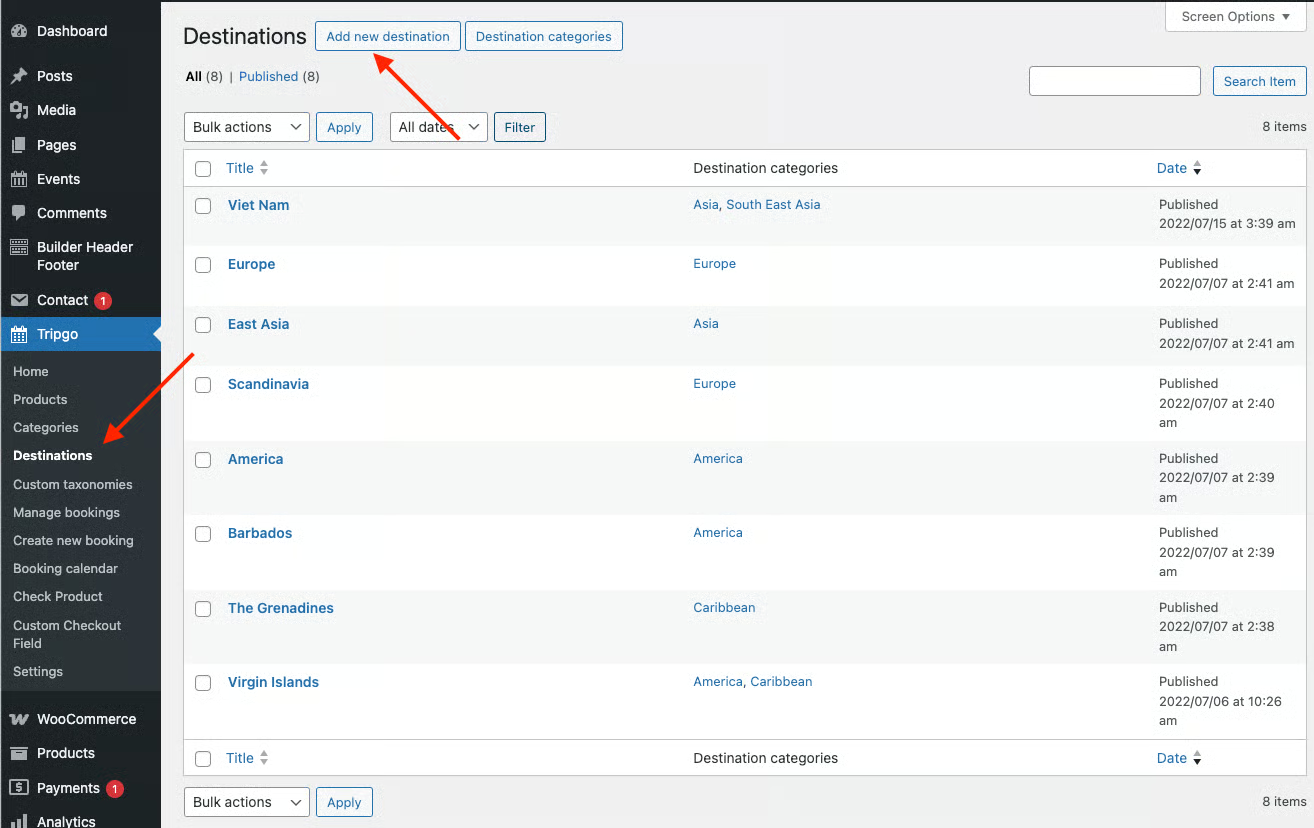
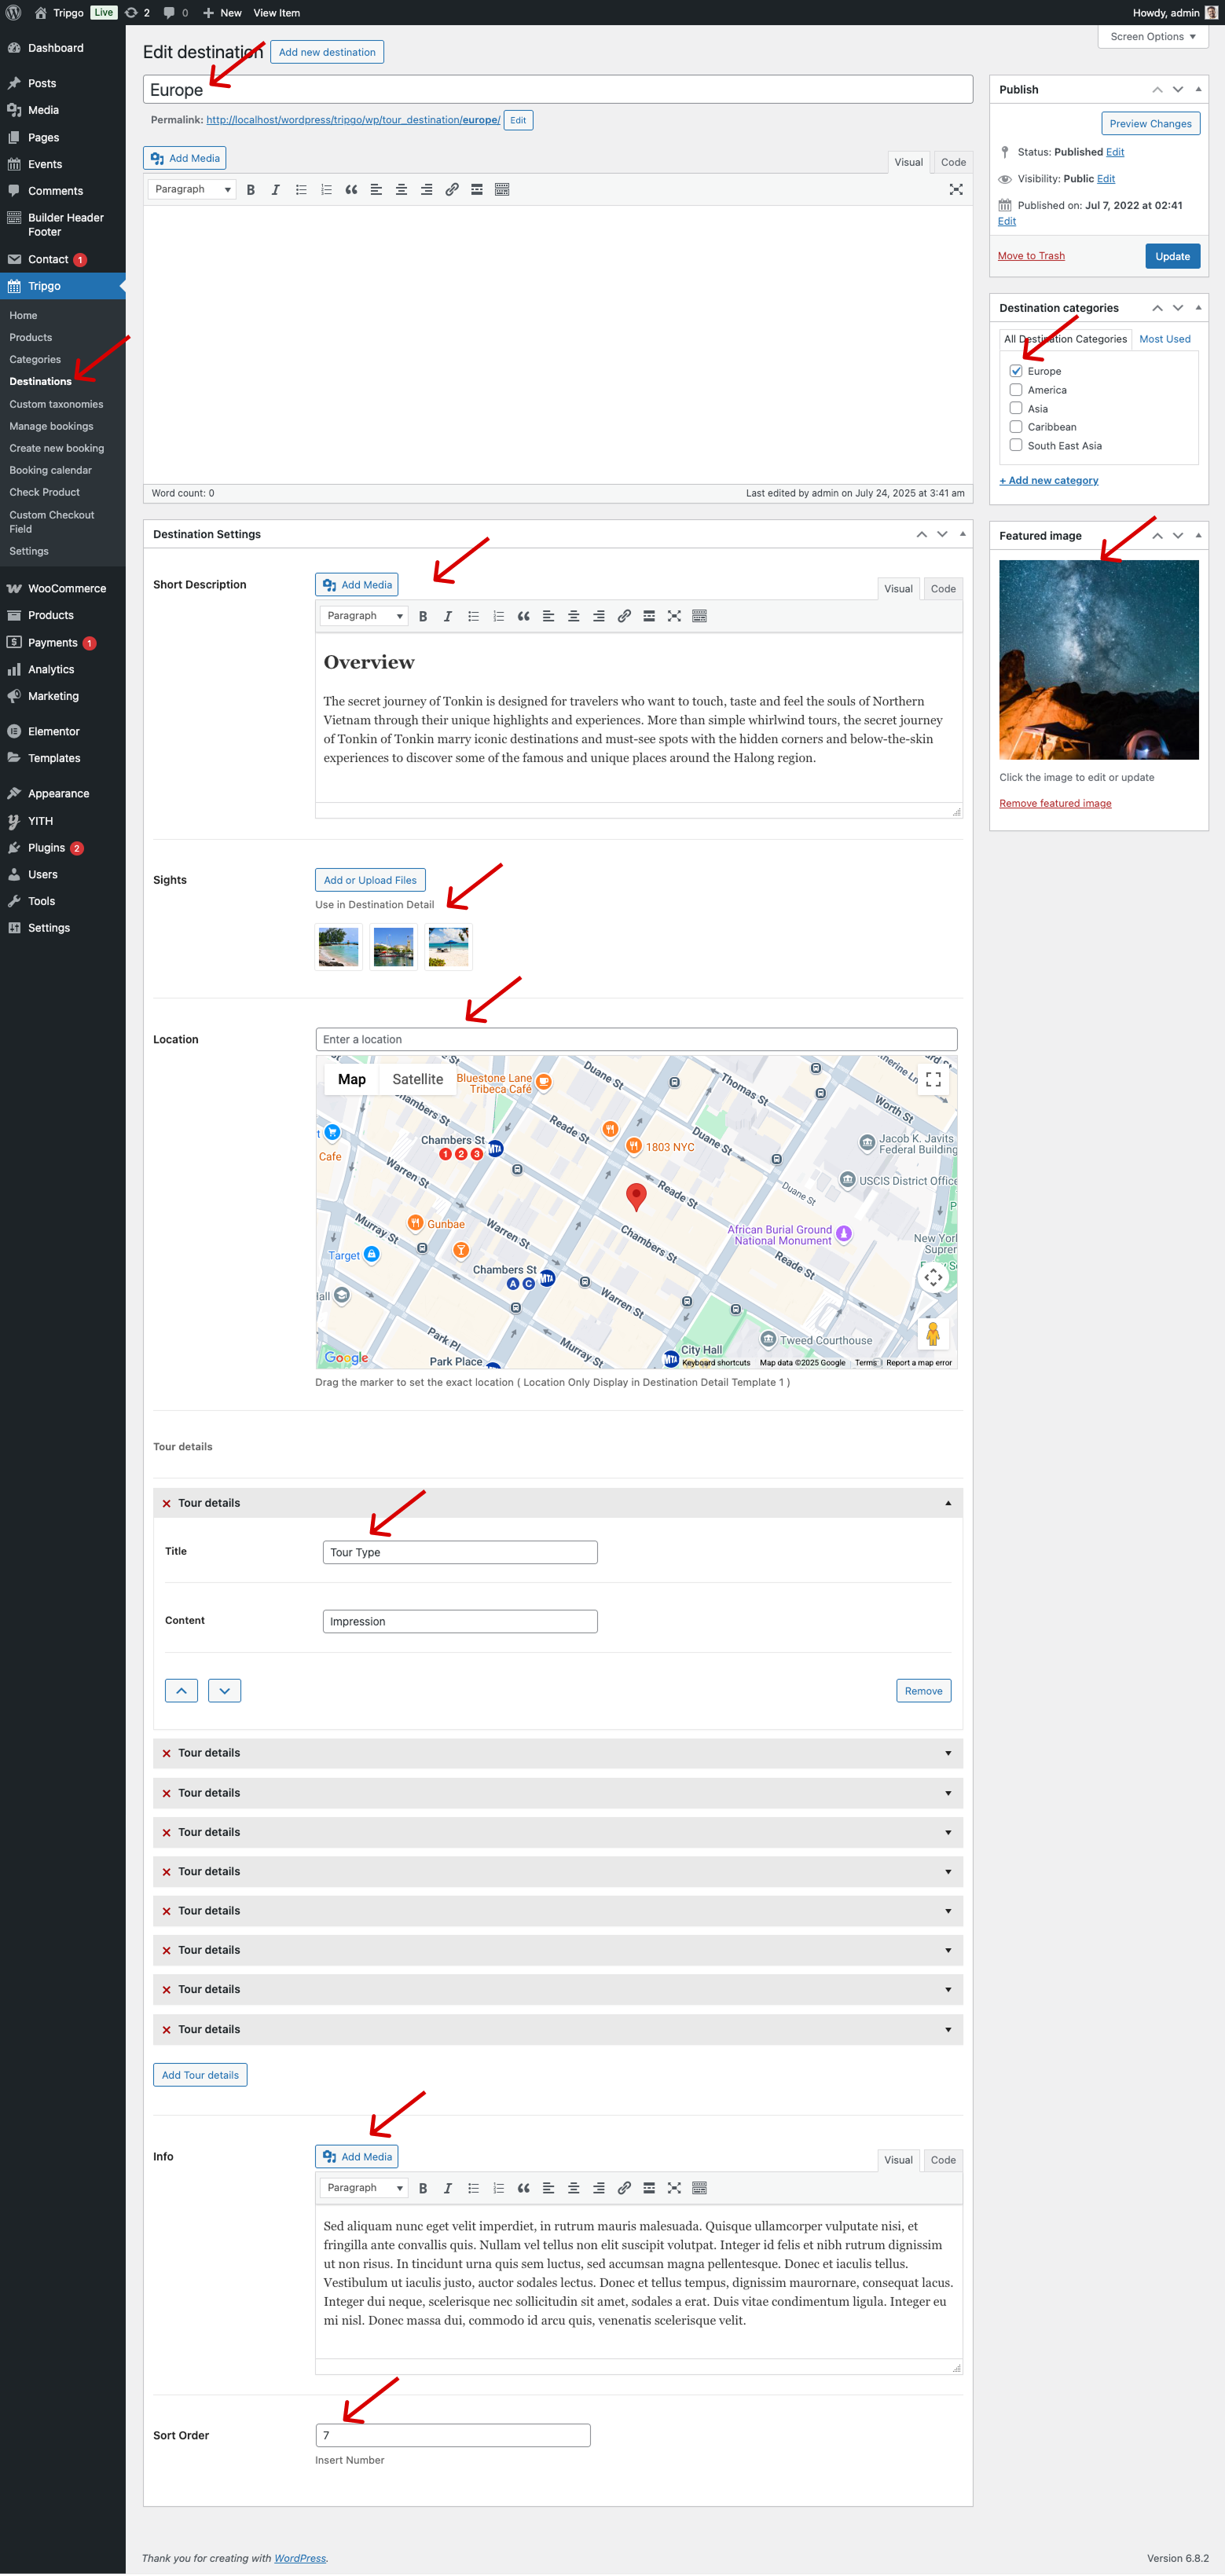
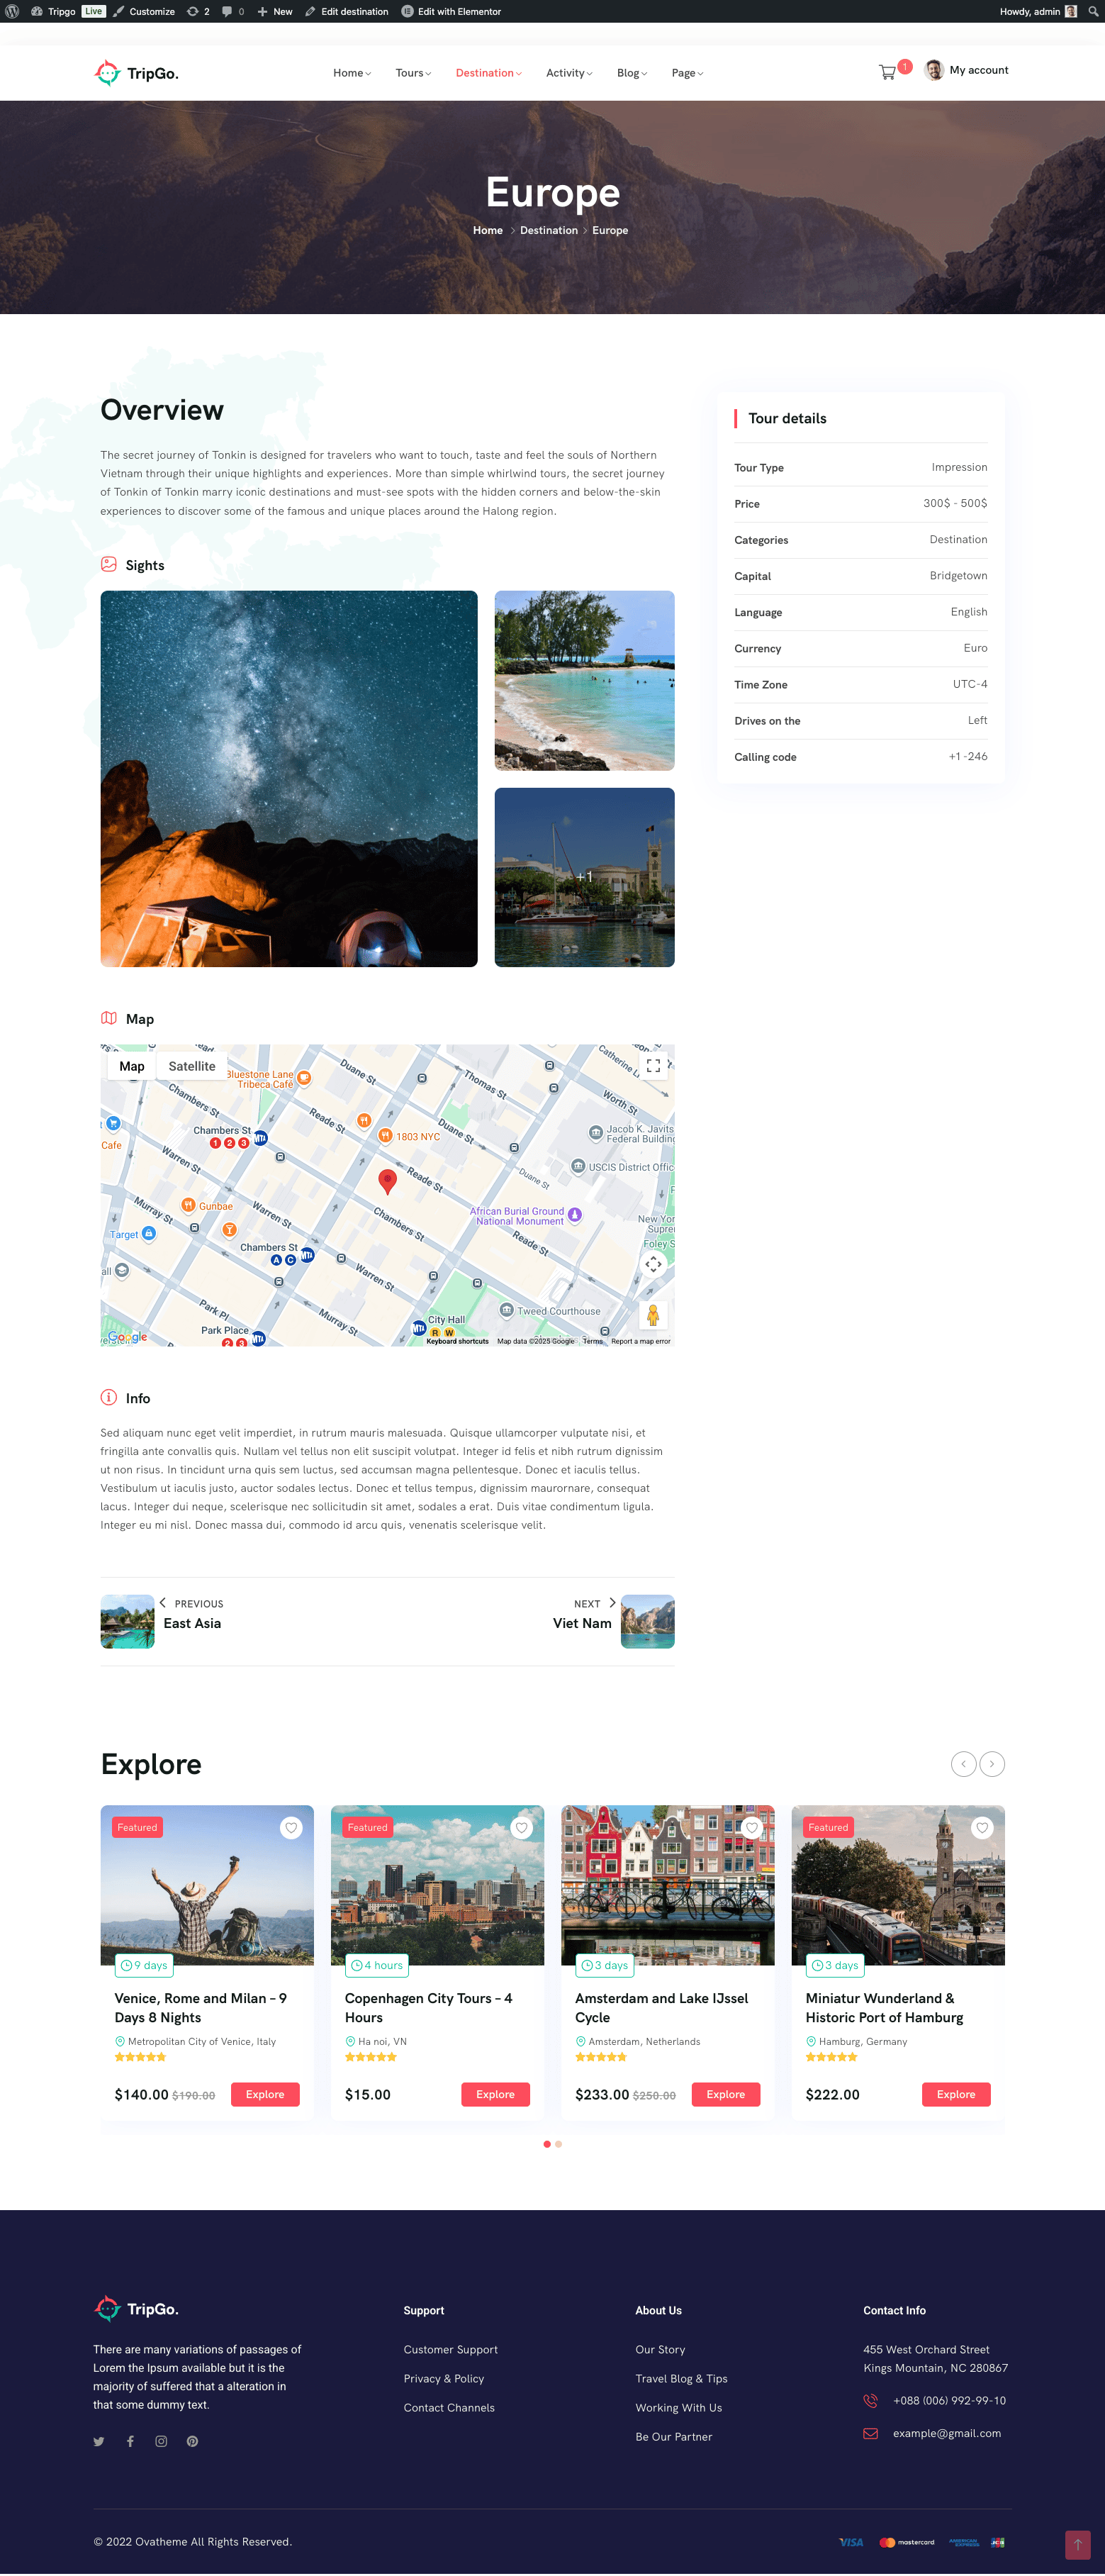
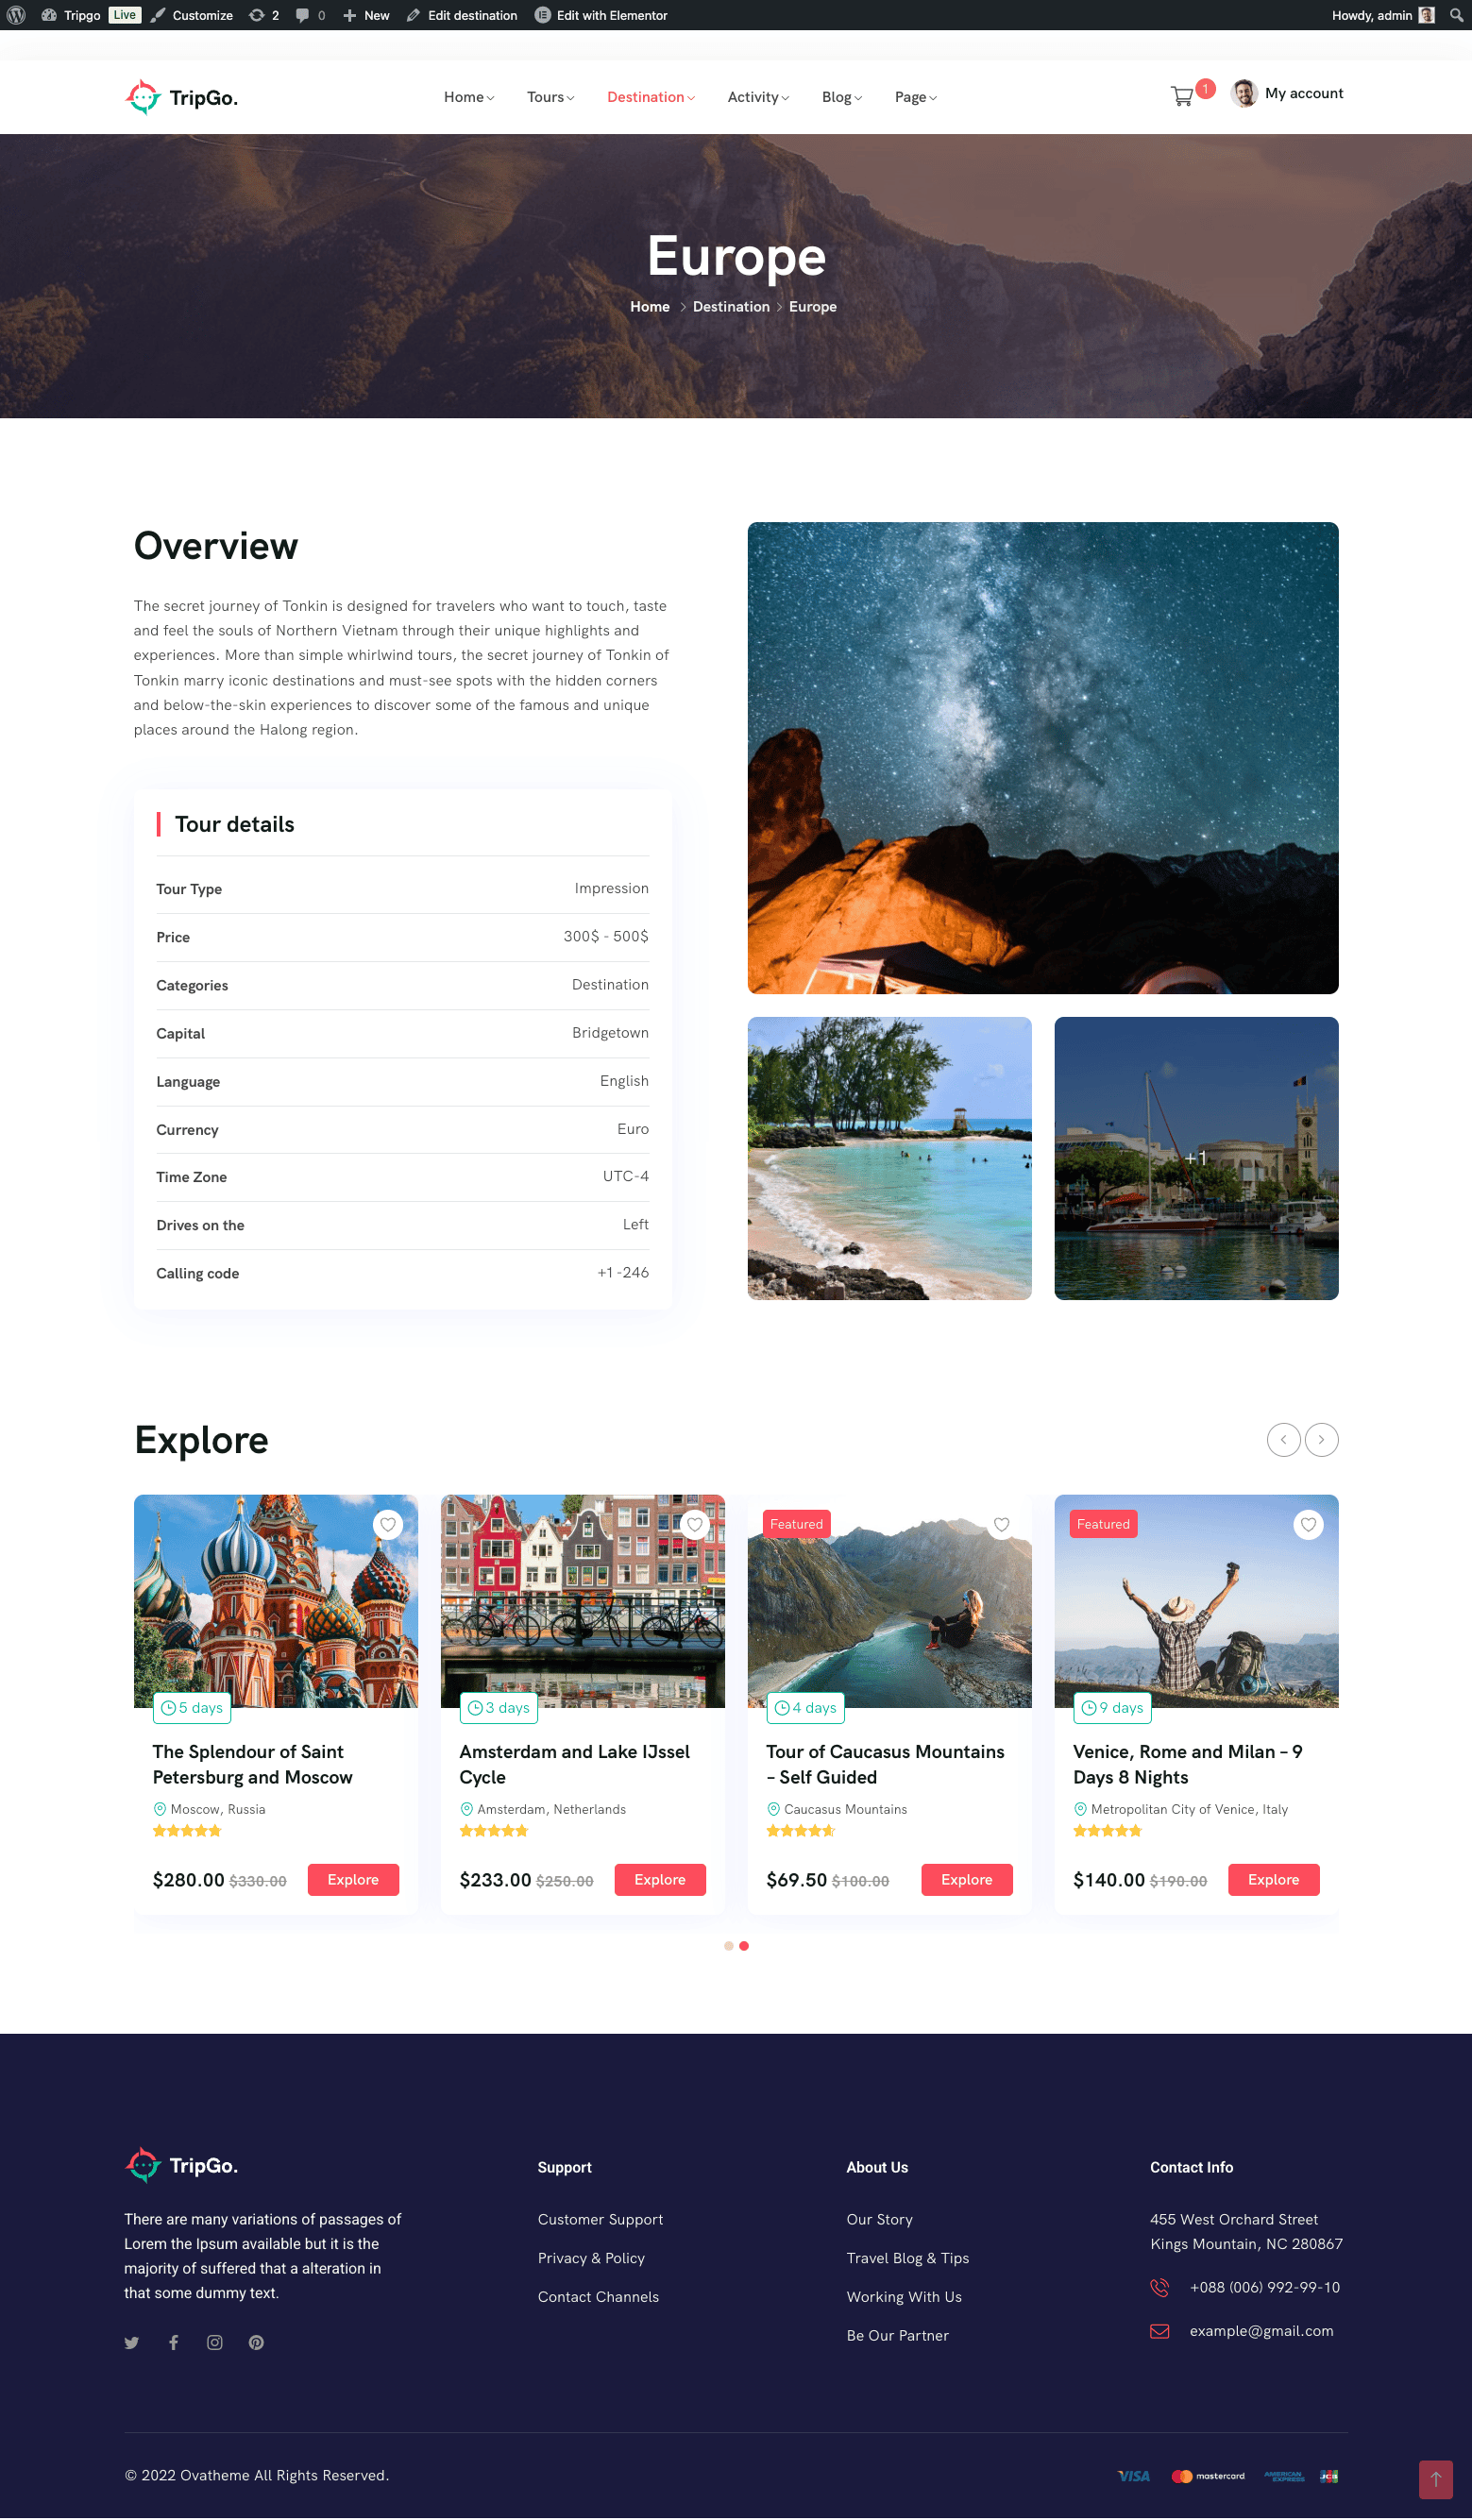
Click any image to view it larger · swipe or use the arrows to browse
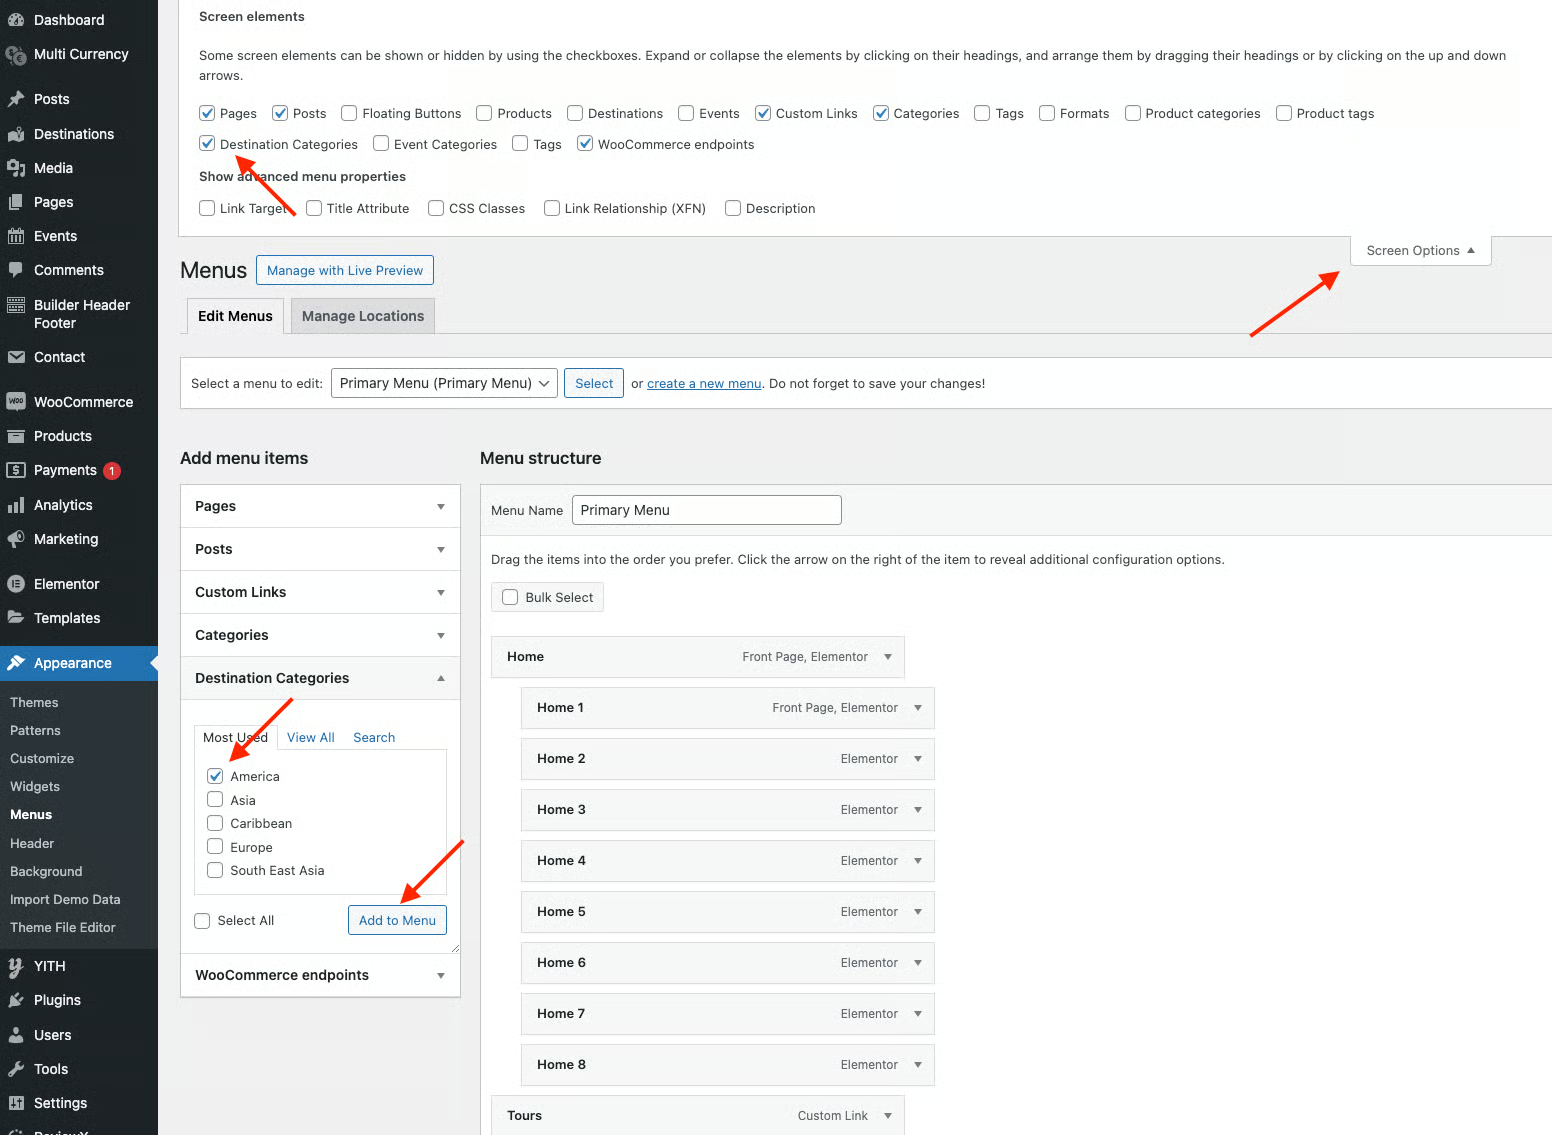
7.2.2 · Create Destination Category
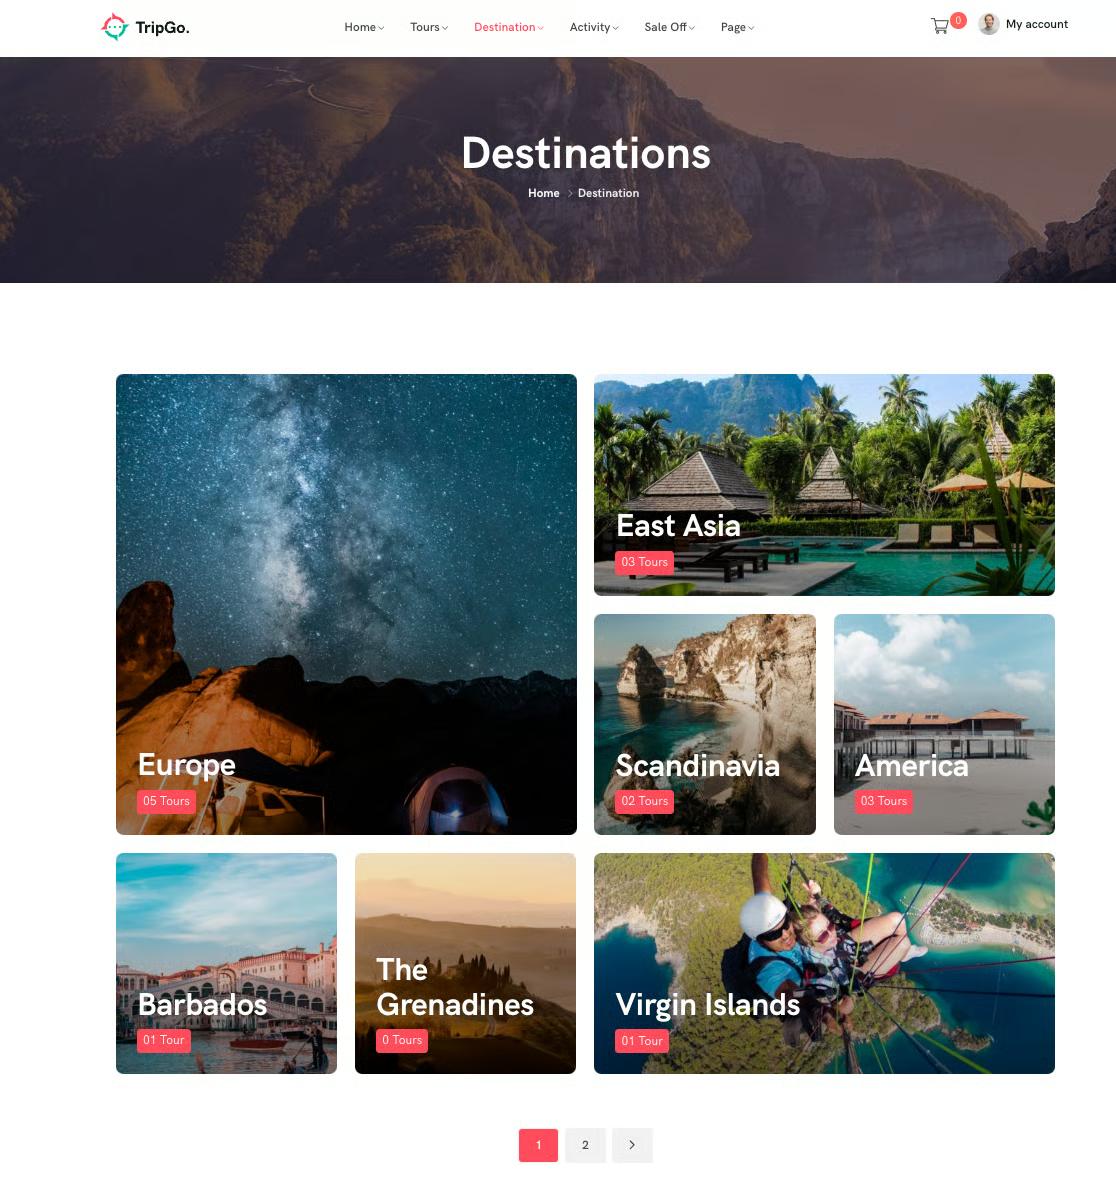
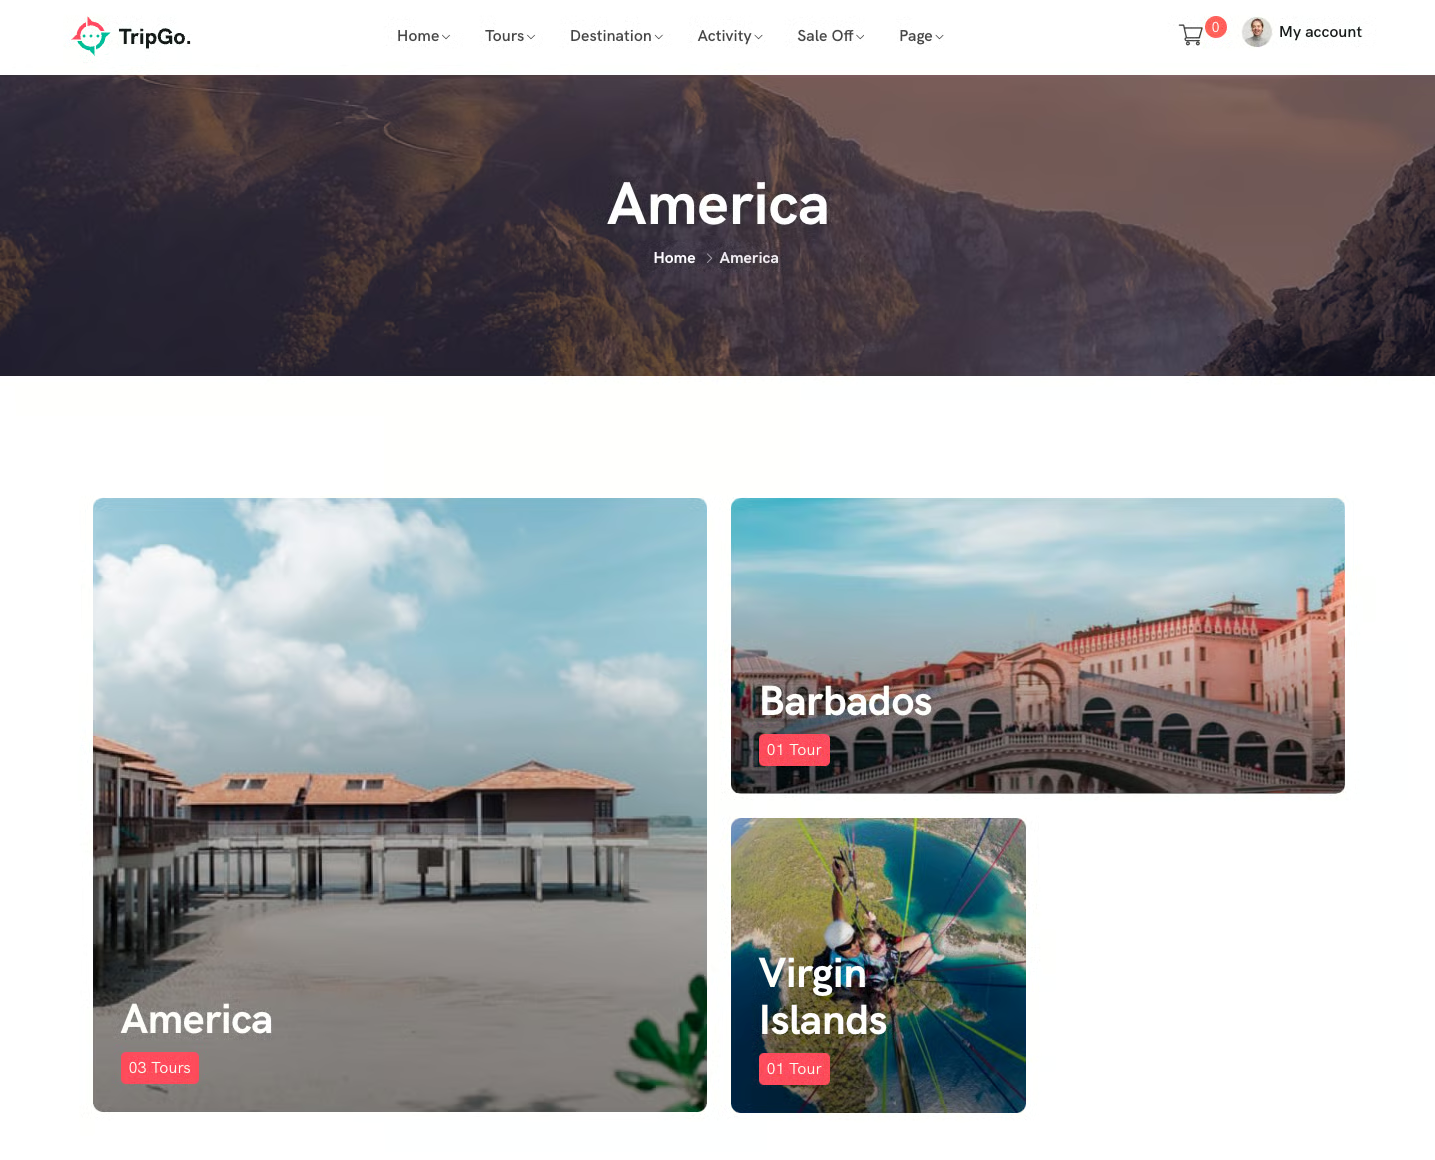
Group destinations at Tripgo → Destinations → Destination categories. To show them on the site, add custom-link menu items: the whole archive at /tour_destination, or a single category at /cat_destination/slug-category/ (both slugs can be renamed with Loco Translate). The listing template is chosen at Appearance → Customize → Destinations → Archive. Customize it by copying plugins/ova-destination/templates/archive-destination.php into themes/tripgo-child/ovadestination-templates/.
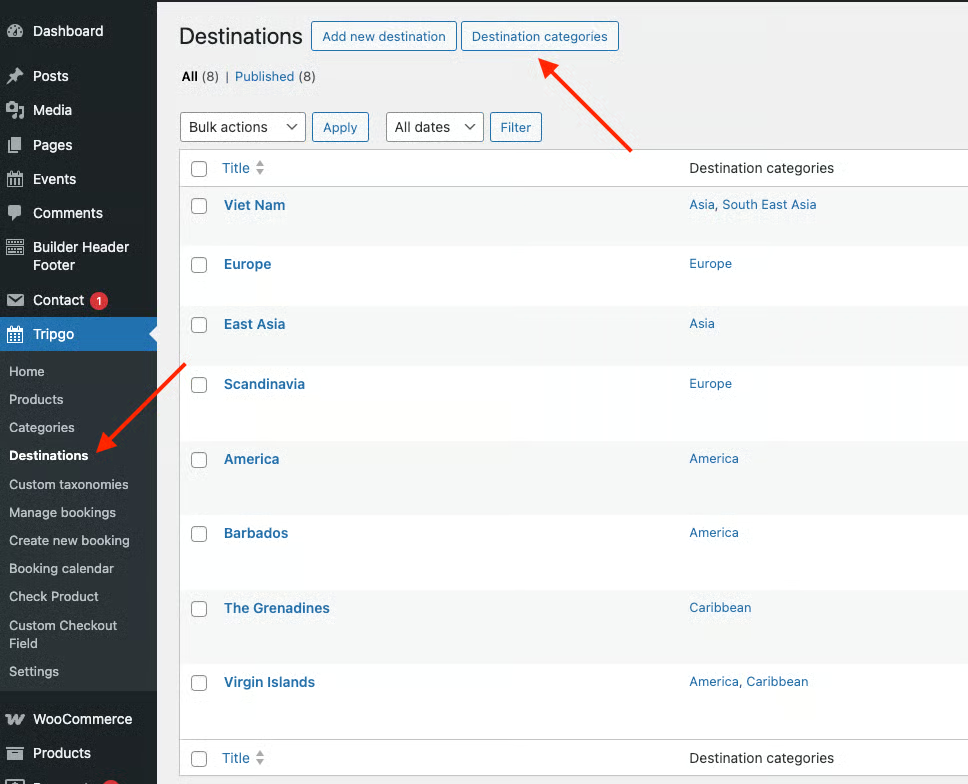
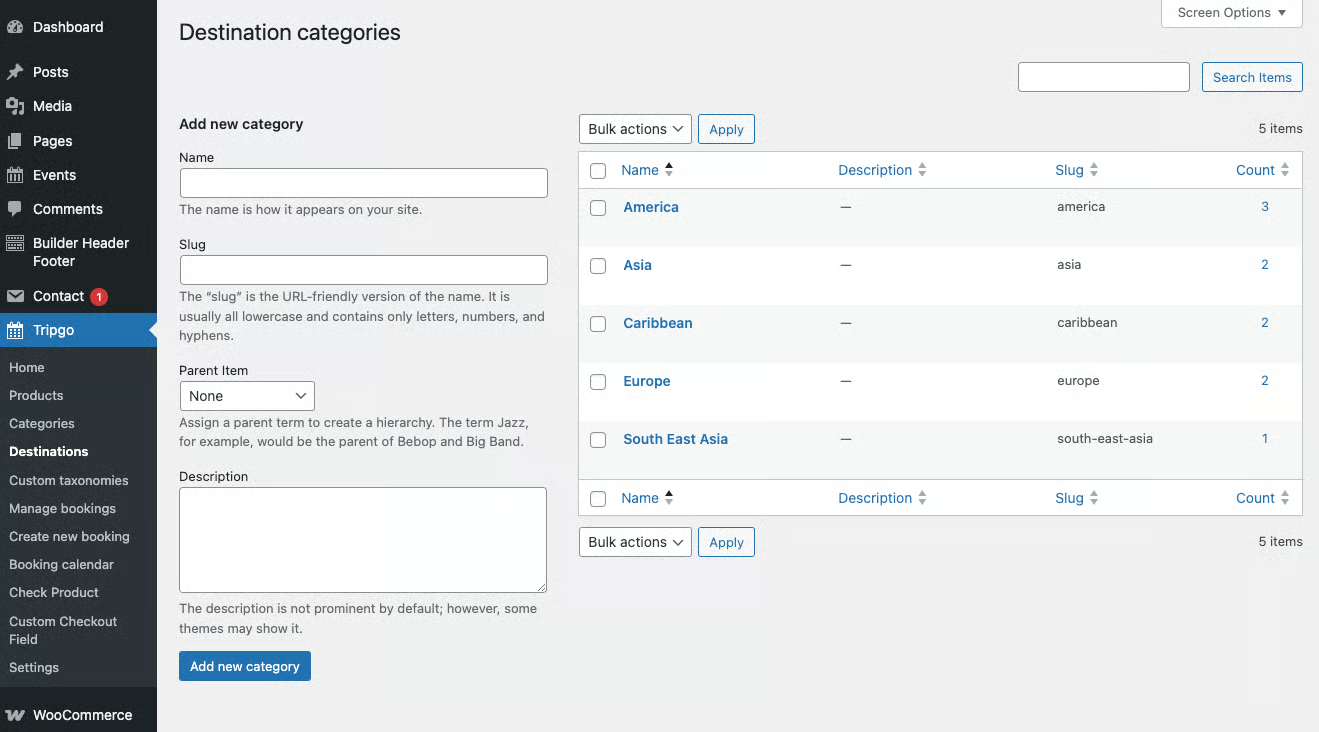
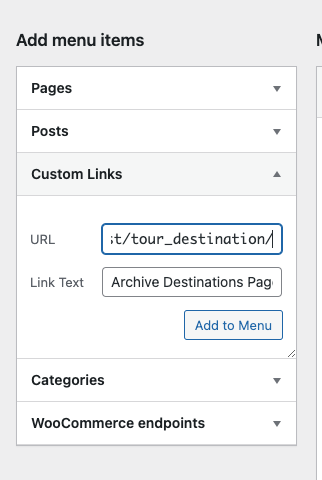
Click any image to view it larger · swipe or use the arrows to browse
7.2.3 · Destination Elements
Three Elementor widgets place destinations anywhere on your layouts: Our Destinations, Our Destinations Slide and Product Destinations Ajax. Each widget can be overridden in the child theme by copying its template file (e.g. plugins/ova-destination/templates/elementor/ova_destination.php) into themes/tripgo-child/ovadestination-templates/elementor/.
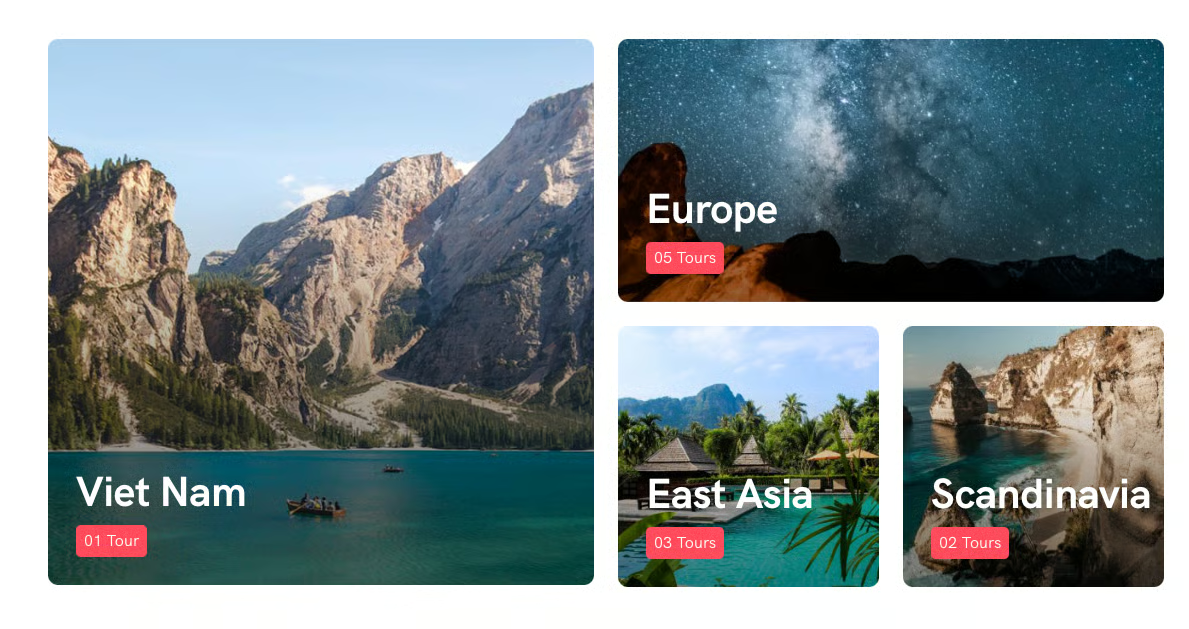
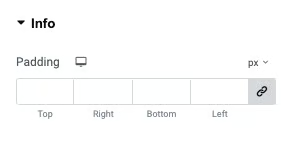
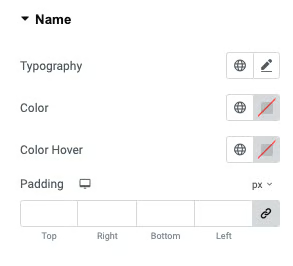
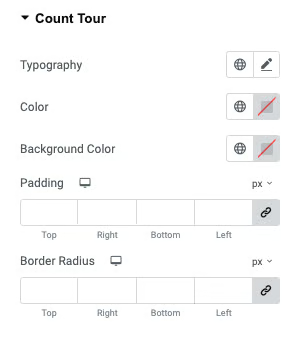
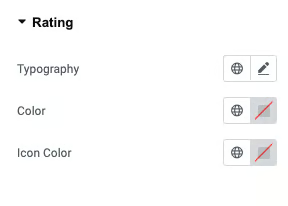
Our Destinations — a destinations grid with three frontend templates. In the backend you choose one or multiple categories, pick a template, show/hide fields and style each section.
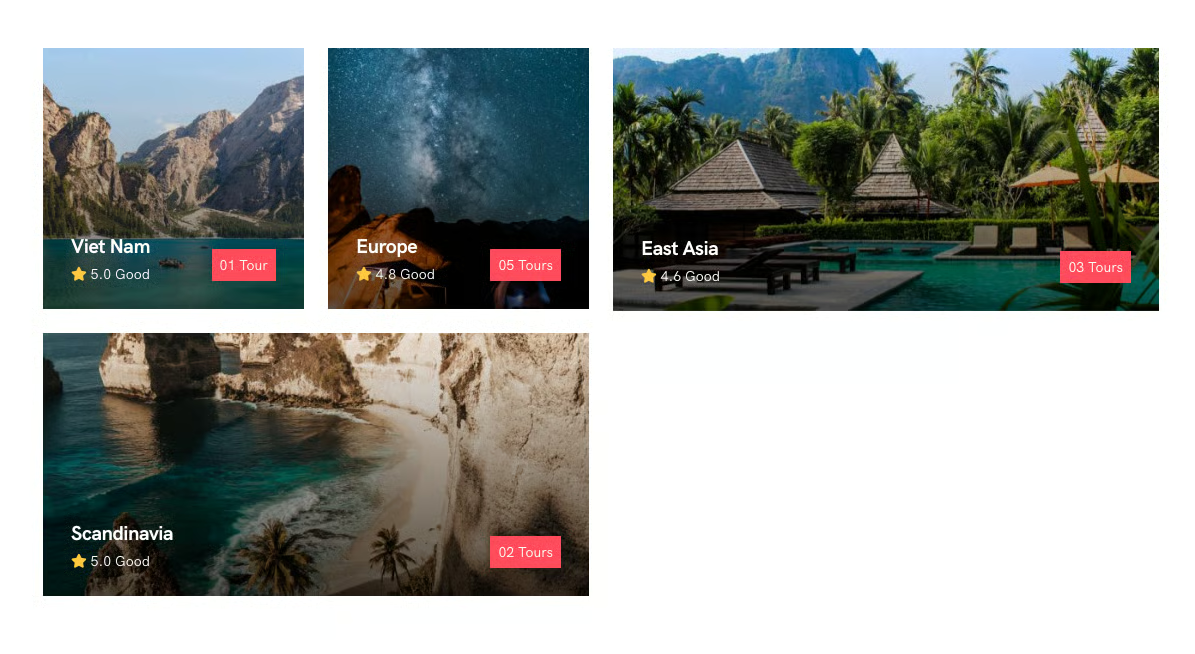
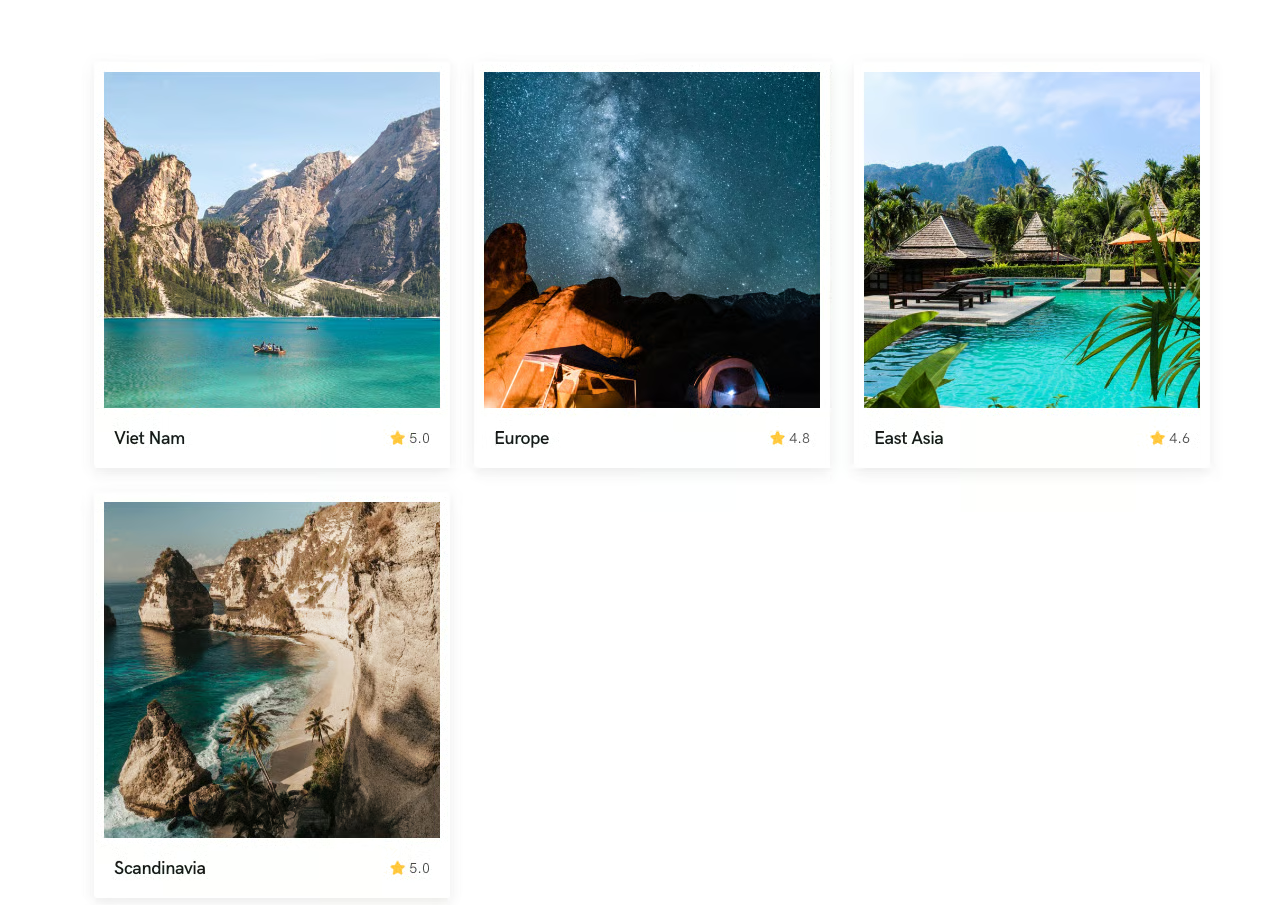
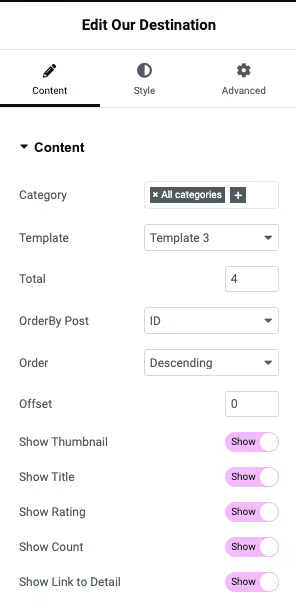
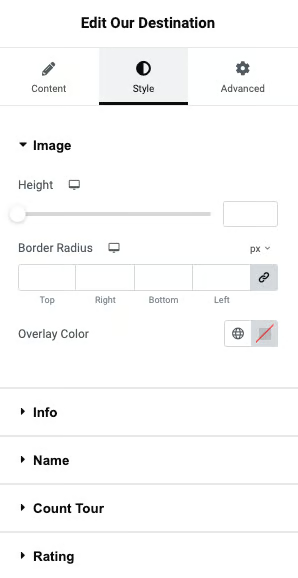
Click any image to view it larger · swipe or use the arrows to browse
plugins/ova-destination/templates/elementor/ova_destination.php to themes/tripgo-child/ovadestination-templates/elementor/ova_destination.php, then edit the copy in the child theme.Our Destinations Slide — a destinations carousel with four frontend templates (including a Circle style). The backend offers the same controls (category, template, show/hide fields and per-section styling).
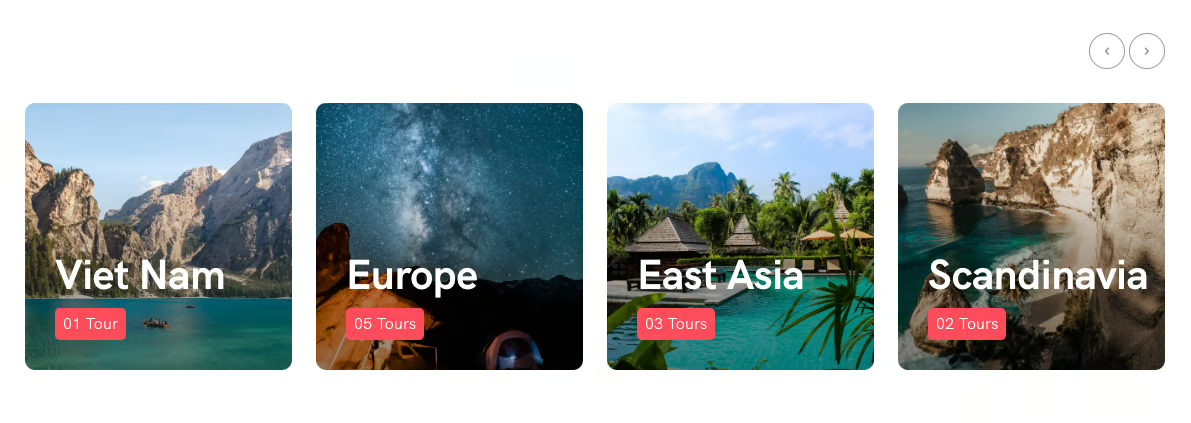
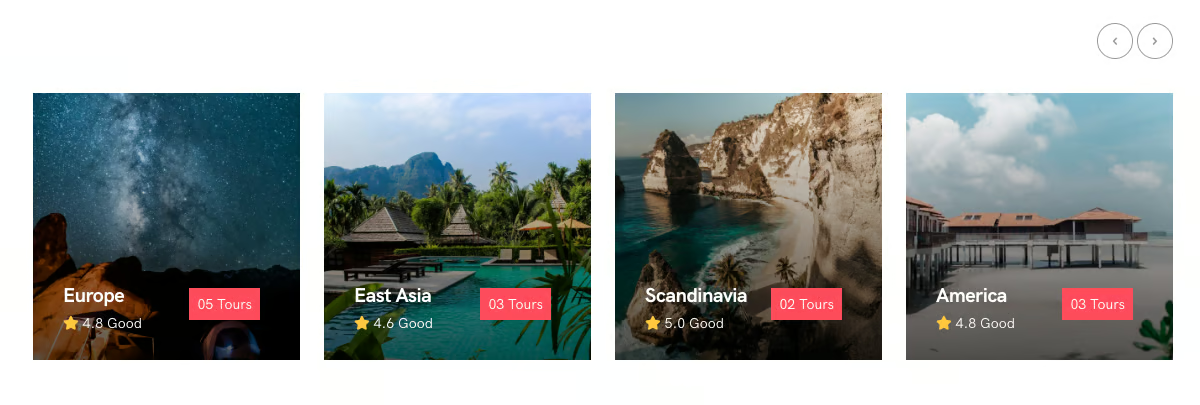
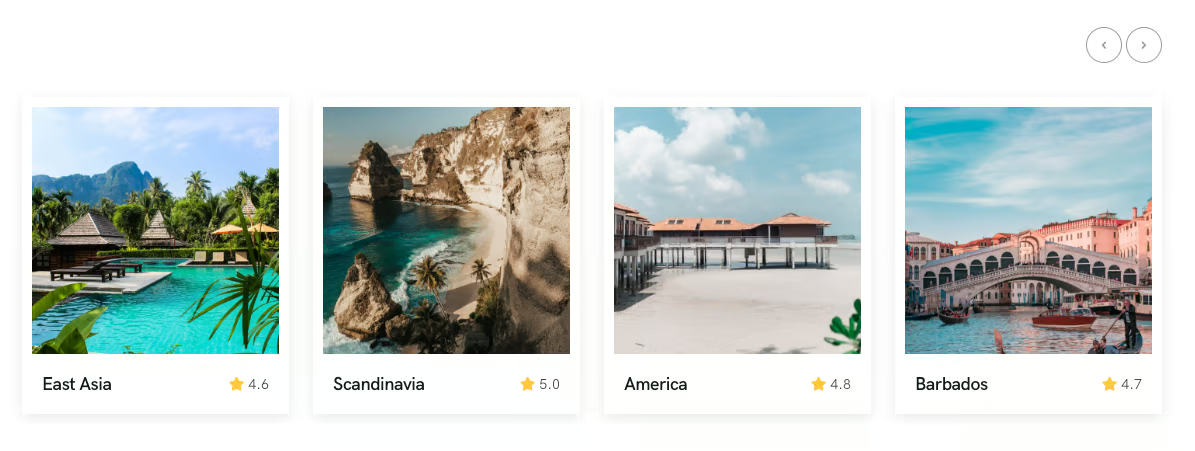
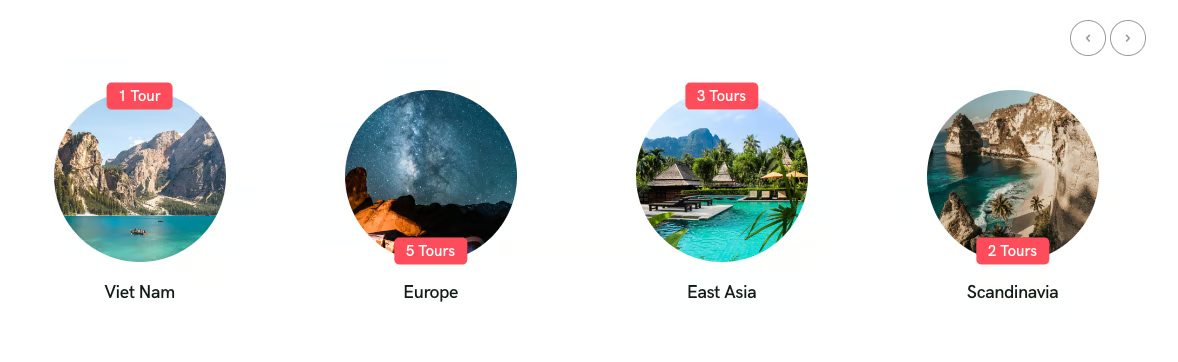
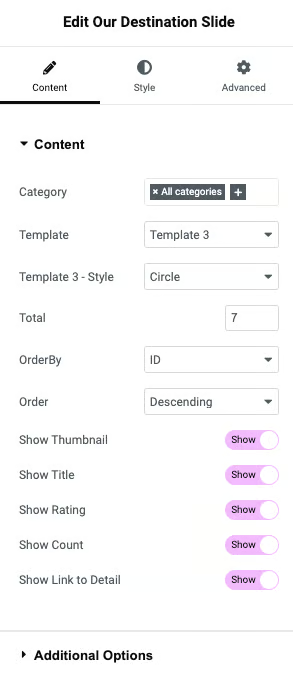
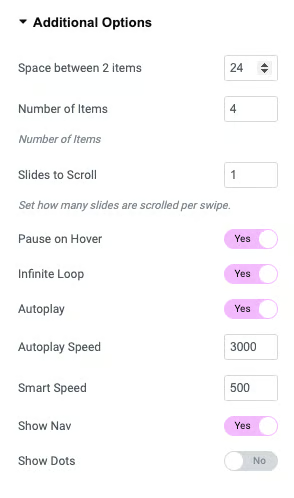
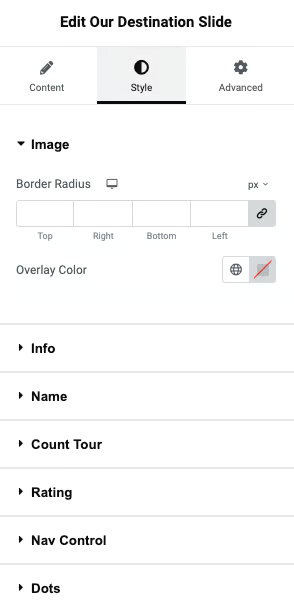
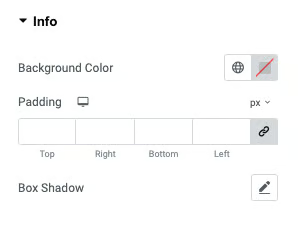
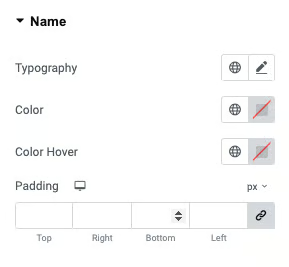
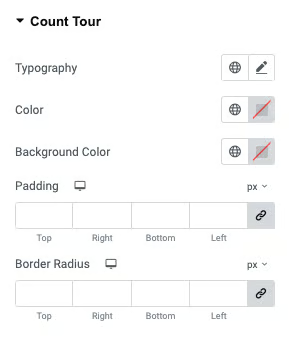
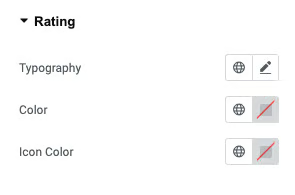
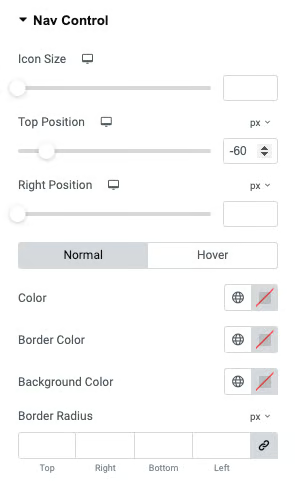
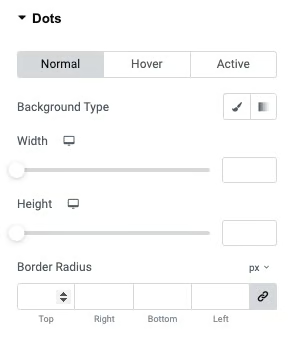
Click any image to view it larger · swipe or use the arrows to browse
plugins/ova-destination/templates/elementor/ova_destination_slider.php to themes/tripgo-child/ovadestination-templates/elementor/ova_destination_slider.php, then edit the copy in the child theme.Product Destinations Ajax — lets visitors filter tours by destination without a page reload.
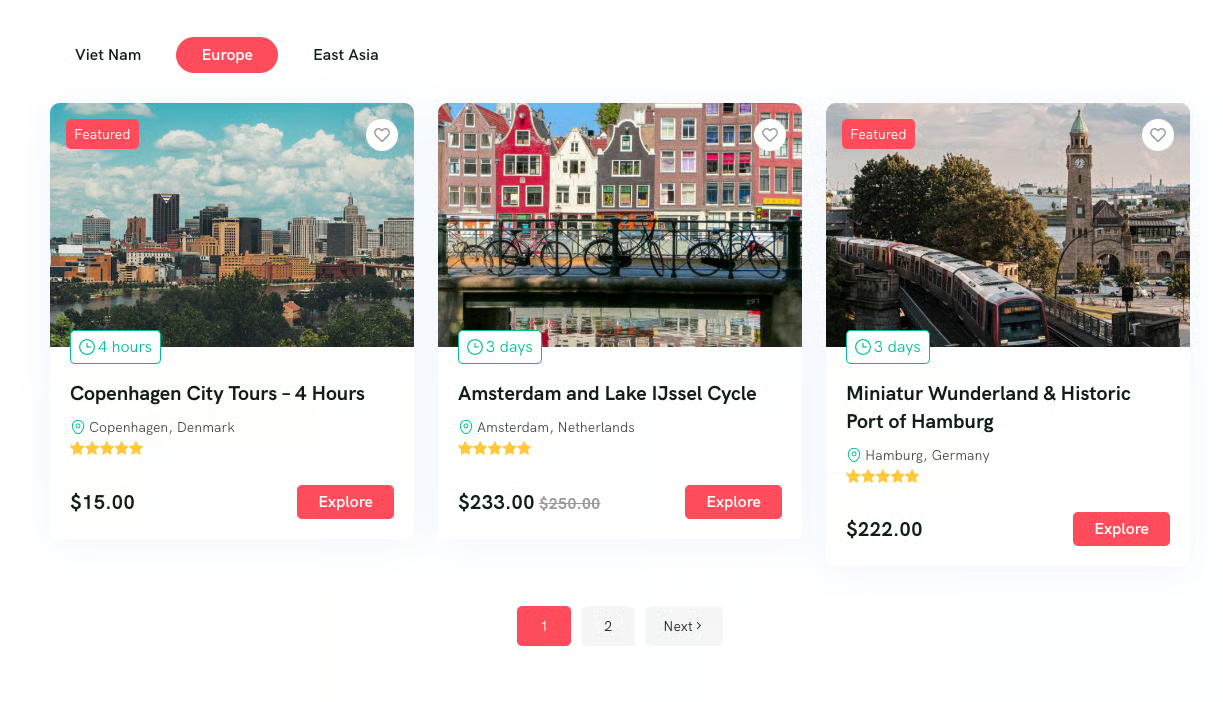
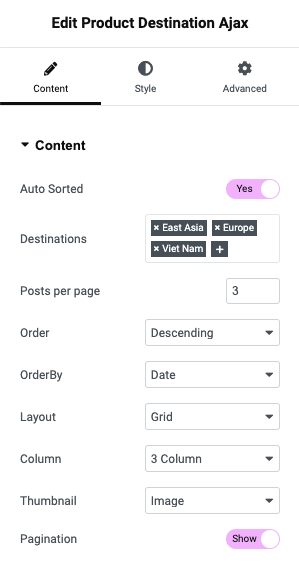
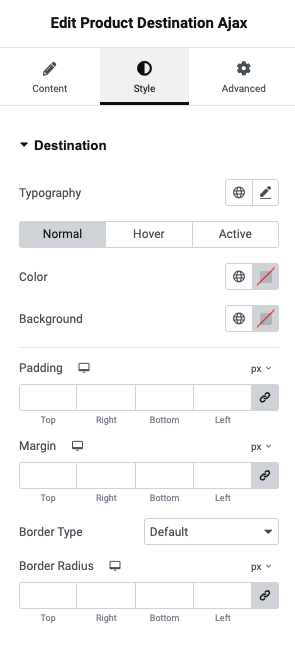
Click any image to view it larger · swipe or use the arrows to browse
plugins/ova-brw/ovabrw-templates/elementor/ovabrw_product_destination_ajax.php to themes/tripgo-child/ovabrw-templates/elementor/ovabrw_product_destination_ajax.php. You must first create the folders ovabrw-templates and elementor in the child theme.7.2.4 · Display listing & detail (Customizer)
Control how destinations look at Appearance → Customize → Destinations, which has two groups: Archive Destinations (the listing pages) and Single Destinations (the detail page) — set the template and show/hide fields for each.
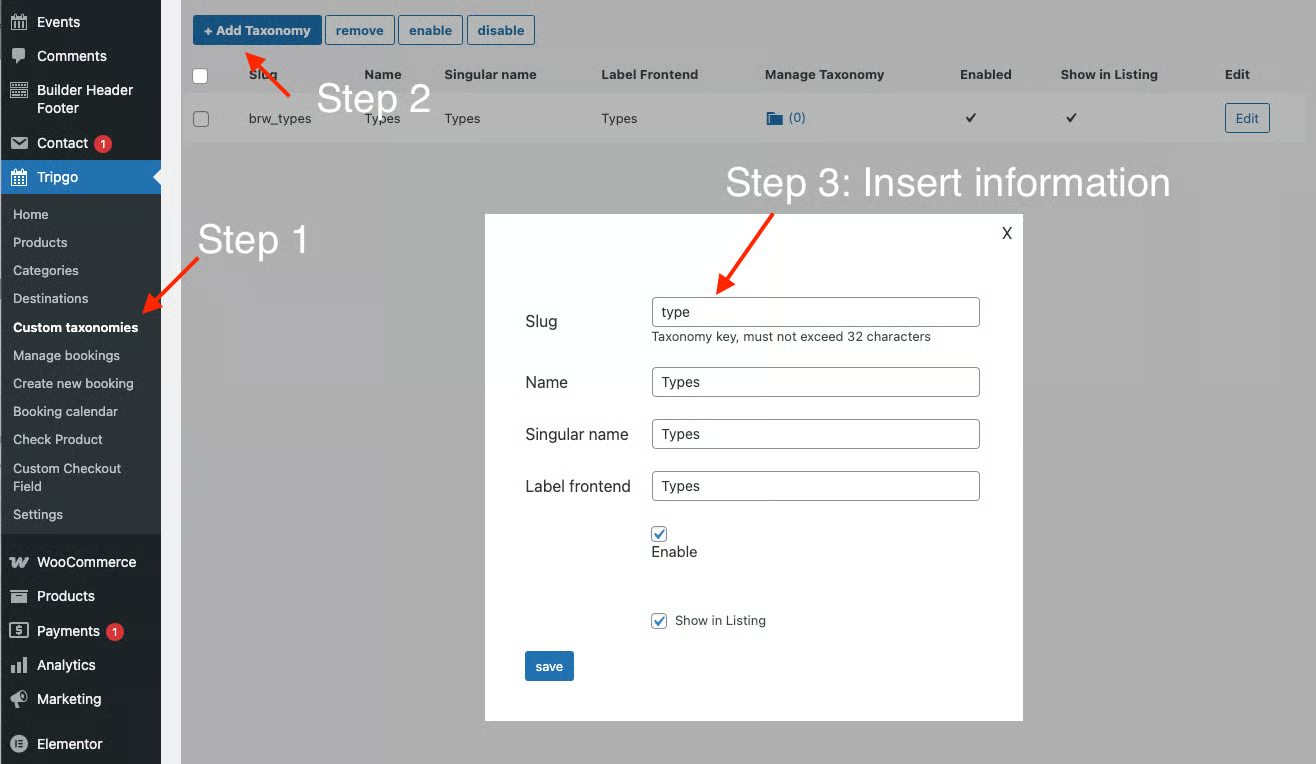
7.3 · Custom taxonomies
Define your own taxonomies for tours — extra grouping/filter sets beyond the built-in categories (for example Tour type, Activity, Difficulty, Language). For each taxonomy you set:
- Name & Singular name
- Slug — the taxonomy key (must not exceed 32 characters)
- Label frontend — how it’s labelled to visitors
- Enable and Show in Listing toggles
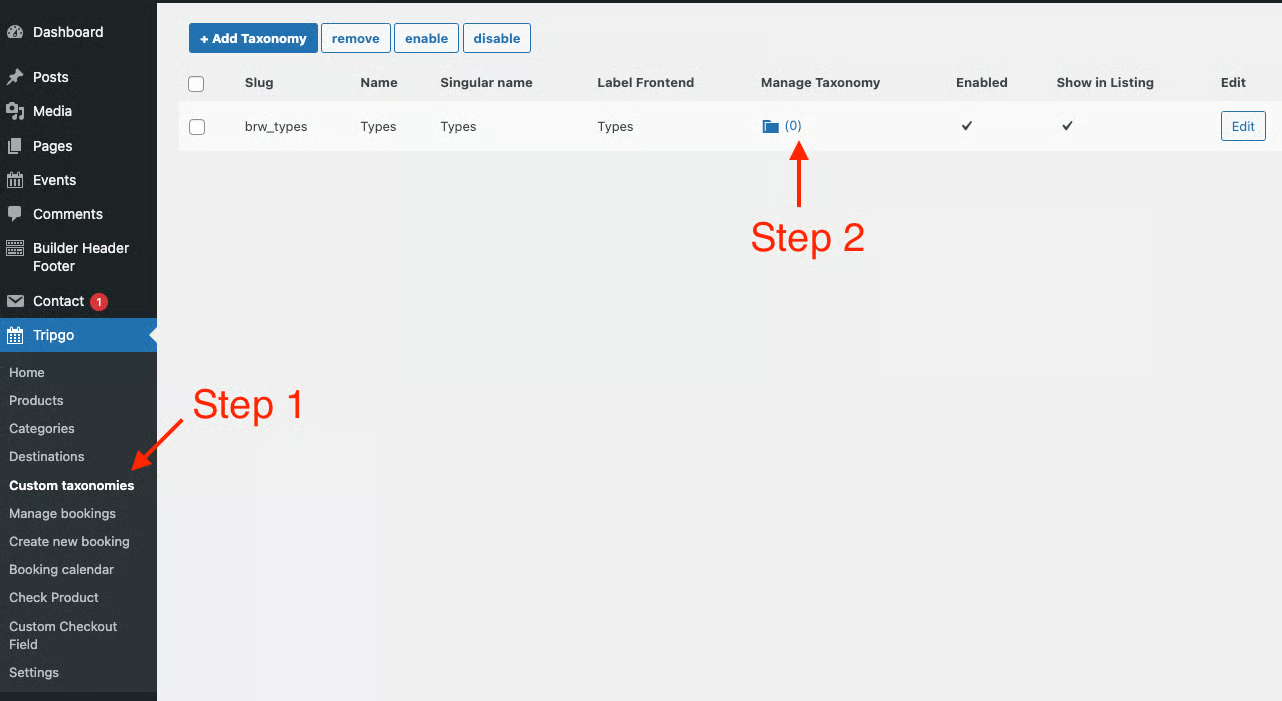
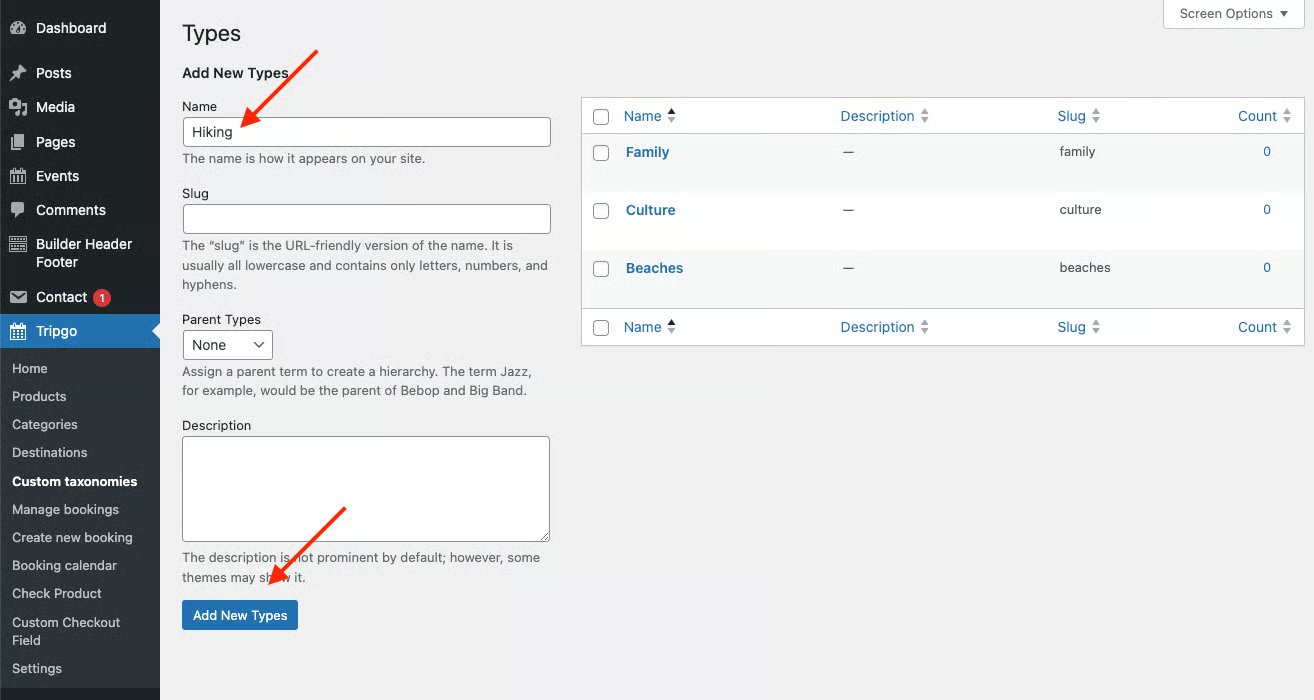
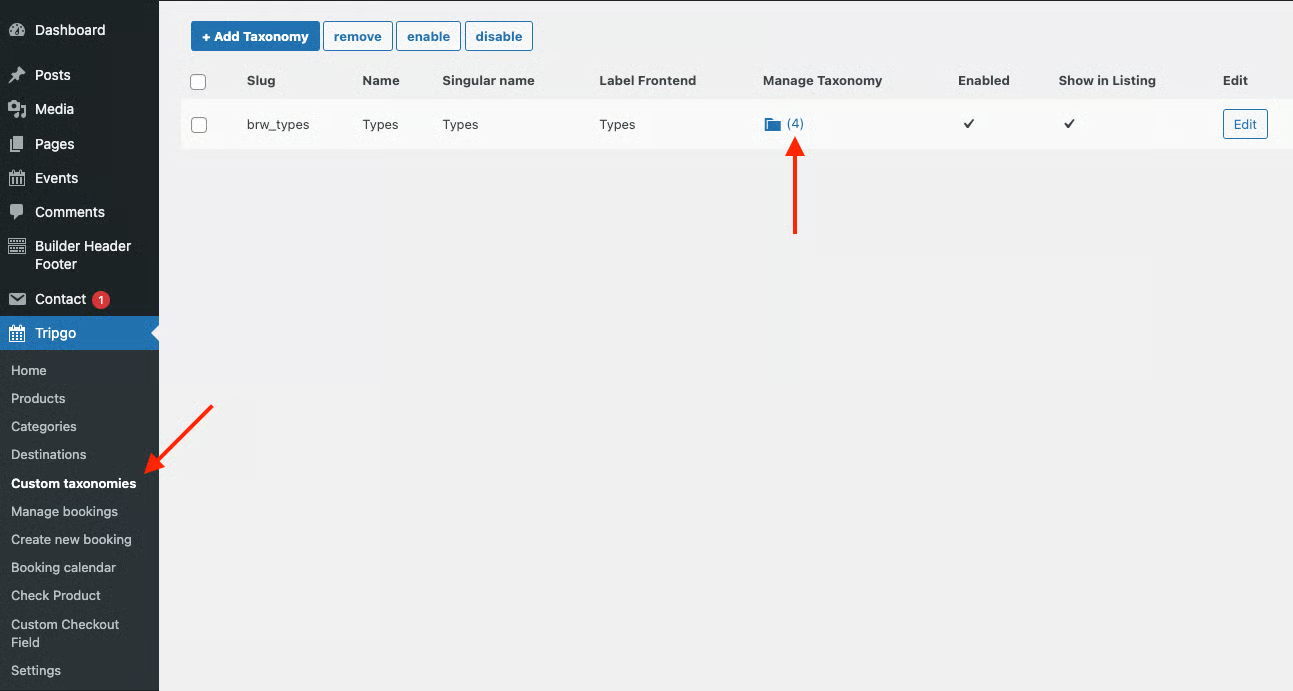
After creating a taxonomy you add/update its terms, then surface it through the Custom Taxonomy and Product Filter Ajax widgets and choose to display it per category or per tour. Whether taxonomies appear in search is also governed by “Show custom taxonomy” in §4.1.
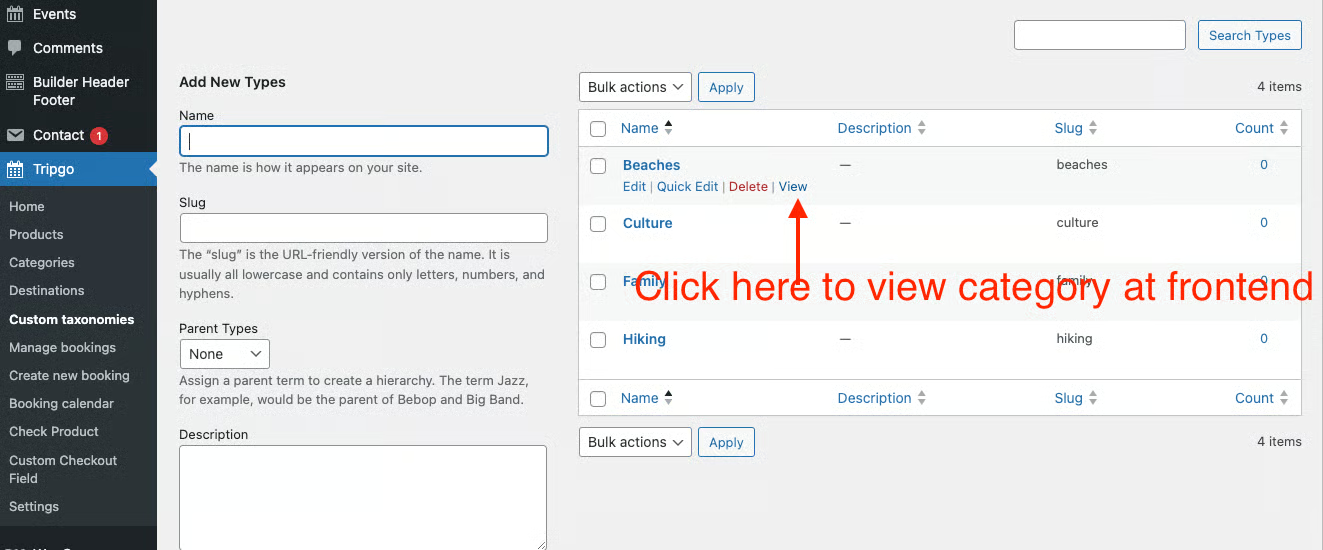
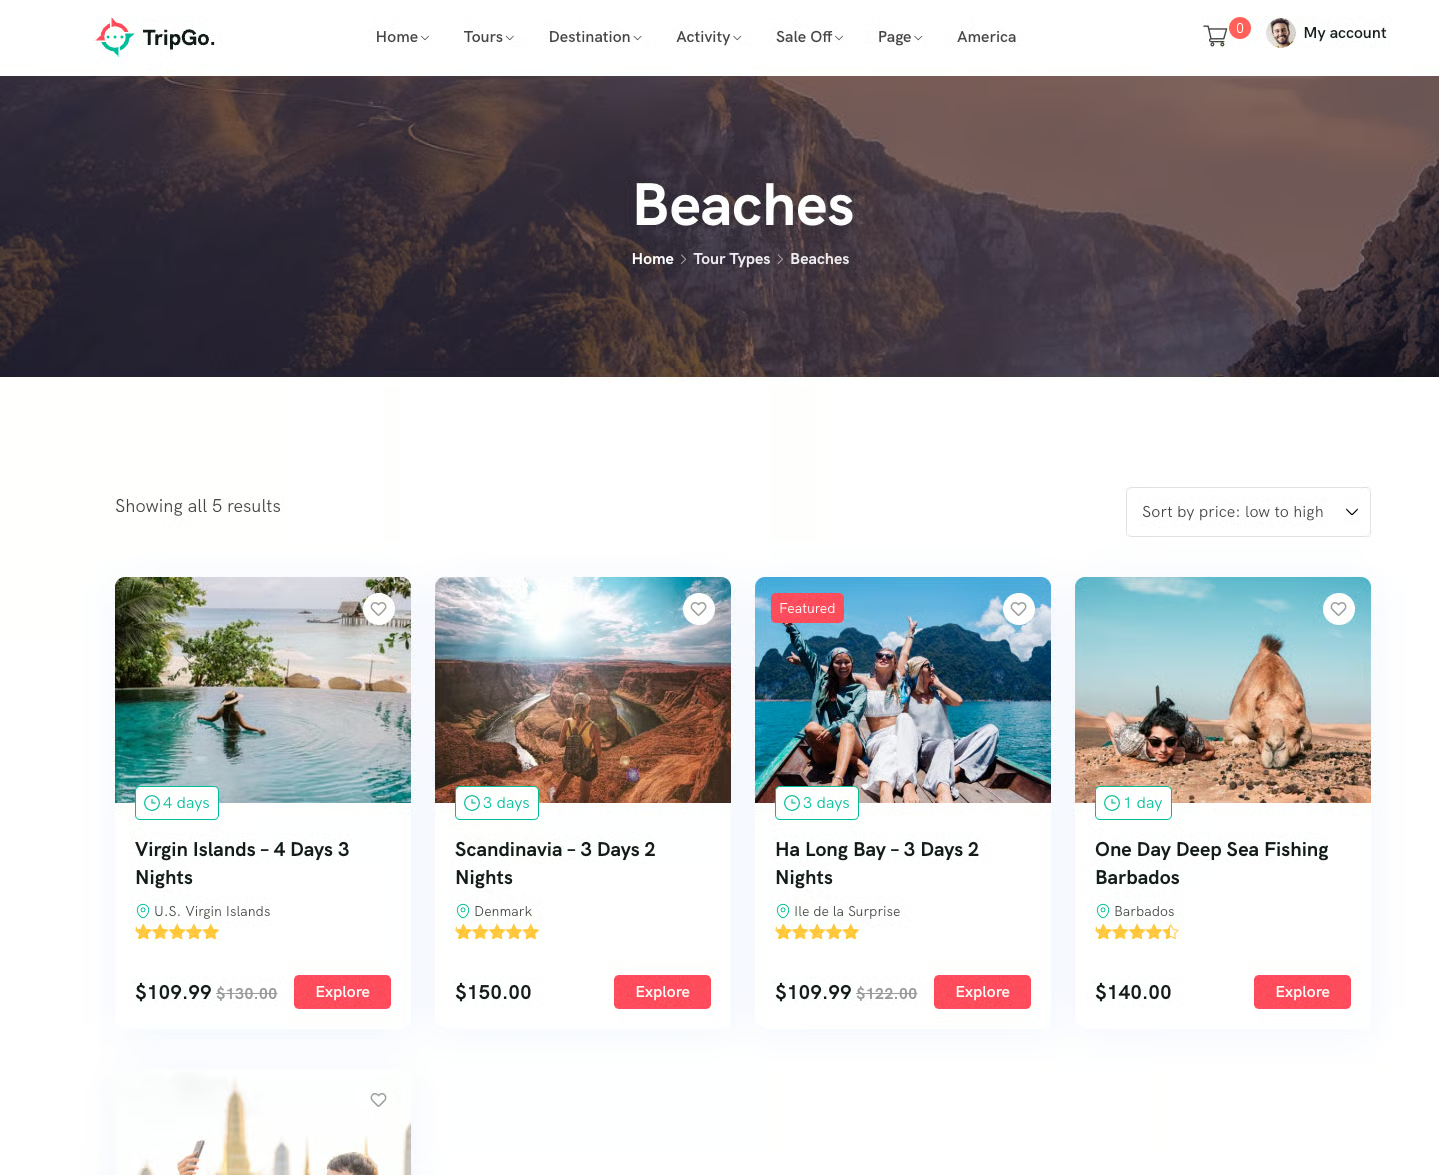
Click any image to view it larger · swipe or use the arrows to browse
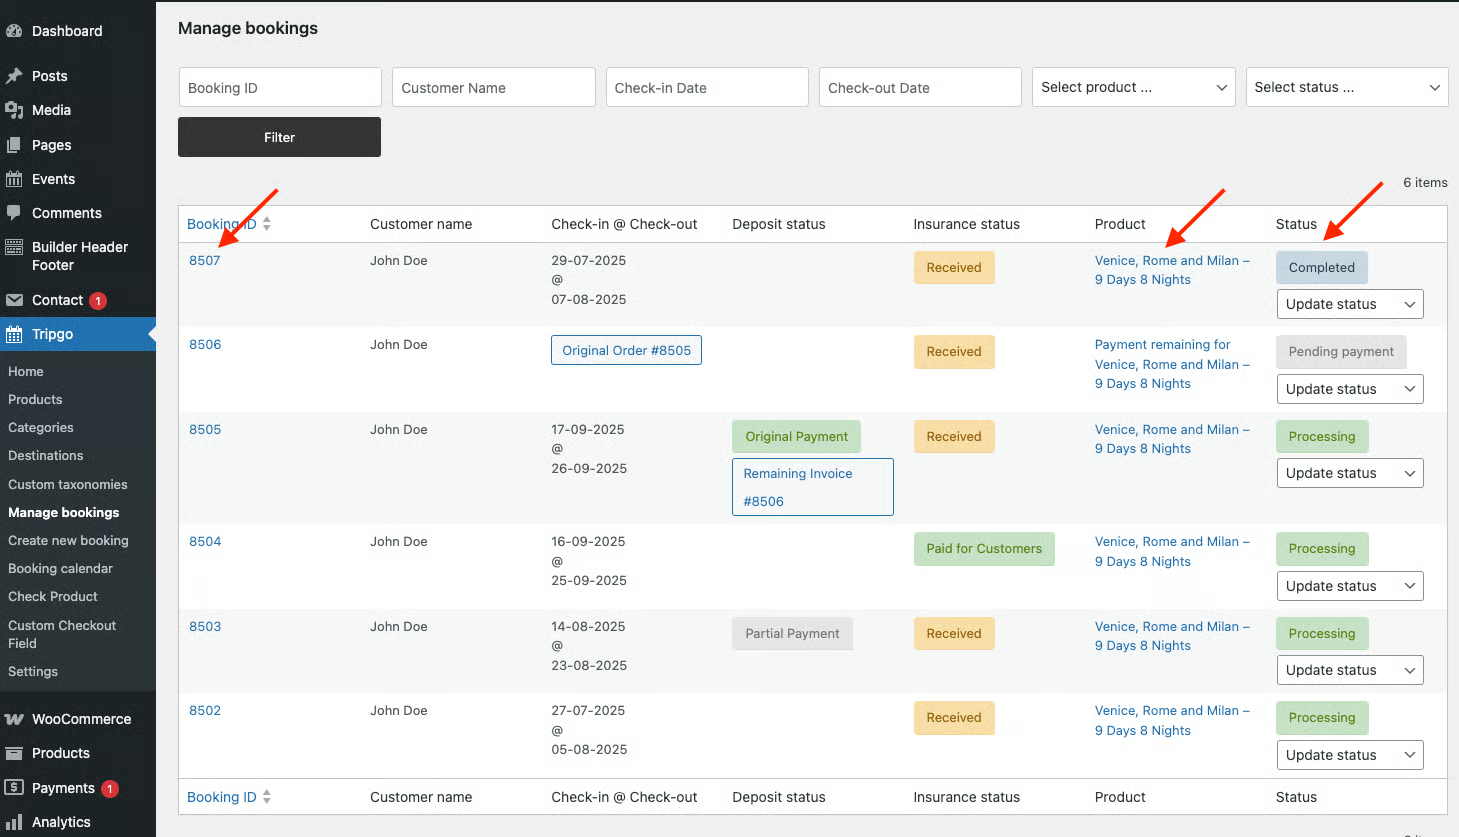
7.4 · Manage bookings
The central list of every booking. Which columns appear here — Booking ID, Customer name, Product, Time, Status, Deposit status, Insurance status — is what you toggle in the Manage bookings settings (§4.5). From the list you can:
- Open and edit an order, or jump to its full WooCommerce order
- Update status of a booking (e.g. Processing → Completed)
- Mark deposit / insurance as Paid for Customers
- See the product, customer and booking time at a glance
Search bookings by filter
The built-in order search lets you quickly find bookings across the whole database by combining these filters:
- Booking ID
- Customer name
- Check-in date and Check-out date
- All tours or a specific tour
- Booking status — Completed, Processing, Pending Payment, On hold, Cancelled, Closed
The results show the matching bookings together with their Insurance and Deposit statuses. Clicking a Booking ID opens the full order in WooCommerce, where you’ll find the insurance/deposit action buttons.
The same bookings can be viewed on the Booking calendar, and you can add one yourself from Create new booking.
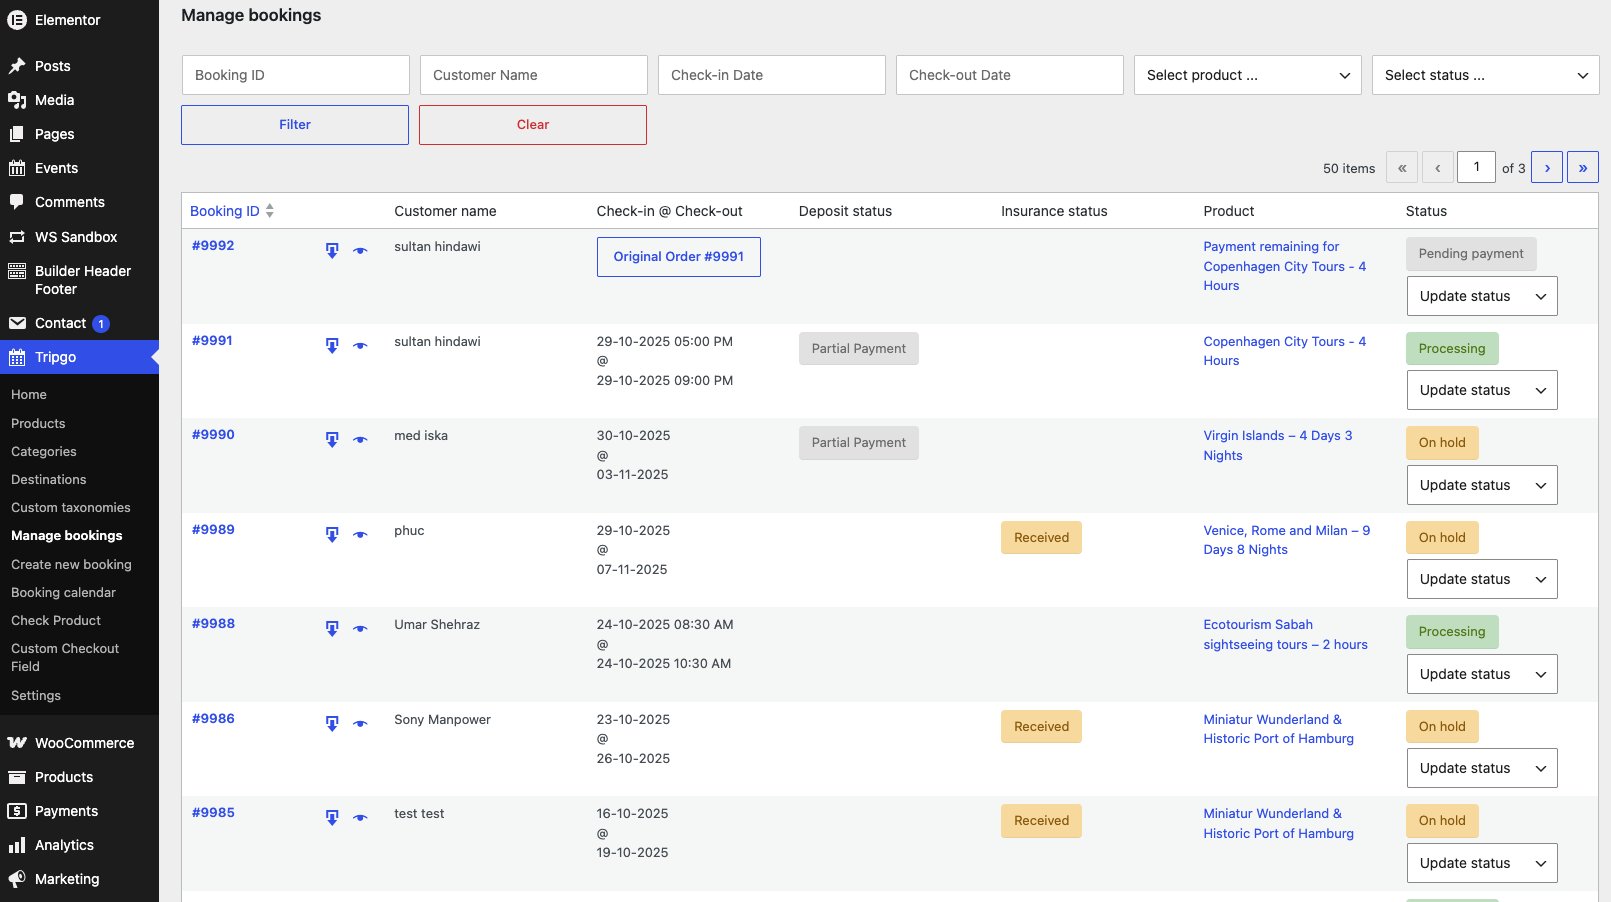
Click the image to view it larger
7.5 · Create new booking
When customers reach out by phone, message or email, you can build the order yourself from the admin so it’s managed in the back-end. Go to Tripgo → Create new booking and fill in:
- Status — pick from Completed, Processing, Pending Payment, On hold, Cancelled, Refunded or Failed
- Customer information — First name, Last name, Company, Email, Phone, Address 1 & 2, City, Country
- Items (add as many as you like) — choose the product, then set Adult / Children price, Check-in / Check-out, number of adults & children, Guest info, choose Resources & Services, and add the Insurance amount, Deposit amount and cost
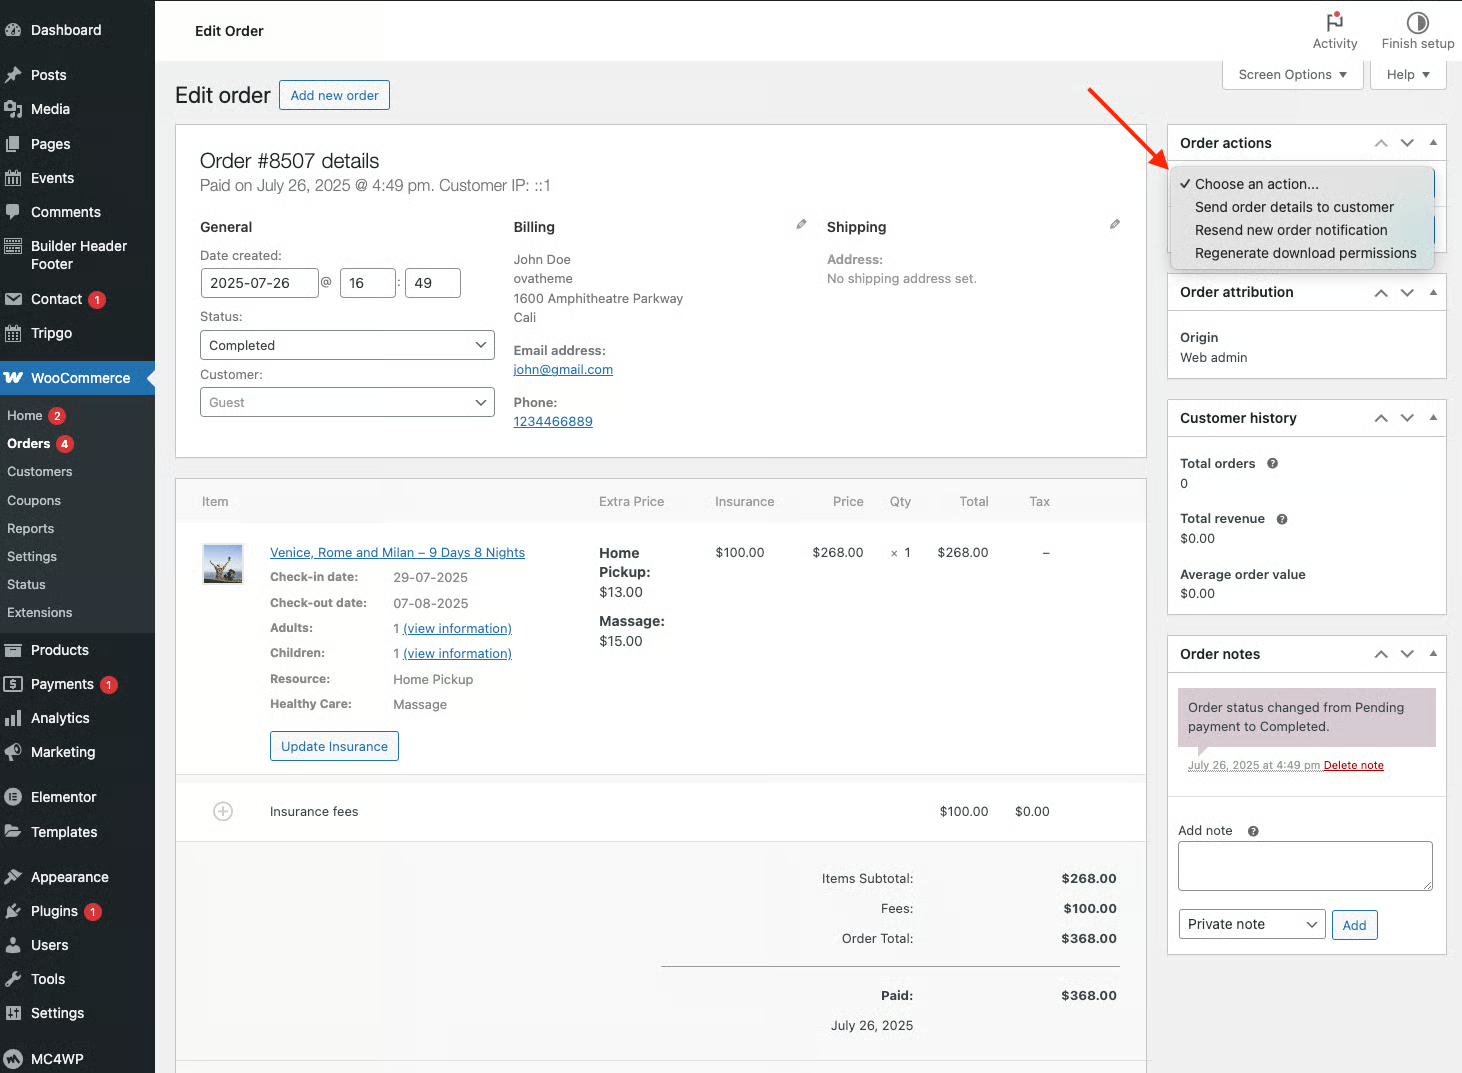
Click Create new booking and it appears in Manage bookings (and the Booking calendar). From the order detail in WooCommerce → Orders you can send the order details to the customer, including a payment link so they can pay online.
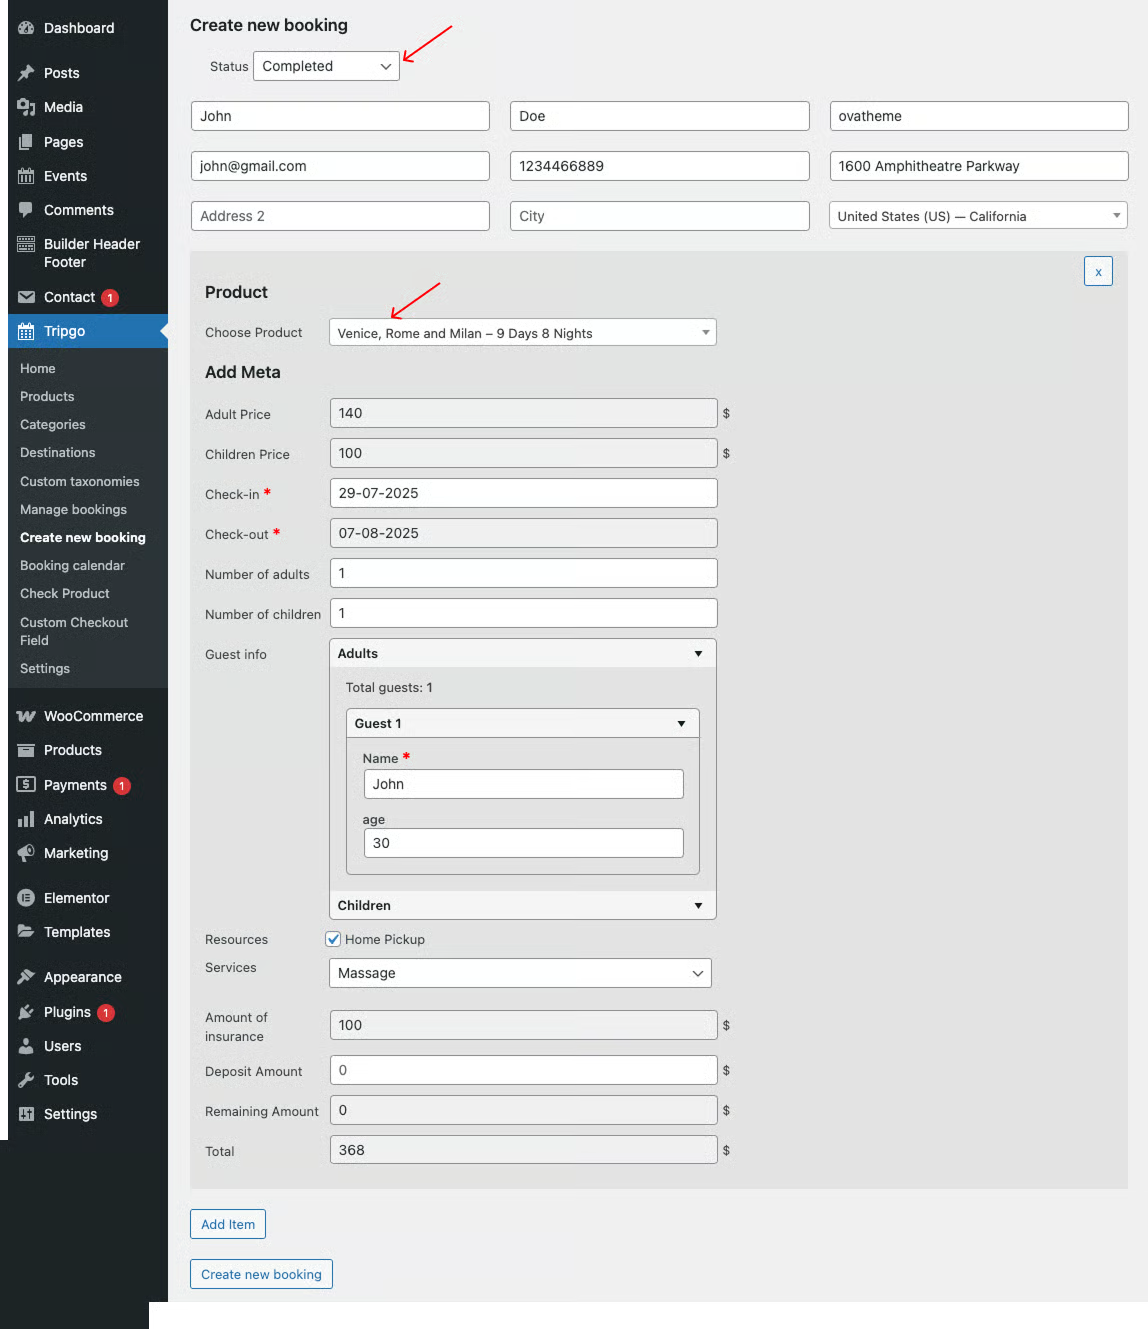
Click any image to view it larger · swipe or use the arrows to browse
7.6 · Booking calendar
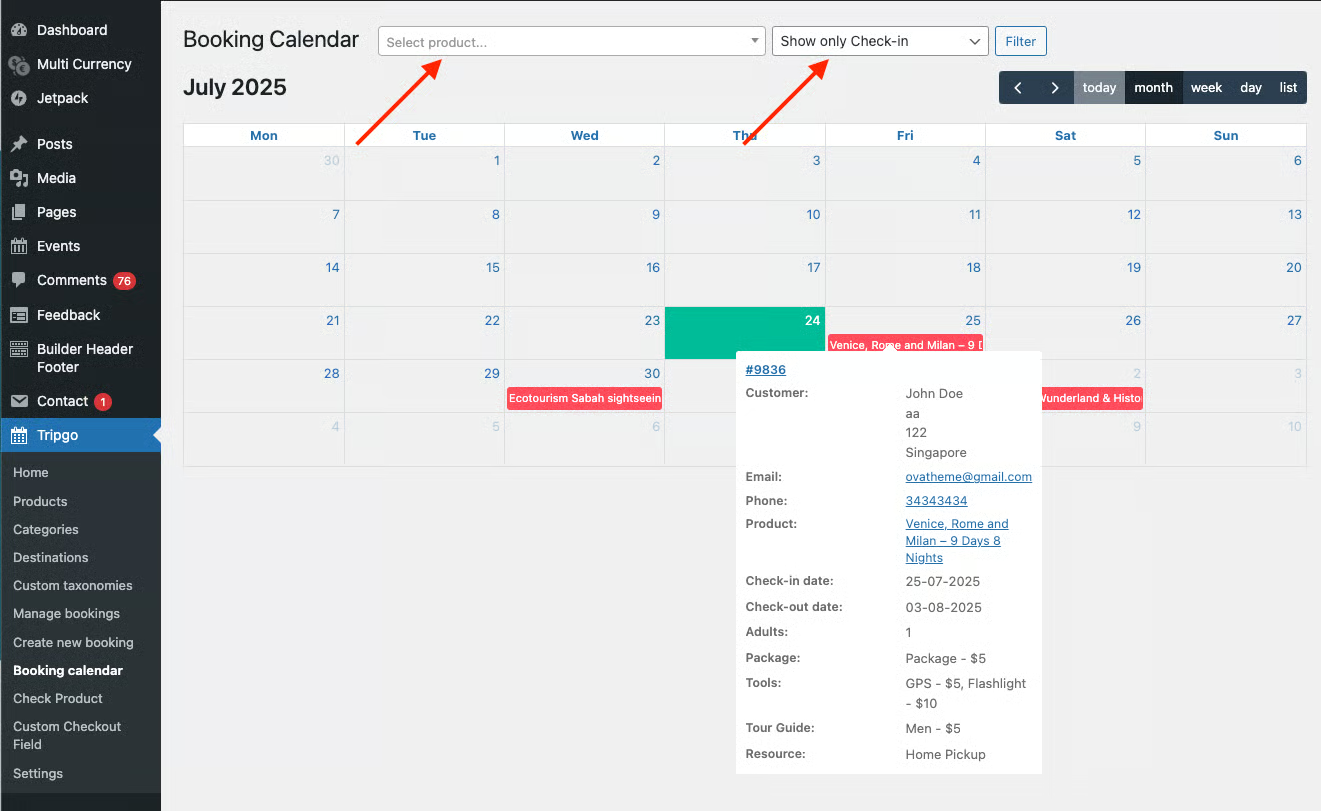
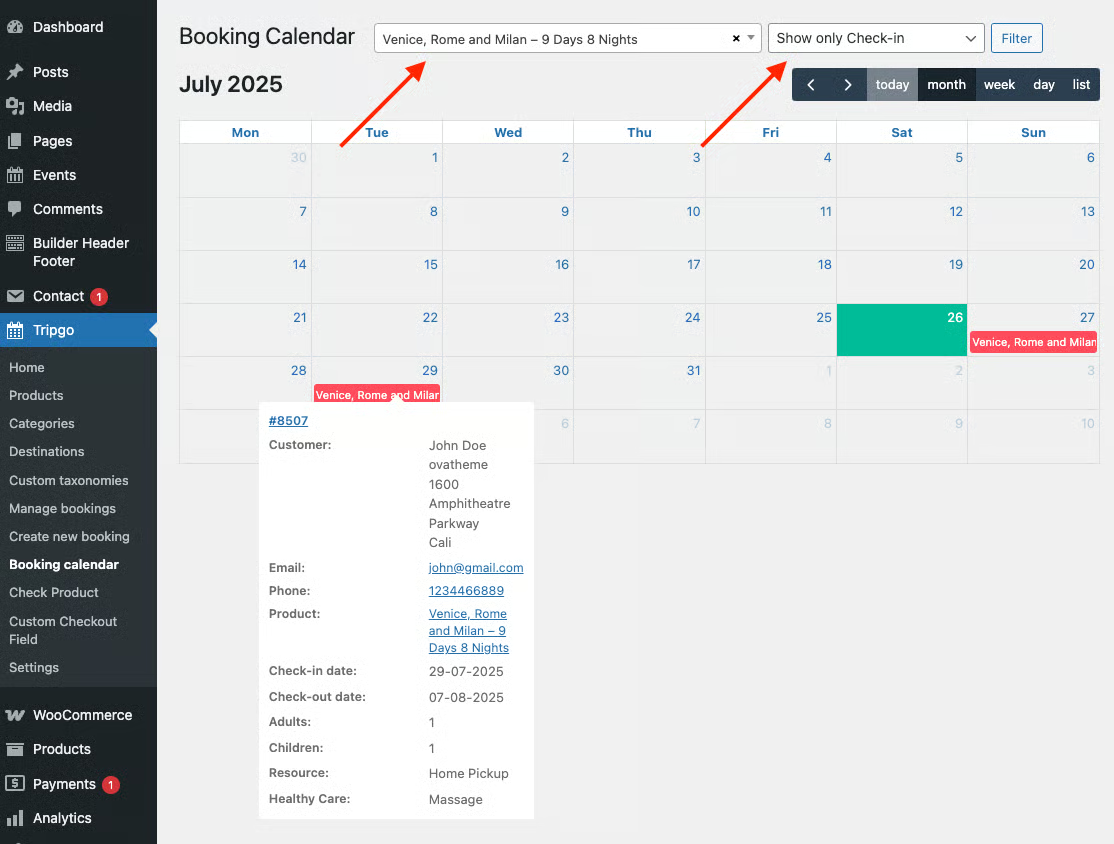
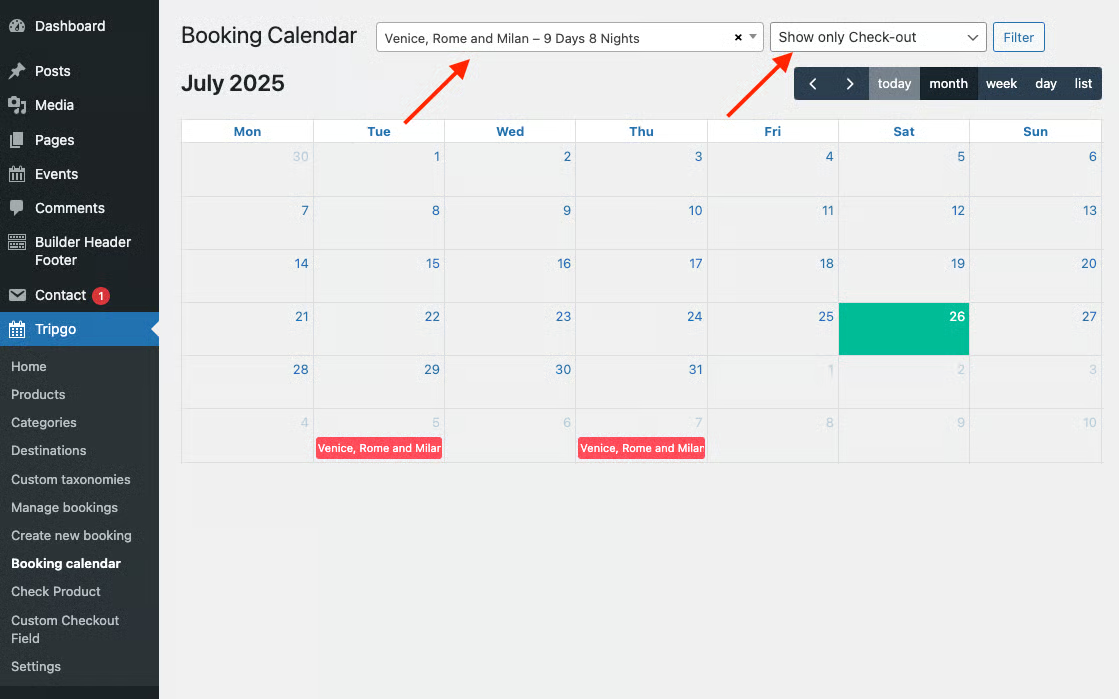
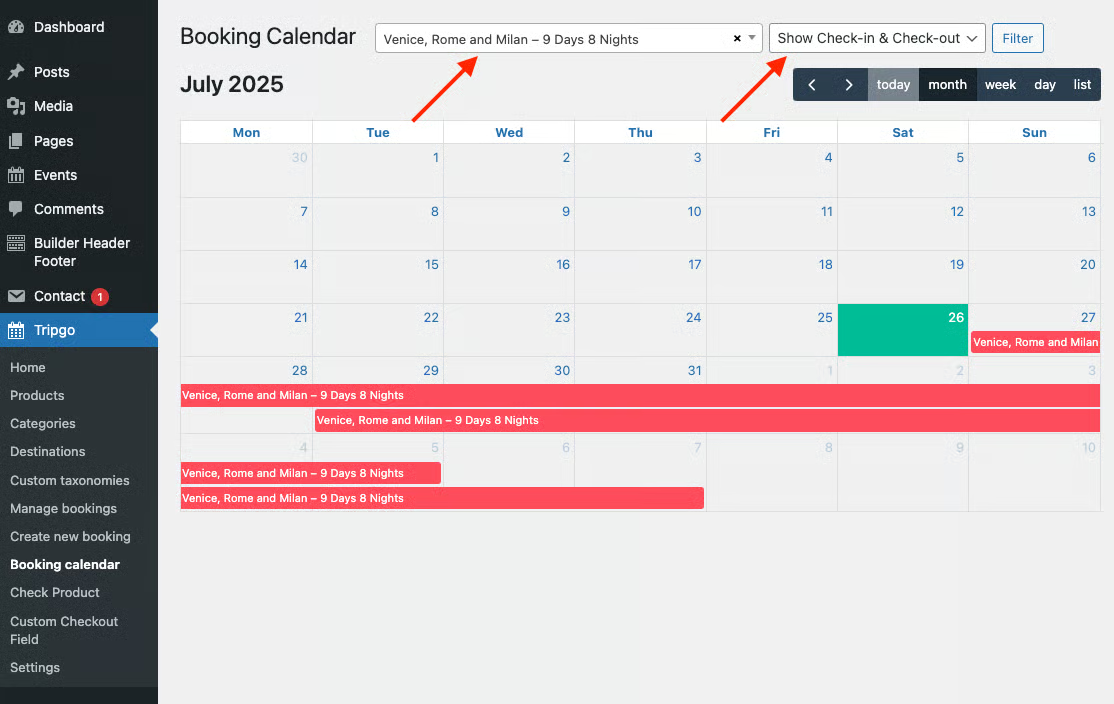
A calendar view of all bookings across your tours, so you can see what’s booked and what’s free at a glance. You can:
- Filter by a specific product (Select product…) or view all
- Choose what each entry shows: Check-in & Check-out, only Check-in, or only Check-out
- Click a booking to see Customer, Email, Phone and Product, and open it for details in Manage bookings
These bookings can also be pushed to your Google Calendar (§4.5), and you can verify a tour’s open dates with Check Product.
Click any image to view it larger · swipe or use the arrows to browse
7.7 · Check Product
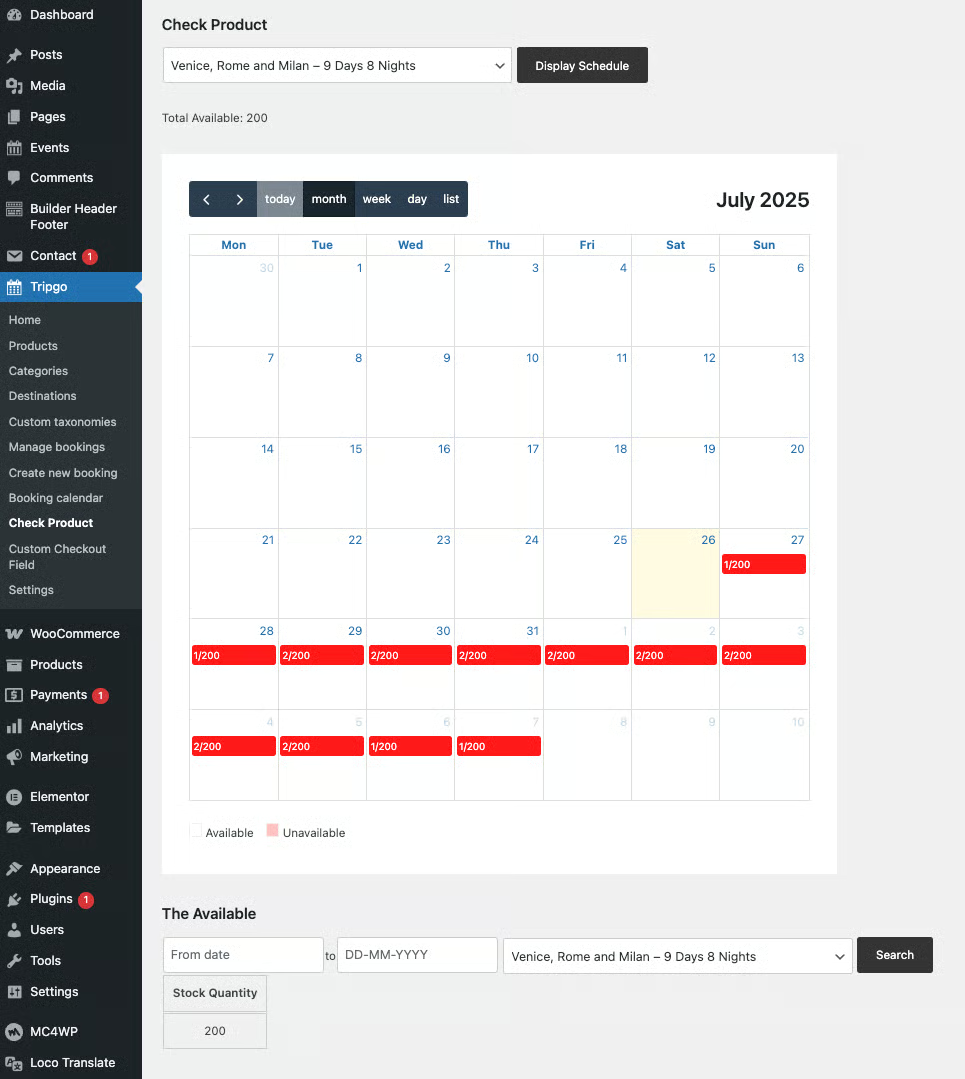
An availability checker for a single tour. Pick a product and it reports the Total Available, The Available and Unavailable quantities for its dates/slots, and lists the related orders (with links to edit each one). Use it to confirm that the tour’s dates & schedule and quantity behave correctly, and to troubleshoot why a date shows as full — the Booking calendar gives the visual counterpart.
Click the image to view it larger
7.8 · Custom checkout field
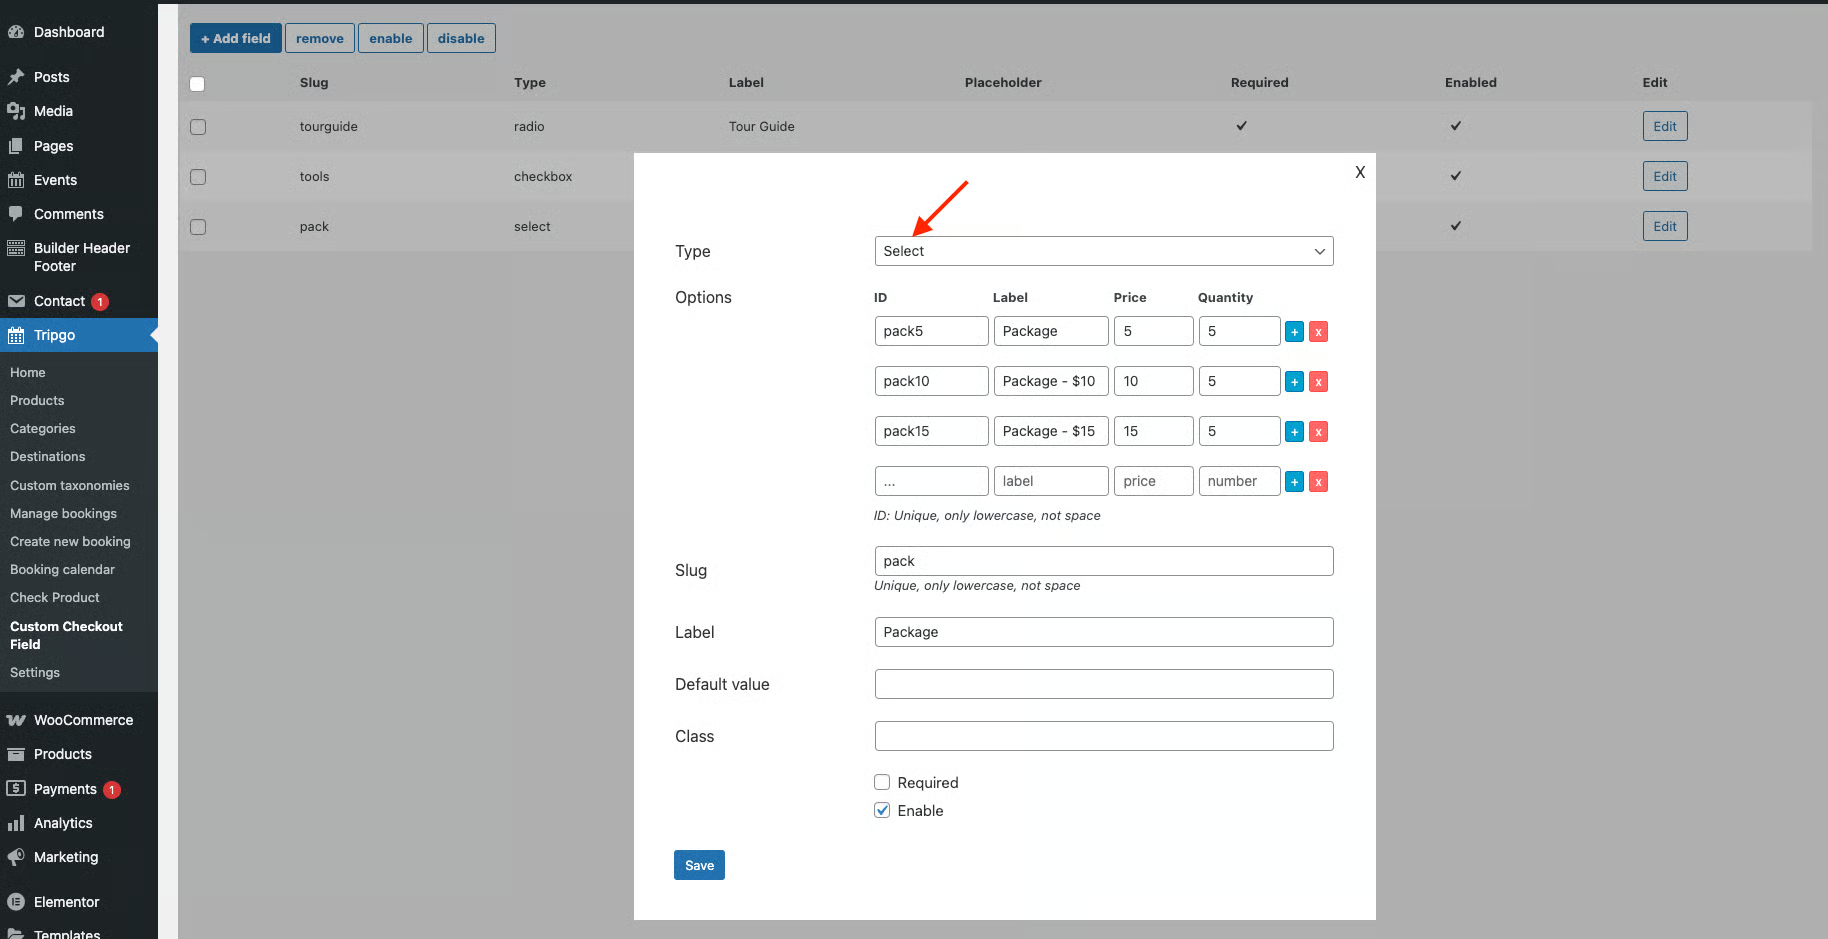
Custom checkout fields let you add extra fields to the Booking form and the Request/Enquiry form, so you can collect exactly the information your business needs. Manage the global set at Tripgo → Custom checkout field → Add Field.
Field options
- Type — 9 types are supported: Text, Password, Email, Phone, Textarea, Select (dropdown), File, Checkbox, Radio.
- Slug — the name shown in the backend list; must be unique, lowercase and contain no spaces.
- Price — an optional cost added by the field; only applies to Radio, Checkbox and Select types.
- Label — the field label shown to customers at the frontend.
- Default value and Class — a preset value and a CSS class for styling.
- Required — mark the field as required or optional.
- Enable — turn the field on/off in the form (this can be overridden per product).
Use the fields on a tour
On a tour, open Products → Add New → Advanced Options → Custom Checkout Fields. The Display Custom Fields From dropdown offers three choices:
- Category Setting — use the fields set on the tour’s category.
- New — pick specific fields just for this tour.
- No — don’t use any custom checkout fields for this tour.
At the frontend the enabled fields appear in the Booking form and the Request form (see also the per-tour Display custom checkout fields option, §5.8).
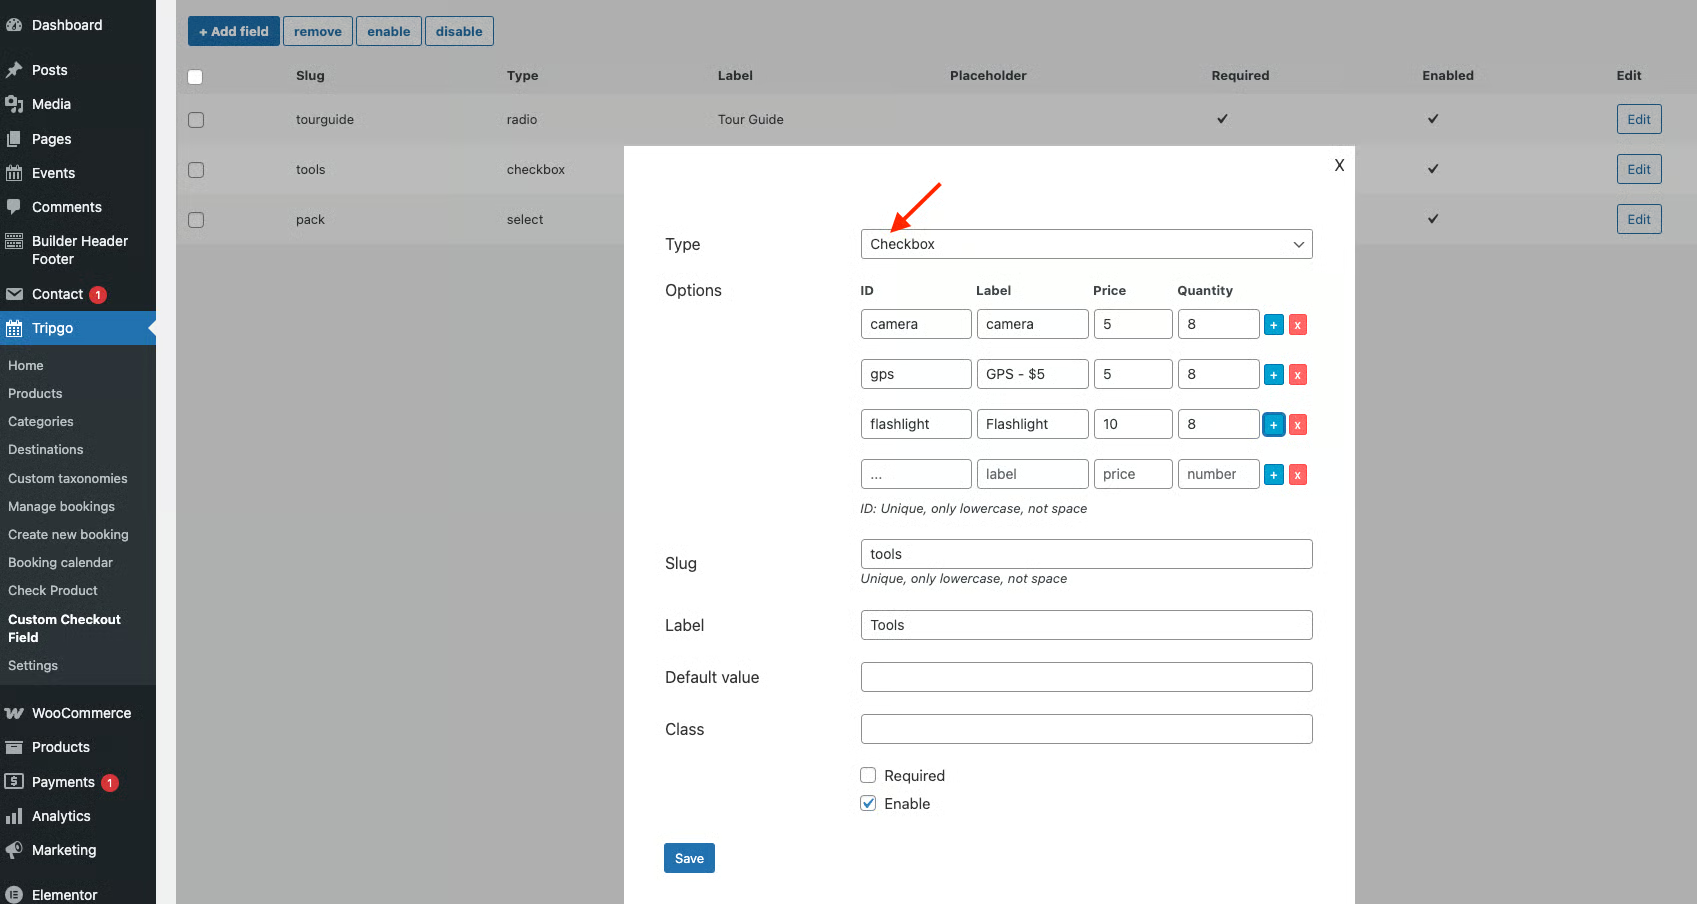
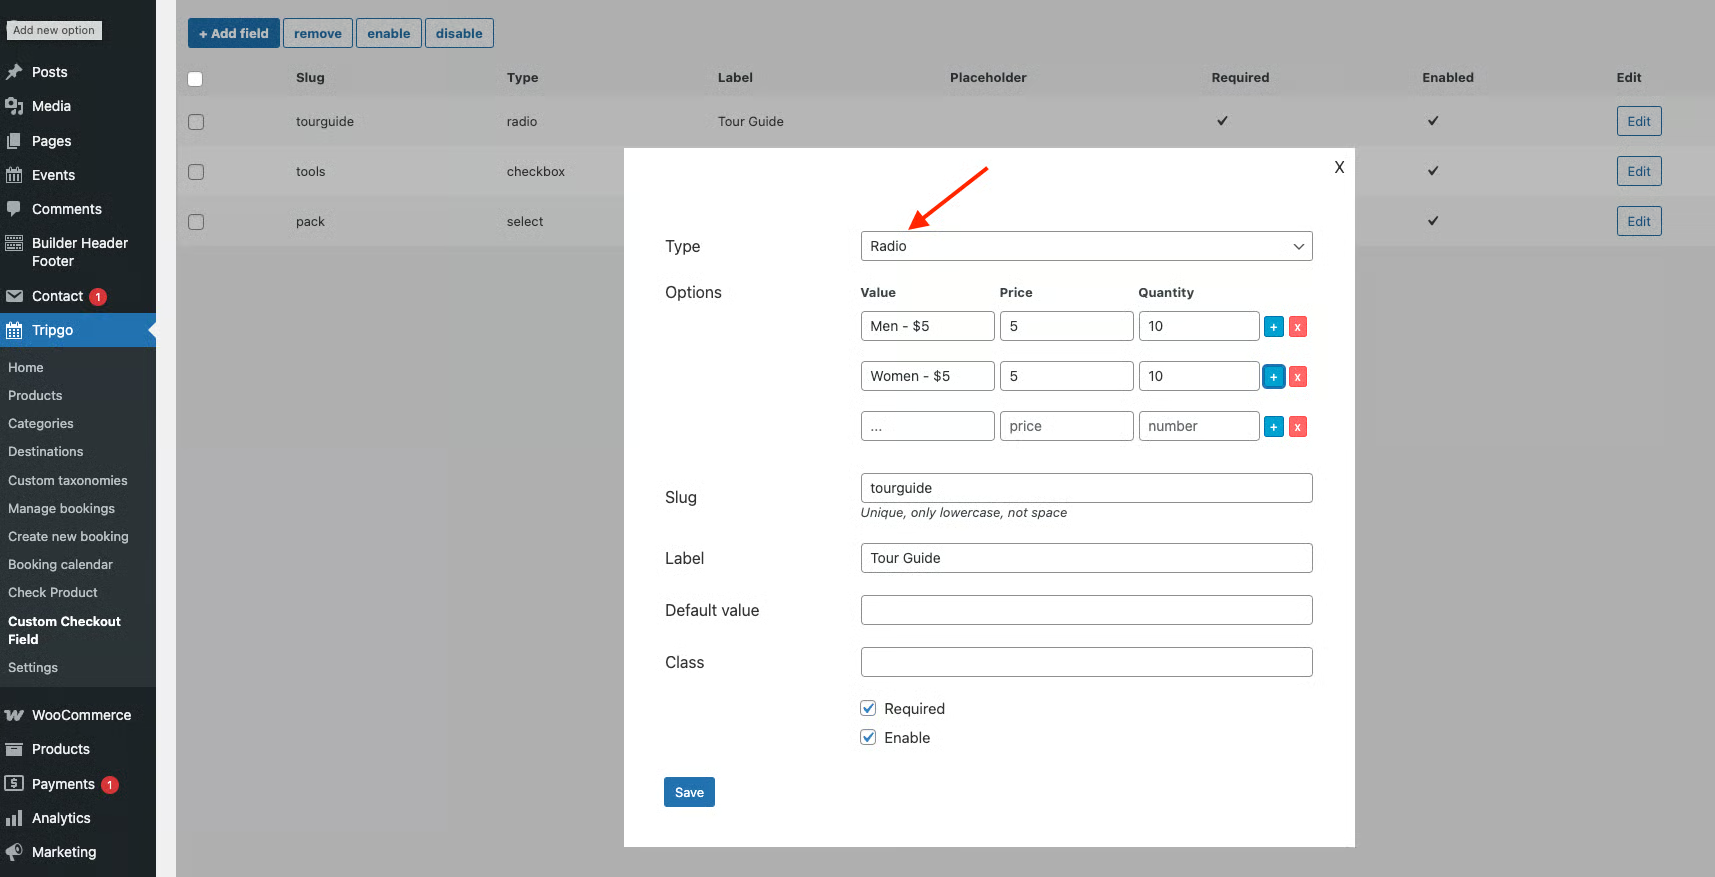
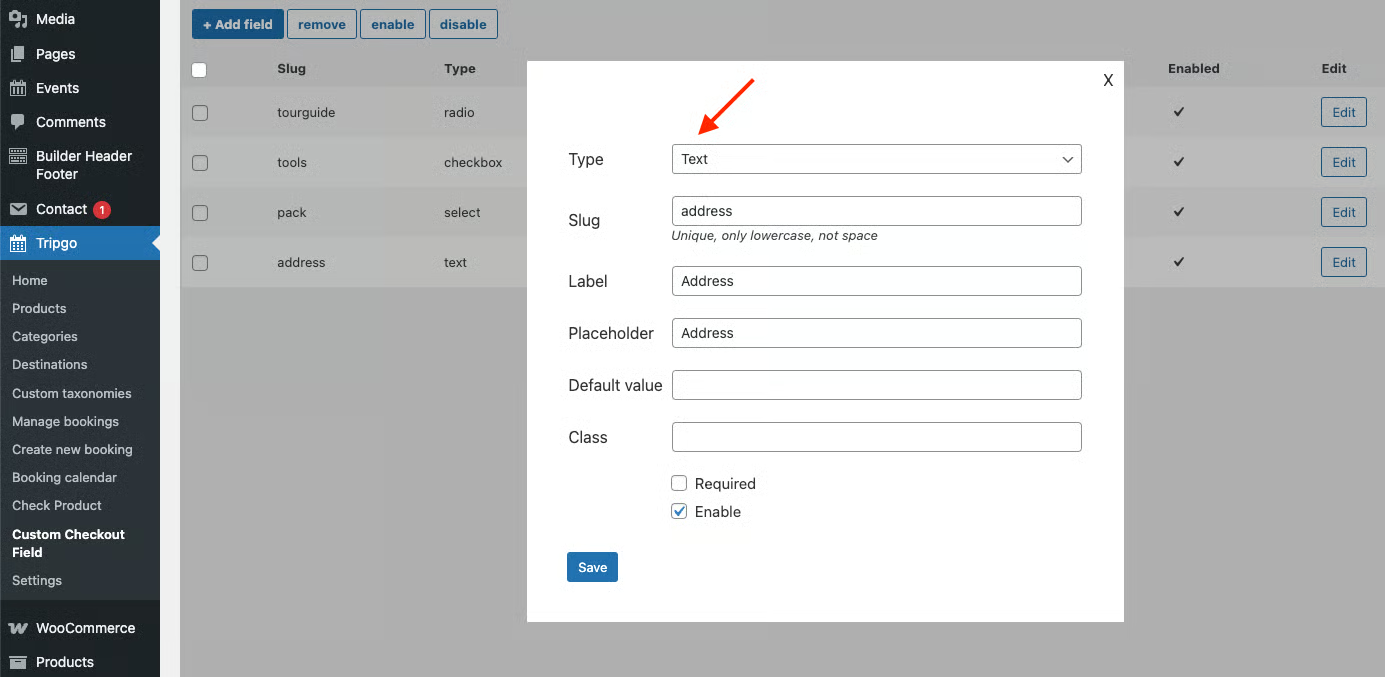
Click any image to view it larger · swipe or use the arrows to browse
7.9 · Booking Elementor widgets 27 widgets
The Travel and Tour Booking plugin ships a full set of Elementor widgets to build tour listings and single-tour pages visually.
Listing, search & filtering
| Widget | Use for |
|---|---|
| Product List / Product Slider / Product Related | Grids, carousels and “related tours” blocks |
| Product Categories / Product Category Ajax | Show/browse tour categories, with live AJAX loading |
| Search Product / Tour Search Ajax / Search Ajax Sidebar | Search bars with instant AJAX results (inline or sidebar) |
| Product Filter Ajax | Filter tours by category, price, taxonomy without page reload |
| Product Destination Ajax / Custom Taxonomy | Filter/list by destination or any custom taxonomy |
Single tour page building blocks
| Widget | Use for |
|---|---|
| Product Title / Short Description / Product Content | Core text elements of the tour page |
| Product Images / Video & Gallery | Main gallery and intro video |
| Product Forms | The booking / request / enquiry form — the heart of the page |
| Product Price Table / Product Plan | Price-per-person / plan tables |
| Product Features / Included/Excluded | Feature icons and what’s covered lists |
| Product FAQ / Product Tabs | FAQ accordion and tabbed content |
| Product Map / Location & Rating | Google map pin and location + star rating |
| Product Reviews | Customer reviews & rating summary |
| Unavailable Time | Displays blocked/sold-out dates |
Customize a widget’s template
Some widgets can be overridden in the child theme: copy the template file below into the same relative path under themes/tripgo-child/ and edit the copy (create the folders in the child theme first).
| Widget | Template file to copy (into the same path in tripgo-child) |
|---|---|
| Product Categories | plugins/ova-brw/ovabrw-templates/single/product_categories.php |
| Search Product | plugins/ova-brw/ovabrw-templates/single/ovabrw_search.php |
| Product List / Product Slider | themes/tripgo/woocommerce/content-product.php |
| Tour Search Ajax | plugins/ova-brw/ovabrw-templates/single/search_ajax.php |
| Search Ajax Sidebar | plugins/ova-brw/ovabrw-templates/single/search_ajax_sidebar.php |
| Product Filter Ajax | plugins/ova-brw/ovabrw-templates/single/product_filter_ajax.php |
| Product Category Ajax | plugins/ova-brw/ovabrw-templates/elementor/ovabrw_product_category_ajax.php |
| Product Destination Ajax | plugins/ova-brw/ovabrw-templates/elementor/ovabrw_product_destination_ajax.php |
plugins/ova-brw/ovabrw-templates/single/ovabrw_search.php → themes/tripgo-child/ovabrw-templates/single/ovabrw_search.php. The single-tour building blocks (Title, Content, Forms, Price Table, FAQ, Map, Reviews…) aren’t copied this way — you shape them by building the Product Template in Elementor (5.9).8Theme features — Customizer & display
The theme controls how everything looks. All global styling lives at Appearance → Customize and is output as CSS variables, so changes apply site-wide instantly.
| Customizer panel | What you control |
|---|---|
| Color | Primary (#FD4C5C) + hover, Secondary (#00BB98) + hover, Heading, Text, Light, Border, and three backgrounds (First / Second / Third) |
| Typography | Primary Google Font (default HK Grotesk), a custom font option, base font size, line-height, letter-spacing |
| Layout | Container width (default 1290px), sidebar width, Wide vs Boxed site, boxed offset |
| Header / Footer | Use the default or assign a builder-made header/footer |
| Blog (Archive & Single) | Toggle media, title, date, category, author, comments, excerpt, read-more, layout, header/footer |
| Tour (Archive & Single) | Toggle result count, order, featured badge, wishlist, max guest, duration, title, location, rating, price, button, pagination |
8.2 · Theme Elementor widget catalog 33 widgets
Beyond the booking widgets, the theme ships a full set of Elementor content widgets (found in the “Tripgo” category of the Elementor panel). Use them to build home pages, landing pages and headers/footers.
Content & layout
| Widget | Use for |
|---|---|
| Ova Heading | Styled section titles with sub-text |
| Ova Icon Box / Ova Icon List | Feature blocks and checklists with icons |
| Ova Counter / Counter List | Animated number counters (stats, milestones) |
| Progress | Progress / skill bars |
| Countdown | Countdown timer for promos or events |
| Road Map | Timeline / itinerary steps |
| Special Offer / Special Offer 2 | Promotional cards / banners |
Media & galleries
| Widget | Use for |
|---|---|
| Image Gallery / Gallery Slide / Gallery Filter | Grid, slider and filterable photo galleries |
| Ova Video | Popup / inline video |
| Logo / Header Banner | Site logo and page hero banners (header building) |
People & social proof
| Widget | Use for |
|---|---|
| Our Team | Team member cards |
| Ova Testimonial (+ styles 2–6) | Six testimonial/review layouts to choose from |
Blog & contact
| Widget | Use for |
|---|---|
| Blog Grid | Show latest posts in a grid |
| Contact Info / Contact Form | Address/phone blocks and a contact form |
| Share Buttons | Social share links |
Header / Footer building
| Widget | Use for |
|---|---|
| Menu / Menu Canvas / Menu Footer | Main nav, off-canvas mobile menu, footer menu |
| Menu Cart | Mini-cart icon with item count |
| My Account Button | Login / account link |
| Switch Language | Language switcher (with WPML) |
8.3 · Header settings
Tripgo ships several ready-made headers, and you control which one shows and how it looks.
Choose a header for all pages
Set the site-wide header at Appearance → Customize → Header (e.g. Header 4). This applies everywhere except blog and shop pages — for those, set the header separately under Customize → Blog → Archive / Single → Header and Customize → WooCommerce → Product Catalog / Product Detail → Header. To make a page follow the global header, set its Header Version to Global (Pages → edit page → General Setting; requires the CMB2 plugin).
Choose a header for one page
On any page, use General Setting → Header Version:
- Global — use the header set in Customize → Header.
- Default — the theme’s built-in header (only customizable in
header.php). - A specific header (Header 4, Header Banner, Header Blog Detail…) — edited in Builder Header Footer → All HF with Elementor.
Edit the header content
There are two header types. For the Default header: change the logo at Customize → Site Identity → Logo Default, the menu at Customize → Menu, and anything else in template-parts/header-default.php. For Elementor-built headers: edit them via Edit with Elementor (from the front-end admin bar) or in Builder Header Footer → All HF.
header_sticky (desktop), mobile_sticky (tablet/mobile) and/or sticky_bg_dark (dark background while scrolling). Use Advanced → Responsive to show/hide sections per device.
For the Header Banner image: set one image for all banners via the widget’s content tab (Display background by feature image → No, then set a Background image), or a per-page image (Display background by feature image → Yes, then set that page’s featured image).
9Ovatheme Events
A full events module with an event post type, event_category and event_tag taxonomies. Add events at Events → Add New Event.
Event data
Start/end date & time, venue & location, gallery, “special” flag, and Contact Details: organizer name, phone, email, website, and booking links.
Categories & tags
Create event categories at Events → Categories and tags at Events → Tags, then assign them per event from the Event Categories / Tags boxes in the event editor’s right sidebar. They power the category/tag listings and filters on the frontend.
Event settings
Configure the module at Events → Settings:
- General — Date format, Time format and Calendar language.
- Archive Event Settings — Template, Columns (1–3), Show past events, Posts per page, Order by (Title, custom sort, Start date or ID), Order (increasing/decreasing), Thumbnail, and the Header / Footer for the events archive page.
- Single Event Setting — Show title, Header, Footer and Templates. The Templates set here apply to every event detail page when the event’s own template is set to Global (Add New Event → Events → Basic → Templates).
Elementor widgets & shortcodes
Every widget has a matching [ovaev_...] shortcode:
EventsEvents AjaxEvents SlideEvents CalendarSimple CalendarSearch AjaxEvent TabsContentTitleDateTimeLocationCategoriesTagsShareButtonThumbnailRelated
Classic (WordPress) widgets
| Widget | Shows |
|---|---|
| List category event | Event categories list |
| Feature event | A highlighted featured event |
| List upcoming event | Next upcoming events |
| List tag event | Event tags cloud/list |
10OvaTheme Framework — Header/Footer builder
The infrastructure plugin that powers custom headers & footers and shared shortcodes.
- Header/Footer Builder — a
Builder Header Footerpost type where you design headers and footers with Elementor, then assign them (default via Customizer, or per page/tour) - Uses the theme’s Elementor menu/logo/cart widgets to assemble navigation
- Shortcode
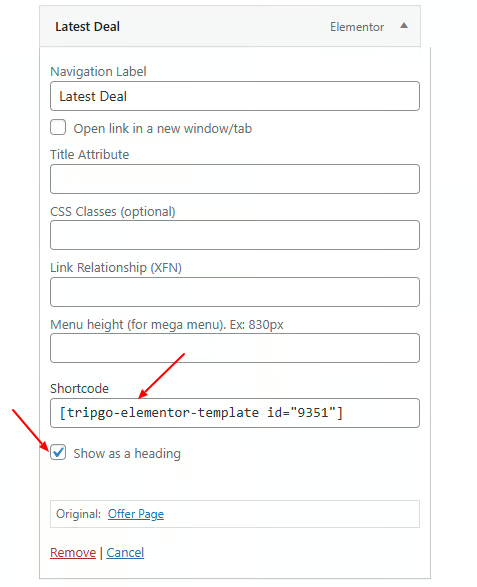
[tripgo-elementor-template id="123"]— insert any saved Elementor template anywhere by its ID - Provides a shared metabox framework used by the other OVA plugins to register custom fields
11Ovatheme MegaMenu
Extends Appearance → Menus so any menu item can become a mega menu. Per-item options:
| Option | Description |
|---|---|
| Menu Column | Turn the sub-menu into One / Two / Three / Four / Five columns |
| Menu height | Fixed height for the mega panel (e.g. 830px) |
| Show as a heading | Render a sub-item as a non-clickable column heading |
| Shortcode | Embed a shortcode (e.g. a promo, form, or Elementor template) inside the mega panel |
Configure in the backend
Open Mega Menu
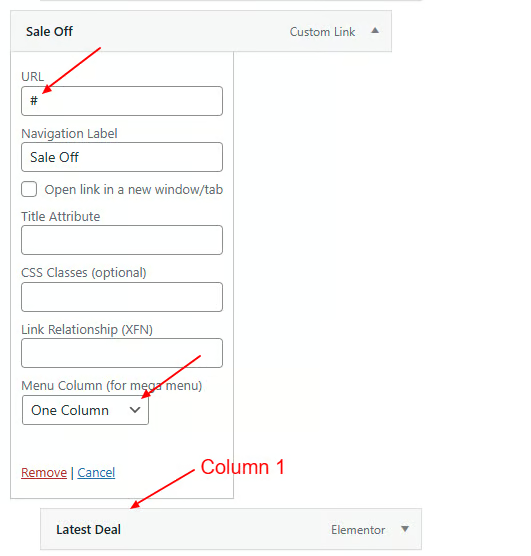
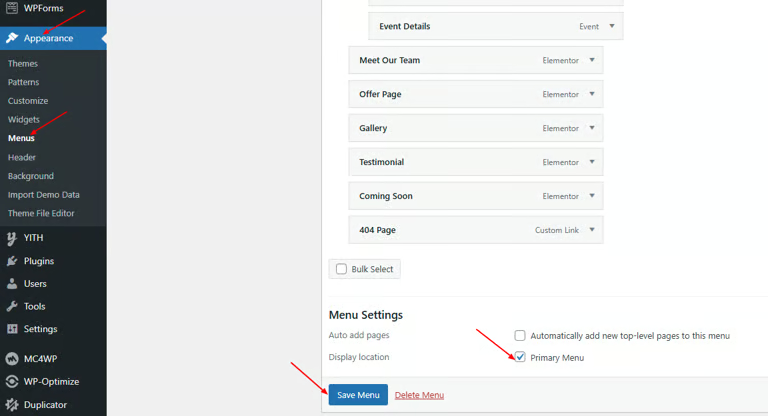
Go to Appearance → Menus, select Primary Menu, then move on to Mega Menu.
Set the parent columns
On the parent menu item, choose Menu Column — it supports 1, 2, 3, 4 or 5 columns.
Configure the children
On each child menu item, enter a shortcode for the content you want to show, then tick Show as a heading.
Assign & save
Tick the Primary Menu location and click Save.
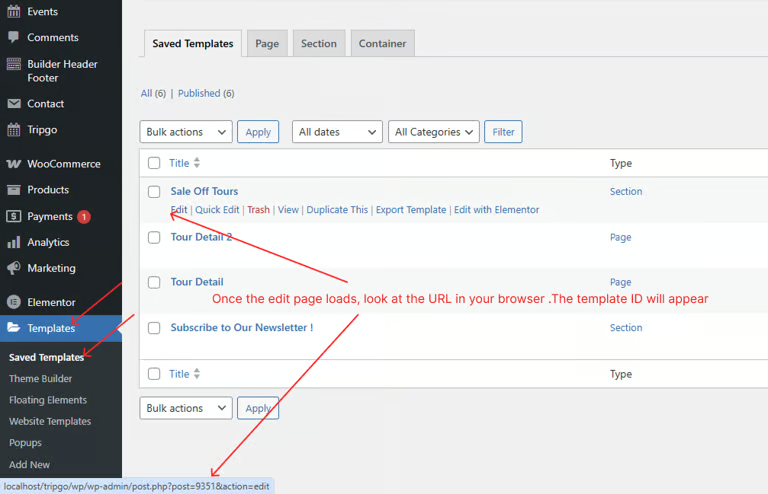
[tripgo-elementor-template id=" "]. To find a template’s ID, go to Templates → Saved Templates, hover the template you want and click Edit; the template ID then appears in the browser URL.Once saved, the mega menu is shown on the frontend.
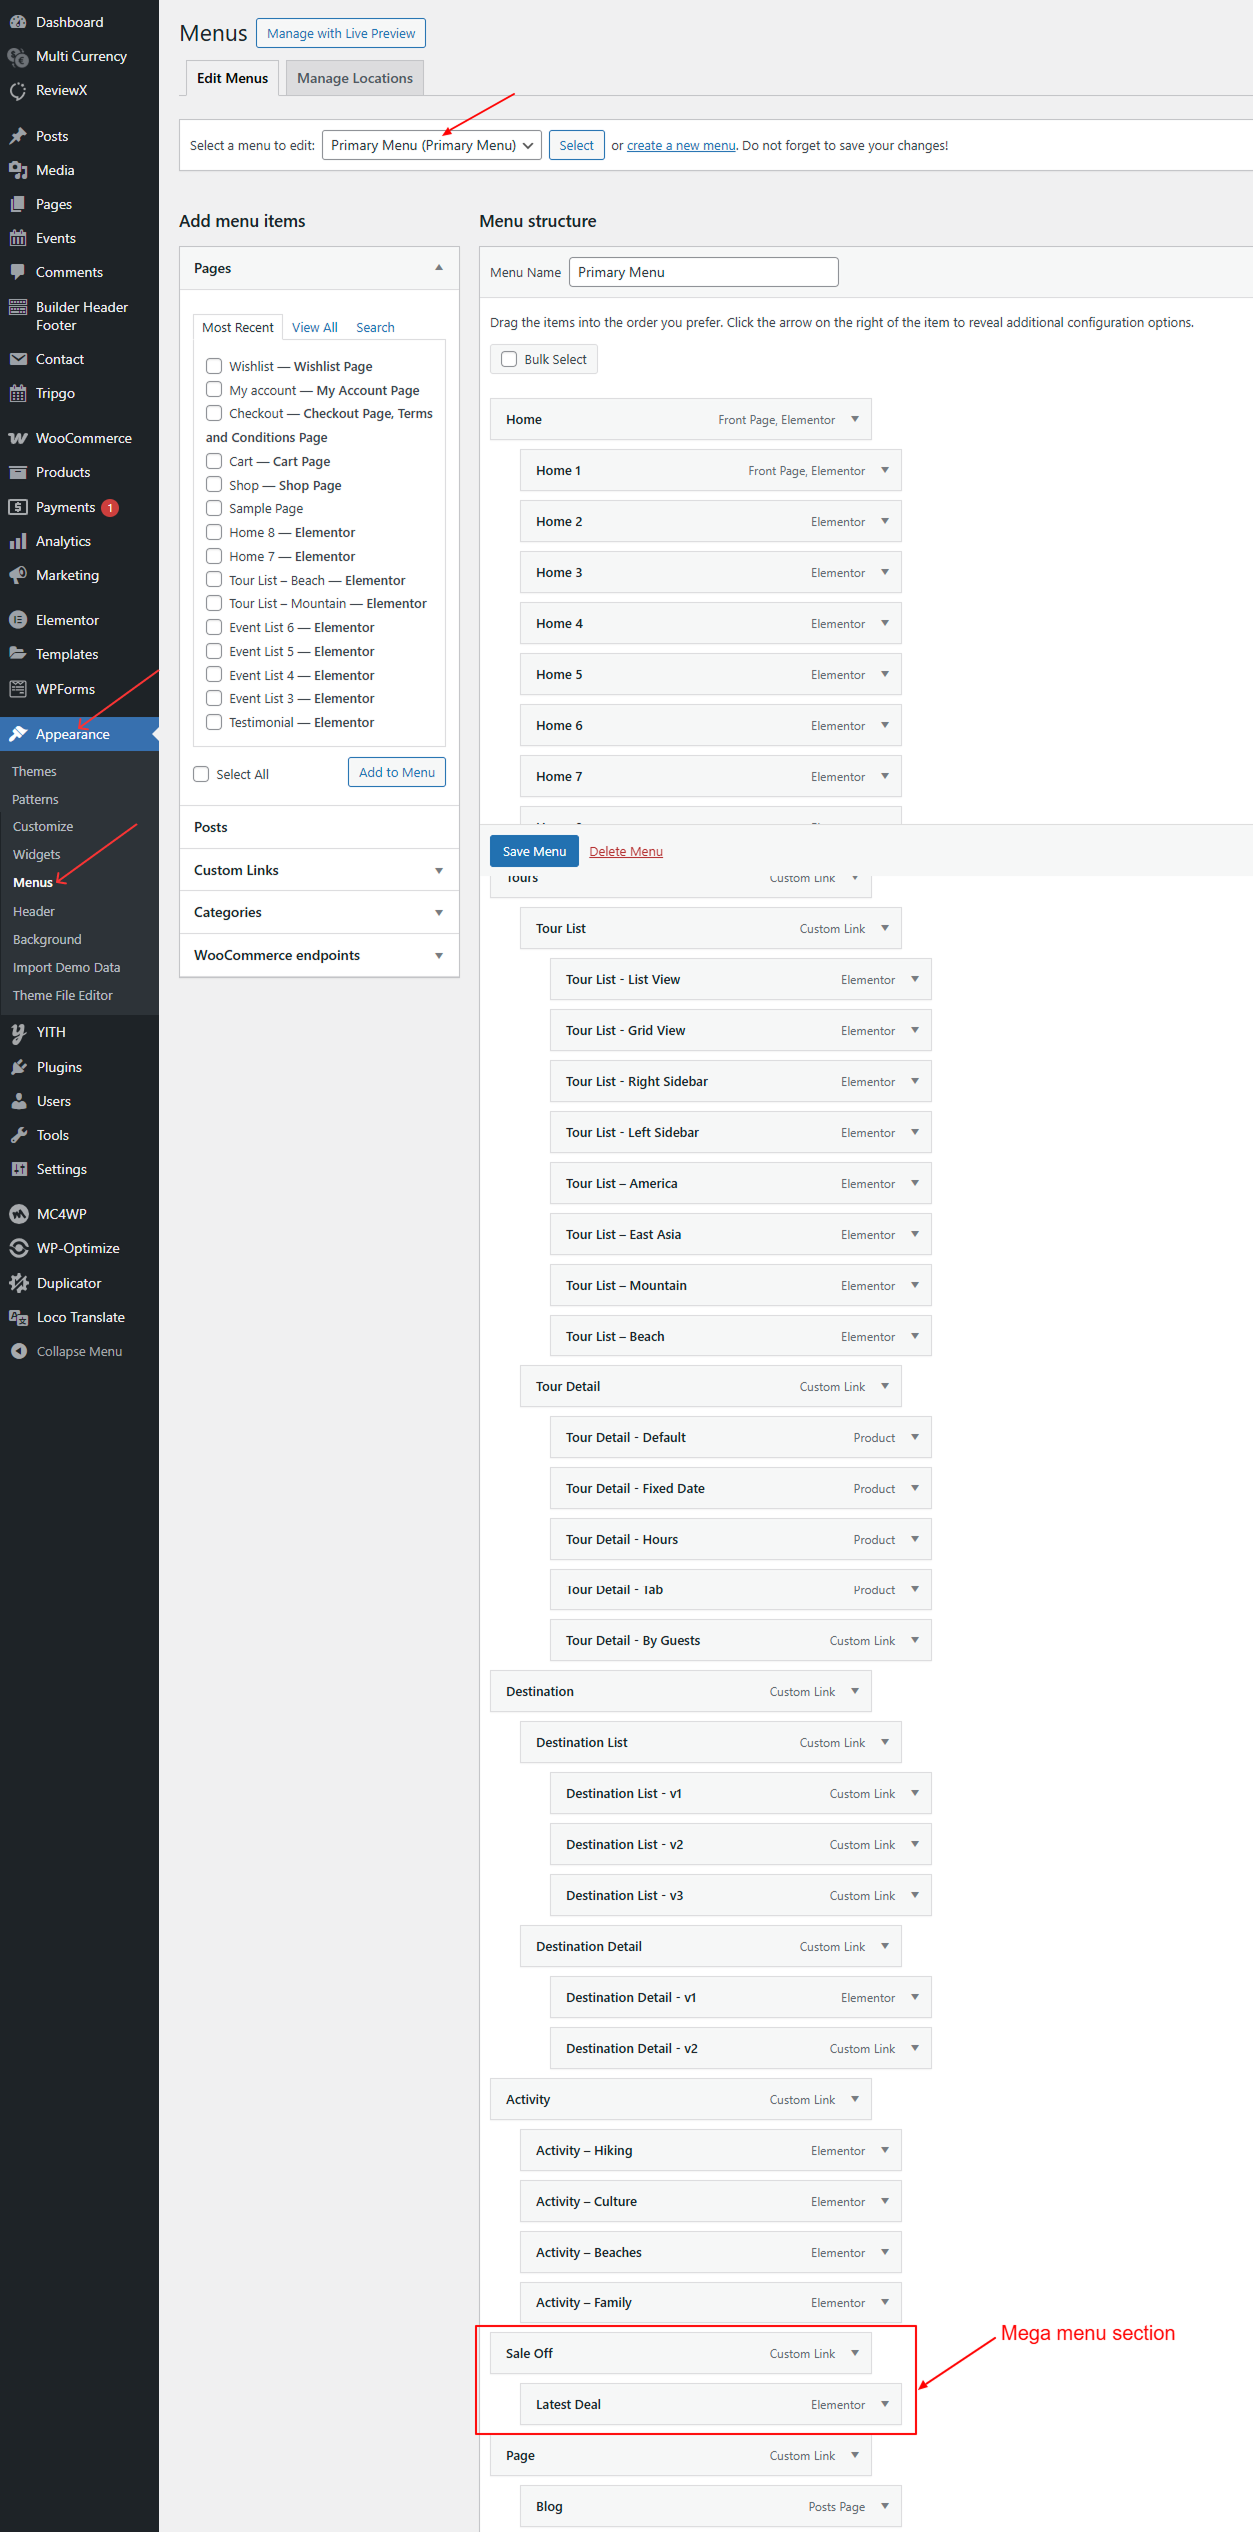
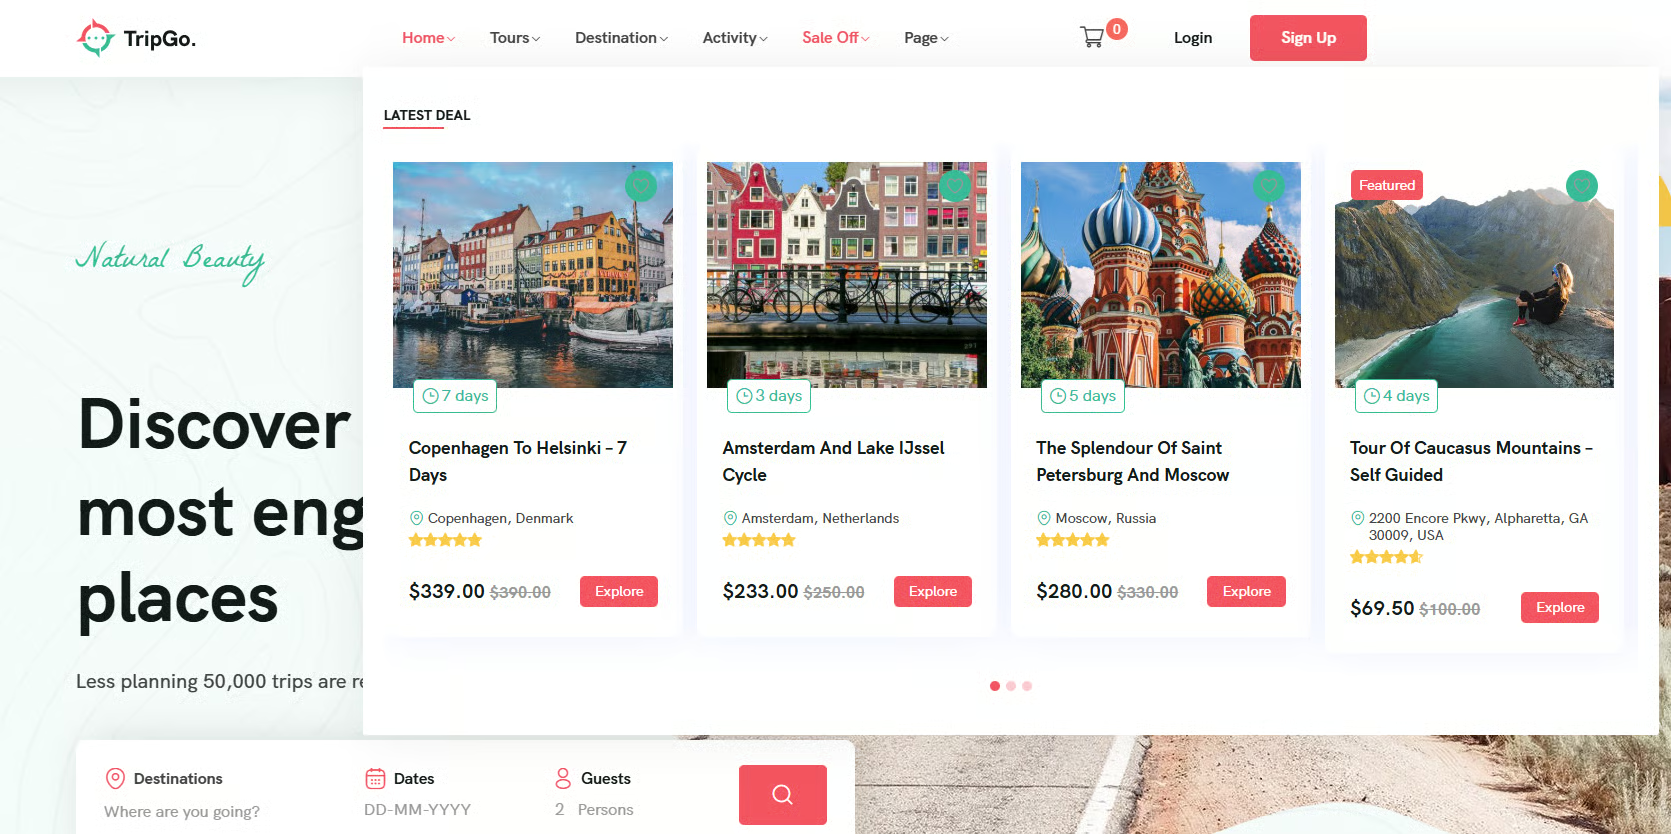
Click any image to view it larger · swipe or use the arrows to browse
readme.txt changelog).